Important Safety Instructions
Achtung
«УКАЗАНИЯ ПО Технике БЕЗОПАСНОСТИ»
For Users in UK, EIRE, Malta and Cyprus only
Connecting Plugs and Main Power / Sewing Light Switch
Please Read Before Using this Machine
Bitte VOR Benutzung Dieser Maschine Lesen
ПОЖАЛУЙСТА,ПРОЧИТАЙТЕПЕРЕДНАЧАЛОМЭКСПЛУАТАЦИИМАШИНЫ
Table of Contents
Inhalt
Оглавление
Не входящие в пуговичный зажим
Principal Parts
Balance Wheel
Для настройки натяжения верхней нитки
Handrad
Нижней
6043
Accessories
Optional Accessories
Notizen
Optionales Zubehör
Дополнительные принадлежности
Примечание
Connecting Plugs
Operating Your Sewing Machine
Vorsicht
Kabelanschlüsse
Предостережение
Netz- und Nählichtschalter
Main Power/Sewing Light Switch
Главный выключатель питания Освещения зоны строчки
Ножной контроллер
Foot Controller
Fußanlasser
Ножной контроллер
Checking the Needle
Replacing the Needle
Nadel austauschen
Nadel prüfen
Проверка иглы
Замена нажимной лапки
Changing the Presser Foot
Nähfuß wechseln
SNAP-ON Type
Flat Bed Attachment
Anschiebetisch mit Zubehörfach
Платформа-приставка
Various Controls
Pattern Selection Dial
Ручка выбора типа стежка Номер стежка
Stichmuster-Einstellrad
Ручка выбора типа стежка
Ручка регулирования длины стежка
Pattern Stitch Name Preset Width Recommended Instruction
Manual
Rampart Stitch Triple Stretch Stitch
Step Automatuc Buttonhole
Empfohlene Einstellwerte
Anleitung
Modell XL-6050, XL-6051, XL-6052, XL-6053
OVERLOCK-SCHRÄGSTICH
Номер Страницы
Строчка Наименование Стежка Заданная Ширина
Руководства
Модели XL-6050, XL-6051, XL-6052, XL-6053
Наклонная Оверлочная
Stitch Length Dial
Higher the NUMBER, the Longer the Stitch
Ручка регулирования длины стежка Длина Частые → SS Редкие
Stichlängen-Einstellrad
Ручка регулирования длины стежка
Поверните ручку влево за0на позицию SS SS Фиксированная 2,5
Rückwärtstaste
Reverse Sewing Lever
Рычаг реверсирования строчки
Переключение на режим Free-arm
Converting to Free-arm Style
Umbau auf Freiarm
Сдвиньте платформу-приставку Платформа-приставка
Aufspulen
Намотка ниток на шпульку
Wound evenly Wound poorly
Сместите этот вал вправо. Поверните шпульку рукой по
Шпульке Установите шпульку на вал мотального механизма и
Ровная намотка Неправильная намотка
Lower Threading
Сдвиньте кнопку и откройте крышку Скользящая кнопка Крышка
Unterfadenführung
Заправка нижней нитки
Пока крышка не встанет на место со щелчком
Upper Threading
Oberfadenführung
Заправка верхней нитки
Heraufholen des Unterfadens
Drawing Up Lower Thread
Вытягивание нижней нитки
Nähen mit Doppelnadel
Twin Needle Sewing
Двухигольная строчка
Установкадополнительноговставногокатушечногостержня
Установка Двойной Иглы
Заправка Ниток В Двойную Иглу
Натяжение ниток
Thread Tension
Fadenspannung
Hinweis
FABRIC/THREAD/NEEDLE Combinations
Тяжелые ткани
75/11 90/14
65/9 75/11
90/14 100/16
Please Read Before Sewing
Прямой стежок
Geradstich
Straight Stitching
Nähbeginn
Изменение Направления Строчки
Changing Sewing Direction
Finishing Sewing
Завершение Строчки
Снятие Прошитой Ткани С Машины
Removing the Material from the Machine
TOP Stitching and Stretch Materials
Верхний Стежок И Эластичные Материалы
Зигзагообразный стежок
Zigzag Stitching
Zickzackstich
Зигзаогообразный Стежок
Blindsaumstich
Blind Hem Stitching
Потайной подрубочный шов
Shell Tuck Stitching
Biesenstich
Подшивочная строчка
Elastic Stitching
Elastikstich
Эластичная строчка
Стежок с двойным эффектом
Elastische Schrittnaht
Double Action Stitching
Строчка-мостик Фиксир Стежок рампарт
Строчка-елочка
Bogennaht
Scallop Stitching
Стежок Длина стежка Строчка-елочка
Декоративный стежок
Decorative Stitching
Dekorstiche
Бисерный стежок Стреловидный стежок
Лоскутное шитье
Patchwork
Patchwork
Позиция формирования первого стежка
Обметочный стежок
Overedge Stitching
Ketteln & Versäubern
Строчка «Гребешок» Фиксир
Перистый стежок
Feather Stitching
Triple Zigzag Stretch Stitching
Тройная трикотажная строчка «зигзаг»
Making a Buttonhole For 1-step BH Type
Making a Buttonhole
Knopfloch Nähen
Knopfloch nähen Für 1-Stufen-Knopfloch BH-Typ
Обметывание петель
Обработка Петли
Knöpfe die nicht in den Halter passen
Example
Making a Buttonhole For 4-step BH Type
Knopfloch nähen
Петли Чего поднимите ее над тканью Шаг
Задняя Сделайте 5-6 стежков Планка
Securing the Stitching and Cutting the BUTTON- Hole
Stiche Sichern UND Knopfloch Aufschneiden
Закрепление ШВА И Прорезка Петли
Buttonhole Fine Adjustment
Knopfloch-Feineinstellung
Тонкая наст ойка для обметывания петель
Wenn das Knopfloch nicht richtig genäht wird
Ишивание пуговиц
Button Sewing
Knöpfe annähen
Фикси Лапка зигзаг
Zipper Insertion
Gathering
Вшивание застежек-молний
Einnähen eines Reißverschlusses
Reffen
Об аботка сбо ок
Штопка
Darning
Stopfen
Любая
Аппликации
Appliqués
Applizieren
Стежок Длина стежка Ши ина стежка
Monogramming
Monogramming Embroidering
Preparing for Monogramming and Embroidering
Embroidering
Изготовление Монограмм
Monogramme und Stickarbeiten
Вышивание
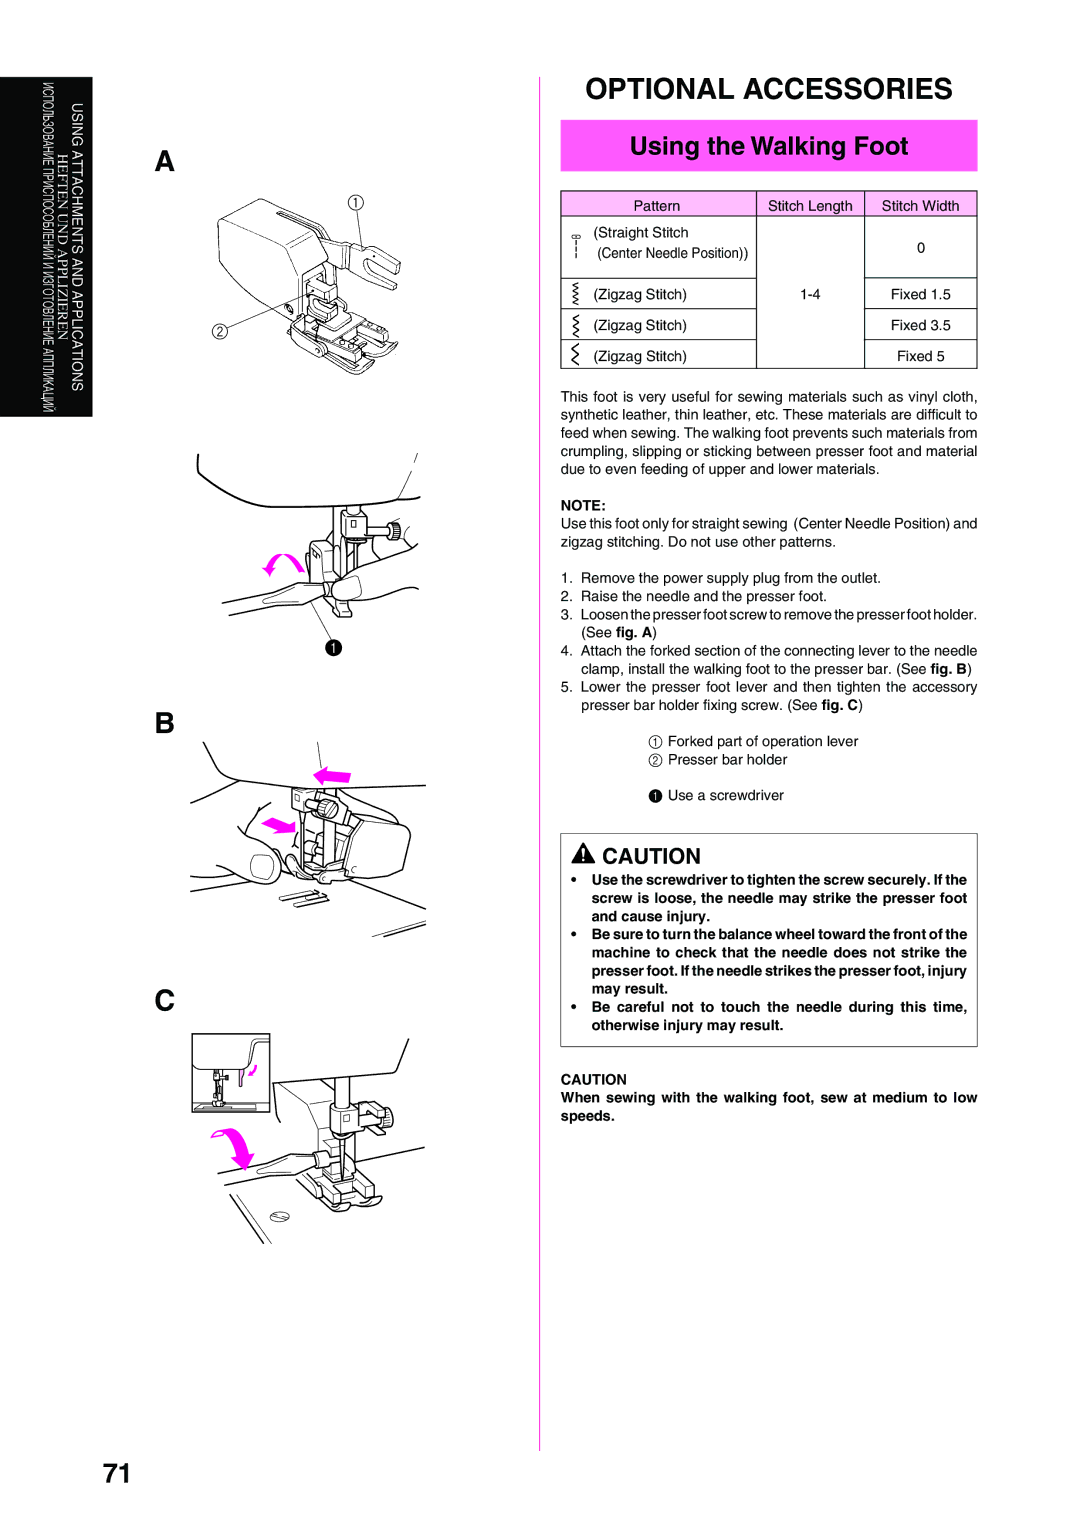
Using the Walking Foot
Optional Accessories
Einsatz des Obertransporteurs
Эта лапка очень полезна п и сшивании таких мате иалов
Optional Accessories
Using the Spring-action Quilting Foot
Стежок Длина стежка
Einsatz des Stopffußes
Использование лапки штопки
Озетки Поднимите иглу и нажимную лапку
Using the 1/4-Inch Quilting Foot
Einsatz des Patchworkfuß
Использование нап авляющей Лапки 1/4 дюйма 6,5 мм
Changing the Light Bulb
Отсоедините штепсель шну а питания от озетки
Nählichtlampe auswechseln
Замена лампочки освещения
Отвинтите винт к епления к ышки с об атной сто оны
Cleaning
Чистка машины
Reinigung
Затем поднимите пластину и снимите ее с машины
Performance Check List
Removed from outlet
Checkliste
Transpor Langsam Tiert
Läuft Nicht AN
Неп авильная
Нет
Типу опе ации
Комбинация номе
Озетку
Штепсель шну а
Неп авильно
Нет Неп авильная Комбинация номе
Maschine verpacken
Repacking the Machine
Пе еупаковка машины
Inch Quilting Foot
Nadel
Лапка для вшивания застежек-молний Лапка штопки-вышивки
Деко ативный под убочный стежок
Зап авка ве хней нитки
Нап авляющая лапка 1/4 дюйма 6,5 мм

![]() CAUTION
CAUTION