Button Sewing
Pattern | Stitch Length | Stitch Width | Foot | |
(Zigzag Stitch) |
| Fixed 1.5 |
| |
|
|
| Zigzag | |
(Zigzag Stitch) | 0 | Fixed 3.5 | ||
Presser Foot | ||||
|
|
| ||
(Zigzag Stitch) |
| Fixed 5 |
| |
|
|
|
|
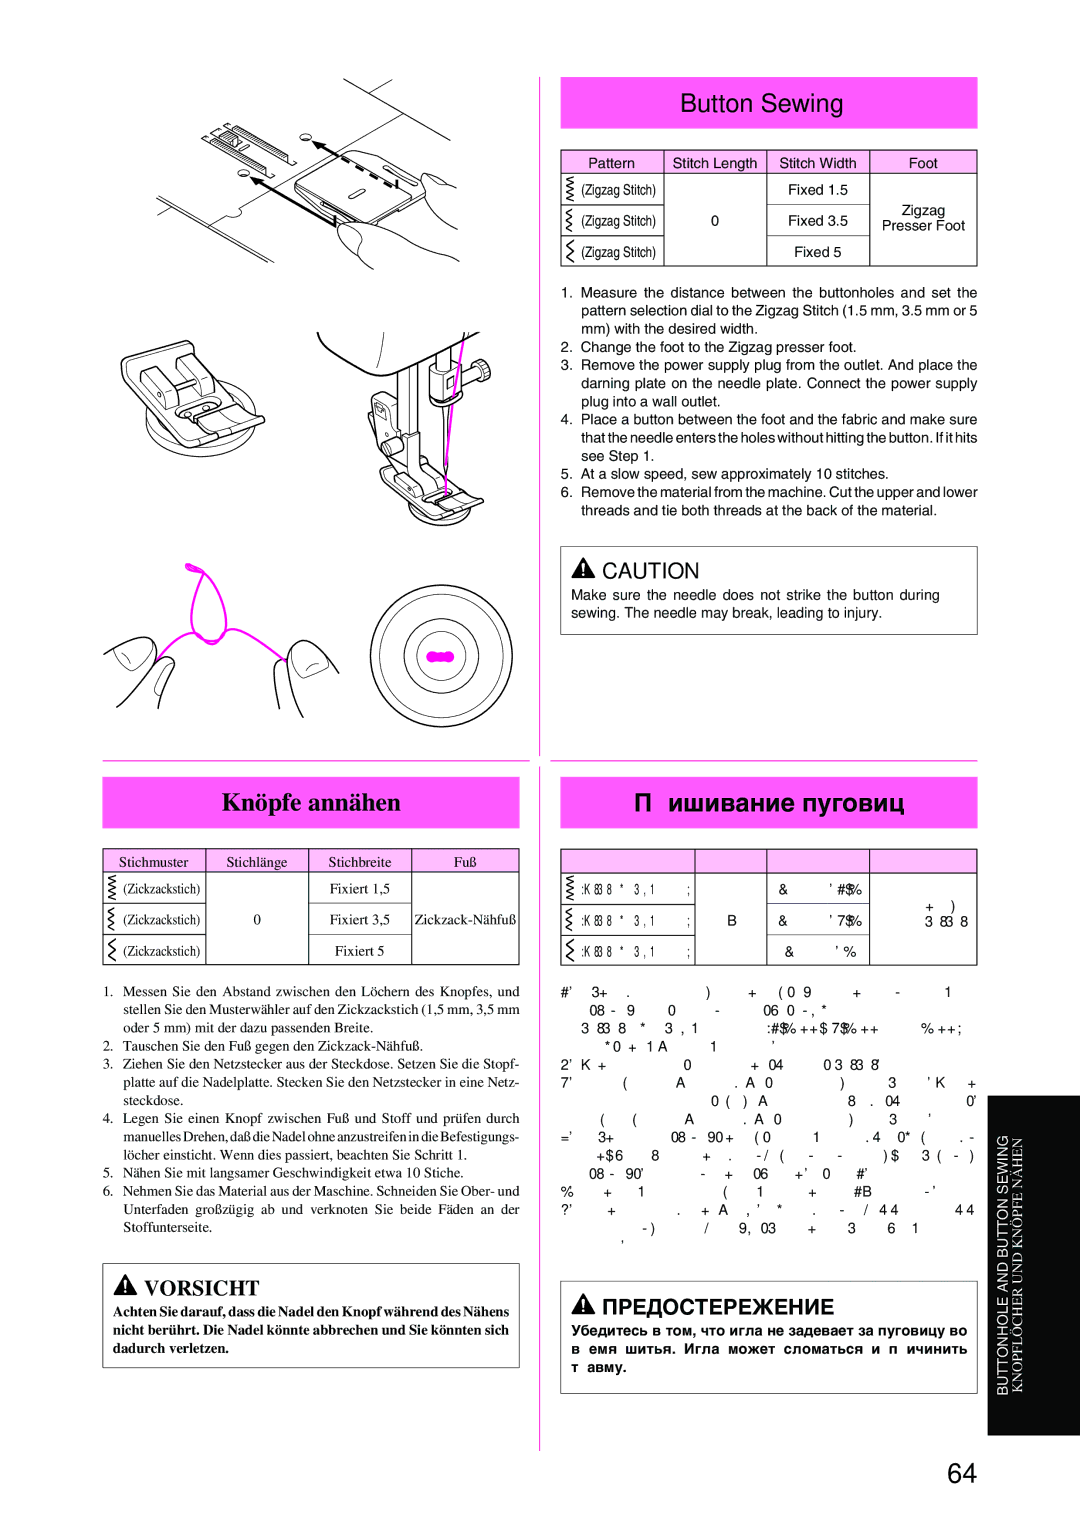
1.Measure the distance between the buttonholes and set the pattern selection dial to the Zigzag Stitch (1.5 mm, 3.5 mm or 5 mm) with the desired width.
2.Change the foot to the Zigzag presser foot.
3.Remove the power supply plug from the outlet. And place the darning plate on the needle plate. Connect the power supply plug into a wall outlet.
4.Place a button between the foot and the fabric and make sure that the needle enters the holes without hitting the button. If it hits see Step 1.
5.At a slow speed, sew approximately 10 stitches.
6.Remove the material from the machine. Cut the upper and lower threads and tie both threads at the back of the material.
![]() CAUTION
CAUTION
Make sure the needle does not strike the button during sewing. The needle may break, leading to injury.
Knöpfe annähen
Stichmuster | Stichlänge | Stichbreite | Fuß |
(Zickzackstich) |
| Fixiert 1,5 |
|
|
|
|
|
(Zickzackstich) | 0 | Fixiert 3,5 | |
|
|
|
|
(Zickzackstich) |
| Fixiert 5 |
|
|
|
|
|
1.Messen Sie den Abstand zwischen den Löchern des Knopfes, und stellen Sie den Musterwähler auf den Zickzackstich (1,5 mm, 3,5 mm oder 5 mm) mit der dazu passenden Breite.
2.Tauschen Sie den Fuß gegen den
3.Ziehen Sie den Netzstecker aus der Steckdose. Setzen Sie die Stopf- platte auf die Nadelplatte. Stecken Sie den Netzstecker in eine Netz- steckdose.
4.Legen Sie einen Knopf zwischen Fuß und Stoff und prüfen durch manuelles Drehen, daß die Nadel ohne anzustreifen in die Befestigungs- löcher einsticht. Wenn dies passiert, beachten Sie Schritt 1.
5.Nähen Sie mit langsamer Geschwindigkeit etwa 10 Stiche.
6.Nehmen Sie das Material aus der Maschine. Schneiden Sie Ober- und Unterfaden großzügig ab und verknoten Sie beide Fäden an der Stoffunterseite.
 VORSICHT
Achten Sie darauf, dass die Nadel den Knopf während des Nähens nicht berührt. Die Nadel könnte abbrechen und Sie könnten sich dadurch verletzen.
П ишивание пуговиц
| Стежок | Длина стежка |
| Ши ина стежка | Лапка |
|
|
| |
| (Зигзагооб азный стежок) |
|
| Фикси | . 1,5 |
|
|
|
|
|
|
|
|
|
| Нажимная |
|
|
|
| (Зигзагооб азный стежок) | 0 |
| Фикси | . 3,5 |
|
|
| |
|
| лапка зигзаг |
|
|
| ||||
|
|
|
|
|
|
|
|
|
|
| (Зигзагооб азный стежок) |
|
| Фикси | . 5 |
|
|
|
|
|
|
|
|
|
|
|
| ||
1. | Изме ьте асстояние между цент ами отве стий на |
|
| ||||||
| пуговице и установите учку выбо а типа стежка на |
|
| ||||||
| зигзагооб азный стежок (1,5 мм, 3,5 мм или 5 мм) с |
|
| ||||||
| т ебуемой ши иной стежка. |
|
|
|
|
|
| ||
2. | Замените лапку на нажимную лапку зигзаг. |
|
| ||||||
3. | Отсоедините штепсель шну а питания от | озетки. Затем |
|
| |||||
| положите пластину для штопки на игольную пластину. | UNDCHERÖKNOPFLKNÖPFENÄHEN | ПРИШИВАНИЕИПЕТЕЛЬОБМЕТЫВАНИЕПУГОВИЦ | ||||||
| Подсоедините штепсель шну а питания к |
| BUTTONANDBUTTONHOLESEWING | ||||||
| озетке. |
|
| ||||||
4. | Разместите пуговицу между лапкой и тканью и убедитесь в |
|
| ||||||
| том, что игла но мально входит в отве стия, не задевая |
|
| ||||||
| пуговицу. В п отивном случае см. Пункт 1. |
|
|
|
| ||||
5. | На малой ско ости сделайте п име но 10 стежков. |
|
| ||||||
6. | Снимите ткань с машины. Об ежьте ве хнюю и нижнюю |
|
| ||||||
| нитки и свяжите их концы узелком на изнаночной сто оне |
|
| ||||||
| ткани. |
|
|
|
|
|
|
|
|
 ПРЕДОСТЕРЕЖЕНИЕ
Убедитесь в том, что игла не задевает за пуговицу во в емя шитья. Игла может сломаться и п ичинить т авму.
64