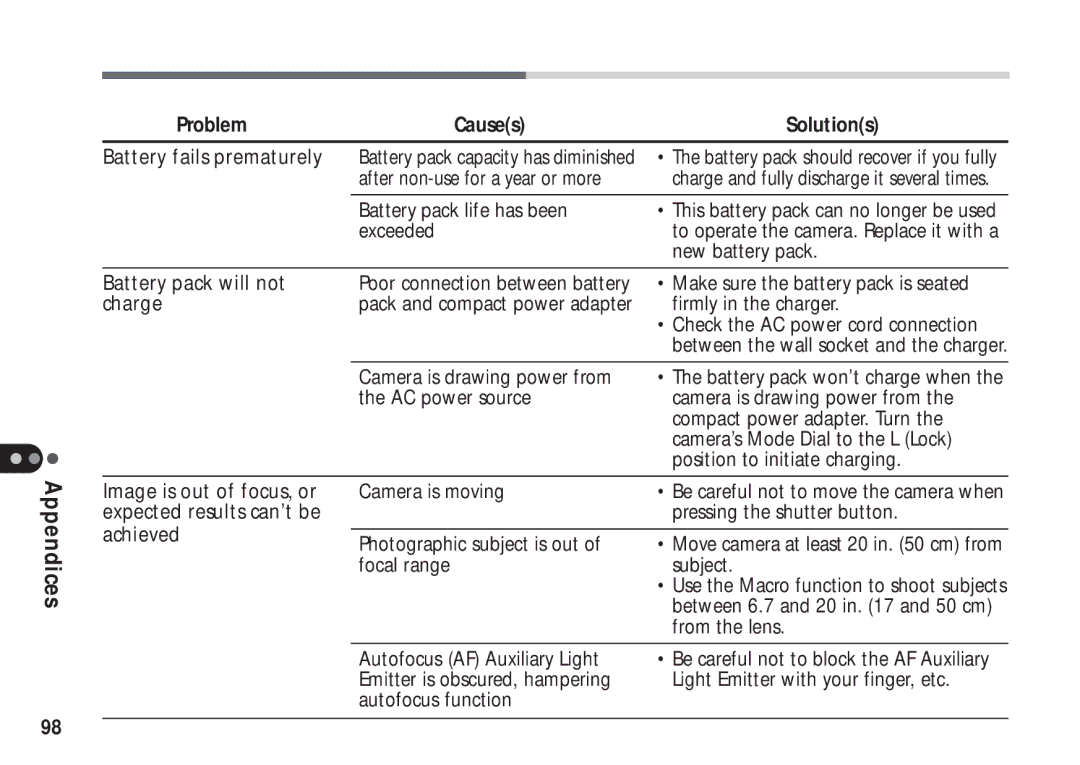
It describes the camera functions, setup and operating procedures
Read this guide first if you are new to this camera
Install the Software
Digital Camera Operating Steps and Reference Guides
This Guide
PowerShot A50 Software Starter Guide
Read This First Camera Setup Quick Start Basic Functions Buttons
Using softwarename On-screen
or Guide or PowerShot A50 Software Stater Guide On-screen Help
Mode Dial Functions Stitch Assist Mode Menu Features Other Functions
Trademark Acknowledgments
Introduction
Disclaimer
FCC Notice
Digital Camera, Model PS1026
Specifications
Table of Contents
Camera Setup
Power On/Off Switch
Setup
Procedures for Shooting Horizontal
Menu Features
Mode Dial Functions
Index
Other Functions
Appendices
Customer Support
Please Read
Handling and Safety Precautions
Read This First
Test Shots
Safety Precautions
Warnings
Do not attempt to disassemble or alter any part of the equipment that is not expressly prescribed in this guide. Disassembly or alteration may result in high-voltage electrical shock. Internal inspections, alterations and repairs should be conducted by qualified service personnel authorized by your camera distributor or a Canon Customer Support Help Desk
Do not handle the power adapter cord if your hands are wet. Handling it with wet hands may lead to electrical shock. When unplugging the cord, ensure that you hold the rigid portion of the plug. Pulling on the flexible portion of the cord may damage or expose the wire and insulation, creating the potential for fires or electrical shocks
Use only Compact Power Adapter CA-PS100/100E to charge Battery Pack NB-5H. Use of other chargers may result in overheating, distortion, fire or electrical shock
Avoid Strong Magnetic Fields
Preventing Malfunctions
Avoid Condensation Related Problems
If Condensation Forms Inside the Camera
Guide to Components
Front View
Battery Cover Lock p Tripod Socket
Back View
Strap Holder p LCD Panel DC Coupler Cable Cover p Battery Cover p
Viewfinder p CF Card Slot Cover p Lock for CF Card Slot Cover p
First
Operation panel
Read This
Camera Setup
Charging the Battery Pack
Do not charge the battery pack in poorly ventilated areas
Installing the Battery Pack
Fully charge Battery Pack NB-5H before using it for the first time
2CR5 Lithium Batteries
Indent
Battery Performance
Adapter CA-PS100/100E
Using the Camera with an AC Power Source
Cable Cover DC Coupler DR-100A DC Indicator DC Compact PowerTerminal
Inserting a CF Card
CF Cards and Estimated Capacities
How to Remove the Windows Standard Driver
Precautions with CF Cards
are uncertain about these procedures
How to Install the SanDisk ATA FlashDisk Device Driver
Attaching the Wrist Strap
Setting the Menu Language
1. Turn the Mode Dial to the Auto position
Setting the Date and Time
Set the correct date and time with the following procedures
2. Press the MENU button to display the Rec. menu
7. Turn the Mode Dial to the L Lock position to shut off the power
Quick Start
About Power Save
Taking Pictures
Taking Pictures in Auto Mode
Two-Stage Shutter Button
Indicator Behavior After a Shot
Other Shooting Features
Replaying Images in MULTI Mode
Replaying Images
Replaying Images in PLAY Mode
Other Replay Features
2. Select image green frame by pressing the +/- buttons
Erasing Images
Erasing Images from a CF Card
To delete all the images at once, select All in Step
If you want to stop the erase procedure, select Cancel
Shortcut
To display the previous menu, press the MENU button
Page
Detailed Guide to the Functions
Image Size and Quality Specifications
Basic Functions
Shooting Modes
Power On/Off Switch
Power Save Function
Playback Modes
Playback Modes
Camera Modes
Shooting Modes
Data Transmission Mode
Display Panel
Basic Functions
Viewfinder
Viewfinder Frame Marks
Lower Indicator
Indicators
Upper Indicator
Green Ready to take picture no flash
Pressing Halfway
Buttons
Shutter Button
Pressing Fully
Rapid Shot Function
extremely low-contrast objects
Focus Lock
Situations Not Suited to Autofocus Photography
extremely bright objects in the center of the viewfinder
Auto Mode
Continuous/Self-Timer/+ Button
Zoom Buttons
Program Mode
This button displays the next stored image
Self-Timer Procedures
Play Mode
Multi Mode
the Red-Eye Reduction
Flash/- Button
Program or Stitch Assist Mode
The icon indicates the Flash Off mode. The flash will not fire
Multi Mode
MACRO/JUMP Button
Play Mode
Menu Button
Jump Mode
Play Mode and Multi Mode
This button turns the Jump mode on or off
The following operations are possible
Auto Mode and Program Mode
LCD/VIDEO Button
MENU Button
This button turns the LCD panel on or off
This button displays the Play menu. p.68
SET Button
Play Mode and Multi Mode
This button selects the current menu option shown on the LCD panel
Auto Mode
Mode Dial Functions
Lock
Self-Timer Button
or Continuous mode as well as the image size and quality
Program Mode
Continuous/Self-Timer Button
Buttons Available in Program Mode Flash Button
Stitch Assist Mode
Play Mode
Multi Mode
PC Mode
into an image processing application program
Buttons Available in Stitch Assist Mode FLASH Button
Stitch Assist Mode
When a Sequence is Complete
MACRO Button
The Display Panel may display a lower number of recordable images in Stitch Assist mode than in Auto or Program mode
Horizontal Sequence
Procedures for Shooting Horizontal/Vertical Sequences
After the indicator stops flashing green, the
1. Turn the Mode Dial to the Stitch Assist position
5. Follow the same steps to shoot subsequent images in the sequence
2. Select 2x2 with the +/- buttons and press the SET button
Procedures for Shooting 2x2 Matrix Sequences
1. Turn the Mode Dial to the Stitch Assist position
3. Shoot the first image
By default, images are recorded in a clockwise direction starting from the upper right. To change the starting position, press the + button before taking the first shot
Page
Play Menu
Menu Features
Record Menu
+/- Buttons
Basic Menu Operations
MENU Button
SET Button
Record Menu
Quality
Menu Features
The Exposure Compensation function cannot be activated in Auto Mode
+/- Exp
Shortcut
White Balance
Icons
Slow Shutter
Icons
Play Menu
Show/Hide Info
Shortcut
Erase
This function can be used to erase image files from a CF card
A lock icon will appear next to an image that is protected
Protect
Rotate
Original
Begin the slide show by selecting the Start option
Slide Show
Start
Images are displayed in order by file numbers
Mark/Unmark
Play Time
Clear Marks
This function clears all marked data contained in shows 1 to
specified parameters on compatible digital
Print Order
Repeat
Print Type
Order Prints
Select Images
All Images
Cancel Orders
Property
Beep
Setup
Power Save
The factory default date style may differ between regions
Date/Time
Review
About File Numbers
File No. Reset
The method by which the camera assigns file numbers can be selected
Format
The Language menu may appear differ- ently on cameras in some regions
Language
Shortcut
Connecting to a TV
Other Functions
Changing the Button Battery
6. Play images using the normal proce- dures
1. Ensure that the Mode Dial is set to the L Lock position
2CR5NB-5H
7. Replace the battery pack
8. Close the battery cover and slide the lock to the locked position
2. Press the MENU button
Changing the Recording Format
1. Turn the Mode Dial to the P Program position
3. Hold the LCD/VIDEO Button down and press the SET button
Camera Body
Camera Maintenance
Appendices
Lens
Causes
Troubleshooting
Problem
Lock the battery cover and reset the
CF card slot cover was accessed
Battery cover lock was opened
Firmly close and lock the CF card slot
after non-use for a year or more
Make sure the battery pack is seated
Check the AC power cord connection
Causes
Problem
Solutions
Appendices
List of Message Codes
List of Messages
The following messages may appear on the LCD Panel
Specifications
PowerShot A50
± 2 EV
Operating Temperatures
Compact Power Adaptor CA-PS100/100E sold separately in some regions
Battery Pack NB-5H sold separately in some regions
Index
Appendices 105
Appendices 106
Customer Support
Canon Customer Support
Ulead Customer Support
Design
Art Direction
Yoshisuke Kuramoto, CDS Inc., Tokyo, Japan
Sumio Koike, J-Cat Communications, Vancouver, Canada
1999 CANON INC
H-IE-021-V1
0599Nixx
PRINTED IN JAPAN