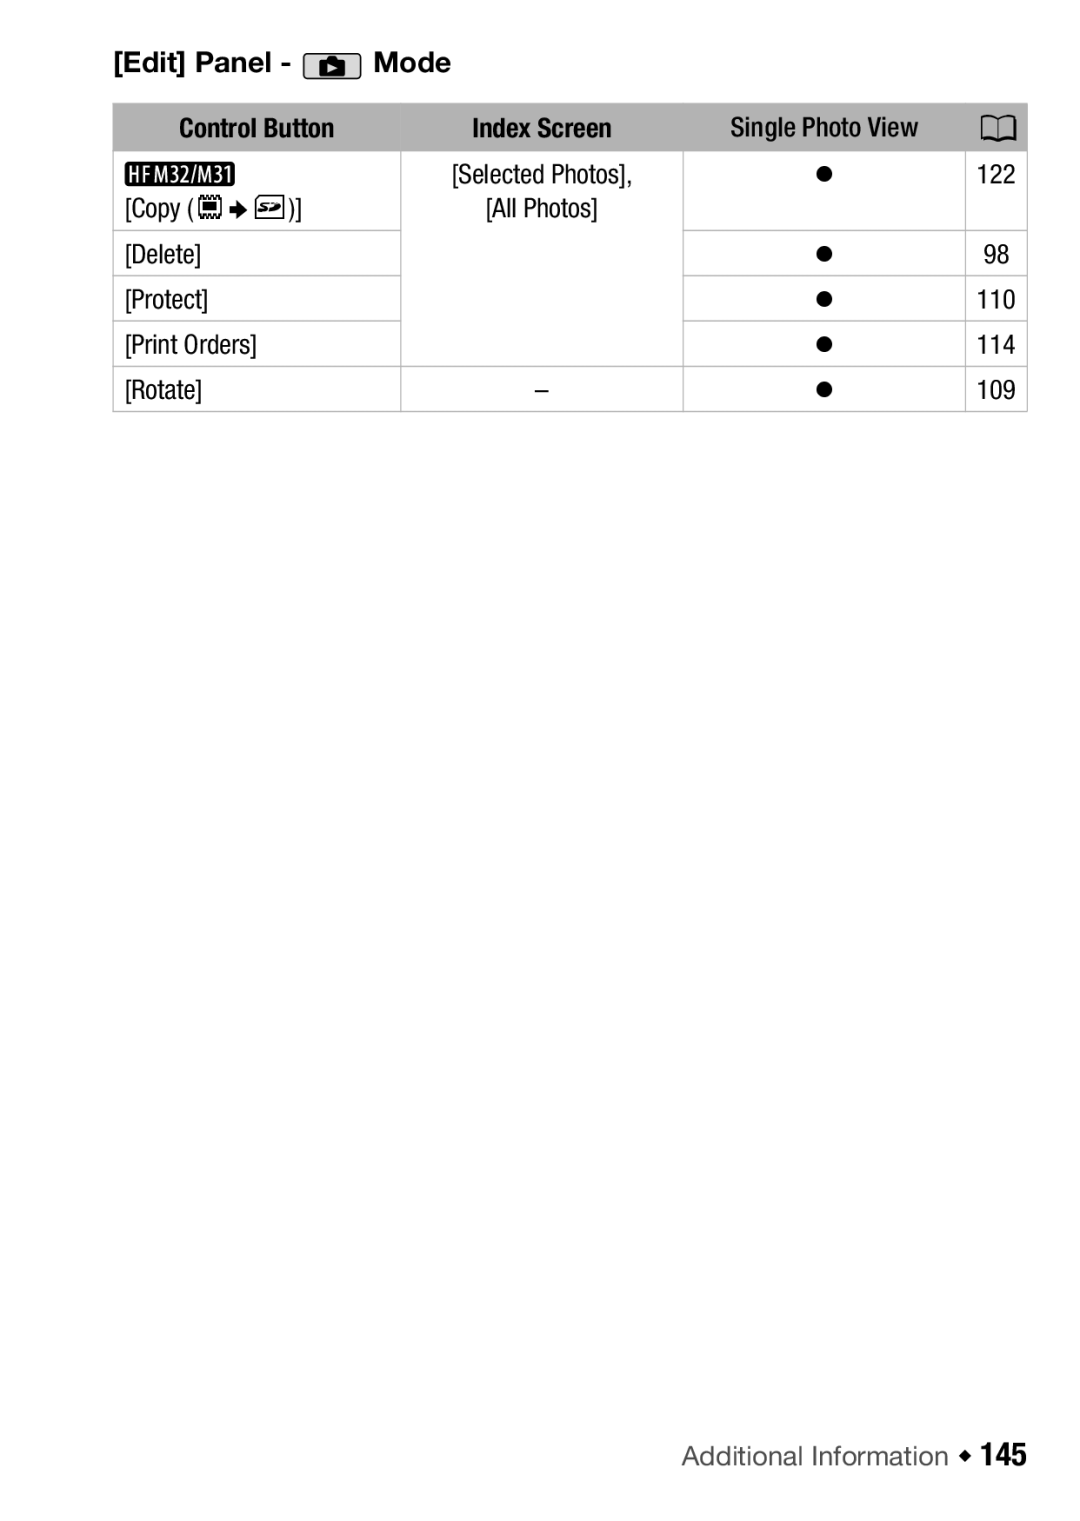
Manuals
/
Brands
/
Photography
/
Camcorder
/
Canon
/
Photography
/
Camcorder
Canon
HF M300, HF M31, HFM32
- page 145
1
145
201
201
Download
201 pages, 4.78 Mb
Additional Information
145
[Edit] Panel -
Mode
Control Button
Index Screen
Single Photo View
0
[Copy (
P
U
g
)]
[SelectedPhotos],
[AllPhotos]
z
122
[Delete]
z
98
[Protect]
z
110
[Print Orders]
z
114
[Rotate]
–
z
109
Contents
Main
Important Usage Instructions
Page
Exciting Features and New Functions
High-Definition Video
Dual Flash Memory
Relay Recording
Smart AUTO
Video Snapshot
Face Detection (062) Image Stabilization
Enjoying your Recordings on Other Devices
Page
Table of contents
Introduction
Preparations
Dual Shot Mode
38 Basic Recording
Video
45 Basic Playback
54 Advanced Functions
Photos
96 Basic Playback
100 Additional Functions
112 Printing Photos
External Connections
Additional Information
About this Manual
Introduction 13
Supplied Accessories and CD-ROMs
The following accessories are supplied with the camcorder:
Page
Names of Parts
Page
18
Wireless Controller WL-D89
Preparations
Getting Started
Charging the Battery Pack
Page
Page
22
Preparing the Accessories
Wireless Controller
Page
24
Adjusting the Position and Brightness of the LCD Screen
Rotating the LCD Panel
LCD Backlight
Basic Operation of the Camcorder
Using the Touch Screen
Operating Modes
Recording
Playback
28
Using the Menus
The FUNC. Panel and Edit Panel
The Setup Menus
First Time Settings
Setting the Date and Time
[FUNC.]* 8 [MENU] 8 6 8 [Date/Time]
Changing the Language
Changing the Time Zone
[FUNC.]* 8 [MENU] 8 6 8 [Time Zone/DST]
[FUNC.]* 8 [MENU] 8 6 8 [Languagea] 8 Desired language 8 [a]
Using a Memory Card
Memory Cards Compatible for Use with the Camcorder
SDXC Memory Cards
Eye-Fi Cards
Inserting and Removing a Memory Card
Selecting the Memory for the Recordings
Relay Recording of Movies
Initializing the Memory
Page
Dual Shot Mode
Basic Recording
Shooting Video and Taking Photos in Dual Shot Mode
Page
Page
Page
42
Zooming
[FUNC.]* 8 [ZOOM]
Using the Zoom Lever or Wireless Controller
Using the Touch Screens Zoom Controls
Quick Start Function
Page
Video
Basic Playback
[b] 8 [Original]
Playing Back the Video
Page
Page
The Index Selection Screen: Selecting the Content to Play Back
Page
50
3D Flip View
Narrowing Down the Scenes Shown in the Index Screen
Showing Only Scenes that Contain Peoples Faces
Showing Only Scenes Recorded on a Specific Date
Deleting Scenes
[yAll Scenes] 8 [Scenes by Date]
Page
Advanced Functions
Shooting Video in y Manual Mode
Selecting the Video Quality (Recording Mode)
[FUNC.] 8 [MENU] 8 8 8 [Recording Mode] 8 Desired recording mode 8 [a]
Special Scene Recording Programs
Approximate recording times
Recording mode
Memory 4 GB
8 GB
Page
[MFireworks] To record fireworks. [rUnderwater] To record underwater scenes in
[ s Surface]
Cinema Mode: Giving a Cinematic Look to your Recordings
[FUNC.] 8 [Rec. Programs] 8 [D Cine Mode] 8 [a]
Advanced Image Stabilization
[FUNC.] 8 [MENU] 8 8 8 [Frame Rate] 8 [DPF25] 8 [a]
[FUNC.] 8 [Image Stabilizer] 8 Desired IS mode 8 [a]
[PDynamic]( mode only) Compensates for a higher
[ Q Standard]*,[QOn]
Pre-Recording
Face Detection
[FUNC.] 8 [dPre REC] 8 [AOn] 8 [a]
[FUNC.] 8 [MENU] 8 7/8 8 [Face Detection & Tracking] 8 [AOno] 8 [a]
64
Touch & Track
Recording Video Snapshot Scenes
Video Snapshot
Digital Effects
[FUNC.] 8 [O Digital Effects] 8 Desired fader/effect* 8 [a]
Manually Setting the Shutter Speed or Aperture
[N Off]Select this setting when you do not intend to use the dig-
[2 Black & White]*Records movies and photos in black and
[3 Sepia]*Records movies and photos in sepia tones for an
Page
Page
Manual Exposure Adjustment
[FUNC.] 8 [eExposure]
Automatic Gain Control (AGC) Limit
Manual Focus Adjustment
[FUNC.] 8 [XFocus]
White Balance
Image Effects
[FUNC.] 8 [MENU] 8 7/8 8 [Image Effects] 8 Desired option* 8 [a]
Mini Video Light
Using an External Video Light
Self Timer
[FUNC.] 8 [MENU] 8 8 8 [Self Timer] 8 [AOn n] 8 [a]
Audio Recording Level
Manual Adjustment of the Audio Recording Level
[FUNC.] 8 [c Mic. Level] 8 [yManual]
Using Headphones
[FUNC.] 8 [c Mic. Level] 8 [zAutomatic] 8 [Audio Level Indicator] 8 [a]
Page
Using the Mini Advanced Shoe
Using an External Microphone
Using the SM-V1 Surround Microphone or DM-100 Directional Stereo Microphone
Using other microphones
Using a Zoom Remote Controller
Selecting the Playback Starting Point
[c] 8 the desired scene
[6 sec] 8 Desired interval 8 [f] [6 sec] 8 [oFaces] 8 [f]
Playing Back Scenes Set to Background Music
Using the Supplied Music Tracks as Background Music
86
[d] 8 [Yes]
Using an External Audio Player for Background Music
[MENU] 8 y / z 8 [External Audio Input] 8 [A On ]
Page
Onscreen Displays and Data Code
90
Playlist and Scene Operations
[Edit] 8 [Add to Playlist] 8 [Yes] 8 [OK]
Editing the Playlist: Adding, Deleting, Moving and Playing Back
Adding Scenes to the Playlist
Deleting Scenes from the Playlist
Moving Scenes in the Playlist
[Edit] 8 [Move] 8 Touch an empty box on the screen to select the desired position 8 [OK] 8 [Yes]
92
Capturing Photos and Video Snapshot Scenes from a Movie
Capturing a Video Snapshot Scene
Capturing Photos
Dividing Scenes
[Edit] 8 [Divide]
[A Divide] 8 [Yes]
Photos
Basic Playback
[b] 8 [Photos]
Viewing Photos
Photo Jump Function
[g] 8 Drag your finger left and right along the scroll bar 8 [f]
98
Deleting Photos
[b] 8 [Photos]
Deleting a Single Photo
Deleting Photos from the Index Screen
[Edit] 8 [Delete] 8 [dProceed] 8 [Yes]
Page
Additional Functions
Taking Photos in y Manual Mode
Deleting a Photo Right After Recording It
Selecting Photo Size and Quality
Page
Flash
[FUNC.] 8 [SFlash] 8 Desired option 8 [a]
Using the VFL-2 Video Flash Light
[ U Automatic]
[ V Red-Eye Auto]
Drive Mode: Continuous Shooting and Exposure Bracketing
[ A Single] [ D AE Bracketing]
[FUNC.] 8 [Drive Mode] 8 Desired option 8 [a]
[B Continuous], [C Hi-Speed Cont.]
Taking Photos while Recording Movies (Simultaneous Recording)
Light Metering Mode
[FUNC.] 8 [Metering Mode] 8 Desired option 8 [a]
[ Q Evaluative]
[S Center-Wt. Avg.]Averages the light metered from the entire
[ R Spot]
Slideshow
Magnifying Photos during Playback
[MENU] 8 z 8 [Slideshow Transition] 8 [Off], [Dissolve] or [Slide Image] 8 [a]
Rotating Photos
[Edit] 8 [Rotate] 8 [q](90left) or [r] (90 right)
Histogram Display
110
Protecting Photos
[Edit] 8 [Protect] 8 [B]
Protecting Single Photos
Protecting Photos from the Index Screen
[Edit] 8 [Protect] 8 [Protect]* 8 [OK]
112
Printing Photos
Printing Photos (Direct Print)
Connecting the Camcorder to the Printer
Printing a Single Photo
[E] 8 [Yes]
[MENU] 8 8 8 [Paper Settings] 8 Desired paper size 8 [a]
114
Print Orders
Marking Single Photos with Print Orders
[Edit] 8 [Print Orders] 8 [Z] or [O] to set the number of copies 8 [Set]
Setting Print Orders from the Index Screen
[Edit] 8 [Print Orders] 8 Desired option 8 [OK]
[One Copy Each]
[Remove Print Orders]Removes all the print orders from the
External Connections
Terminals on the Camcorder
Connection Diagrams
Page
Page
Playback on a TV Screen
Saving and Sharing Your Recordings
Copying Recordings to a Memory Card
[Edit] 8 [Copy (3g)] 8 [Yes]* 8 [OK]
Copying Scenes
122
Copying a Single Photo
[Edit] 8 [Copy (3g)] 8 [Yes]* 8 [OK]
Copying Photos from the Index Screen
[Edit] 8 [Copy (3g)] 8 [iProceed] 8 [Yes]
Saving Recordings on a Computer
Saving Movies
124
Saving Photos
Page
126
Saving Movies onto High-Definition Discs (AVCHD/Blu-ray Discs)
Preparations on the Camcorder
Connecting to the DW-100 DVD Burner and Creating AVCHD Discs
[MENU] 8 8 8 [Add Recordings to Disc] 8 [All Scenes] or [Remaining Scenes] 8 [a]
Page
O O
Playing Back AVCHD Discs Using the DW-100 DVD Burner
Saving Movies onto Standard-Definition Discs (DVD)
Converting Scenes into Standard Definition
132
Connecting to the Computer and Creating DVD Discs
[5] 8 [Embed Date/Time] 8 [On] 8 [f] 8 [f] [5] 8 [Bit Rate (Quality)] 8 Desired option 8 [f] 8 [f]
[b] 8 g 8 [SD Scenes] 8 [For DVD (SD-VIDEO)]
Connecting to the DW-100 DVD Burner and Creating DVD Discs
Saving Photos on Photo DVDs
Copying Recordings to an External Video Recorder
Connecting
Recording
Uploading Movies to Video Sharing Web Sites
Converting Scenes into Standard Definition
[5] 8 [Embed Date/Time] 8 [On] 8 [f] 8 [f]
[5] 8 [Bit Rate (Quality)] 8 Desired option 8 [f] 8 [f]
Connecting to the Computer and Uploading your Videos
[b] 8 g 8 [SD Scenes] 8 [For Web (MPEG-2)]
140
Uploading your Videos Wirelessly
[MENU] 8 6 8 [Eye-Fi Communication]* 8 [BOff] 8 [a]
Additional Information
Appendix: Menu Options Lists
FUNC. Panel
Page
[Edit] Panel - Mode
Page
Setup Menus
7 / 8 Camera Setup
[Digital Zoom]:
[AF Mode]:
[Focus Priority]:
[Focus Assistance]:
[Auto Slow Shutter]:
[Wind Screen]:
[Microphone Attenuator]:
[Surround Mic Directionality]: Sets the directionality mode of the optional
[Onscreen Markers]:
[POWERED IS Button]:
[Frame Rate]:
[Memory Info]:
[x.v.Colour]:
[Auto Rotate]:
[Photo Review Time]:
[Photo Numbering]:
[USB Connection Type]:
[Data Code]:
[TV Type]:
Page
d
[Font Size]:
[Output Onscreen Displays]
[LCD Brightness]:
[LCD Screen Dimmer]:
[Notification Sounds]:
[Calendar Start Day]:
[Battery Info]:
[Control for HDMI]:
[HDMI Status]:
Page
Appendix: Onscreen Icons and Displays
Additional Information 159
Recording Movies (in y Manual mode)
g f 3
Page
Additional Information 161
Viewing Photos
100% 75% 50% 25% 0%
Troubleshooting
Recording
Playback
Indicators and Onscreen Displays
g
S
Picture and Sound
Memory Card and Accessories
Connections with External Devices
170
List of Messages
Page
Page
Additional Information 173
Page
Page
Page
Messages Related to the Optional DW-100 DVD Burner
Page
Direct Print Related Messages
Page
Handling Precautions
Camcorder
182
Long-term storage
Battery Pack
Long-term storage
Remaining battery time
Regarding the use of non-Canon battery packs
Memory Card
184
Built-in Rechargeable Lithium Battery
Lithium Button Battery
Page
186
Maintenance/Others
Cleaning
Condensation
Using the Camcorder Abroad
Accessories
Optional Accessories
Page
Page
Page
Page
194
Specifications
LEGRIA HF M32 / LEGRIA HF M31 / LEGRIA HF M300
System
Recording System
Television System
Term ina ls
196
Power/Others
CA-570 Compact Power Adapter
BP-808 Battery Pack
Page
198
Index
A
B
C
D
I
L
M
N
O
200
T
U
V
W