Page
Copyright 2002 Canon Inc. all rights reserved
Notations About Text
Conventions
Illustrations and Screen Examples
Legal Notice
Abbreviations
FCC Regulations
Regulations for this product
International Energy Star Program
Canadian Radio Interference Regulations
Safety Warnings and Precautions
Power Supply
Location
An Emergency
Cleaning the Printer
Pacemakers
Printer location
Printhead and Ink Tanks
Moving the Printer
General Caution
Contents
How to Perform Menu Settings
Canceling a Print Job
Menu Settings Summary Tables
Cleaning the Printer
Print Job Results Abnormal
Replacing the Printhead
Options
Consumables
Uninstalling the Software
Before Using the Printer
Printer Main Unit
Printer Part Names
Operation panel
DIP switches
Right cover
Lift handles
Media Take-up Unit connector Only W7200
Power connector
Ieee 1394 Port Optional for W7250
Top View Inside Carriage rail
Carriage Inside Upper Cover Carriage cover
Printhead height adjustment lever
Printhead lock cover
Printhead
Roll stopper
Inside the Tray Belt stopper holder
Tray open lever
Roll holder
Bk Ink Tank Cover PC Ink Tank Cover PM Ink Tank Cover
Inside the Right Cover Bk Ink Tank PC Ink Tank PM Ink Tank
Take-up switch
Take-up mode switch
Media Take-up Unit Take-up holder
Slider holder
Switching the Printer On
Switching the Printer On and Off
Switching the Printer Off
Setting the Printer Online
Setting the Printer Online and Offline
When the Online lamp goes off, the printer is offline
Setting the Printer Offline
Print Media You Can Use
Types of Print Media
Print Media That Can Be Used
Photo Glossy Paper
Glossy Film
Photo Semi-Glossy Paper
Proofing Paper
Paper Sizes
Roll Media
Cut Sheets
Arch E
Handling Print Media
Printing Area
Selecting the Media Source
Loading Roll Media
Press Paper Source to light the Roll Media lamp
Loading the Roll Media
Pull the tray open lever then pull out the roll media tray
Open the tray
Print Media You Can Use
Roll media is locked in place by the roll holder
Print Media You Can Use
Loading Roll Media
Close the roll media tray
Media Name
Close the tray
Print Media You Can Use
Press or to select Roll Media Type then press
Selecting the Roll Media Type
Selecting the Cut Sheet Source
Loading Cut Sheets
Press Paper Source. The Cut Sheet lamp lights
Loading Cut Sheets
Open the upper cover
Raise the paper release lever
Loading Cut Sheets
Press or to select the type of cut sheet, then press Enter
Lower the paper release lever Close the upper cover
Cut Sheet Type Setting
Select the Cut Sheet Type
Press or to select Cut Sheet Type then press
Press or to select the type of cut sheet then press Enter
High Quality Printing on Film
Adjusting Printhead Height
Press and hold for more than 1 second
Close the upper cover
Aligning the Printhead
Re-adjusting Printhead Height
Using the Media Take-up Unit
Settings for Using the Media Take-up Unit
Press or to display Enable then press Enter
Press or to display Take-up Reel then press
Loading Roll Media
If the output stacker is installed, remove it from the stand
Print Media You Can Use
Press or to select Yes then press Enter
Press or to select Auto Feed then press
Press to feed some slack into the roll media
Press the Online button to display Online
Set the weight roll inside the slack of the roll media
Press to feed the roll media by a small amount
Removing Printed Media from the Media Take-up Unit
Press or to display Force Cutting then press
Remove the weight roll from inside the roll media
Tape the edge of the roll if required
If the output stacker was in use, re-attach it to the stand
Disabling the Media Take-up Unit
Press or to display Disable then press Enter
Printing from Windows
Print Procedure
Printing
Software application, select Print from the File menu
Print job starts
Page
Viewing Online Help
Opening Online Help
Printer Properties window, click the Help button
Printing from Windows
Printing from a Macintosh
Selecting the Printer
Mac OS 8.6/9.x
From the Apple menu, select Chooser
This completes the selection of the printer
Mac OS
If the name of the printer is in the list, go to Step
Click the Print button
Canceling a Background Print Job
Canceling a Print Job
Select Resume Printing from the File menu
Printer re-enters print mode and is ready for operation
Select the Finder then select Applications from the Go menu
Queue list for the printer is displayed
Print job in progress is canceled
Print job is canceled
Canceling a Foreground Print Job
Opening Help
Viewing Help
Printing from a Macintosh
UsingPanel the Operation
Reading the Display
What’s On the Operation Panel?
Standby
Print Job Processing
Message Display
Current Selection
Cancel button
Paper Source button
Button
Power button
Enter button
Online button
Cut Sheet lamp
Roll Media lamp
Data lamp
Message lamp
Printer Function Priorities
Function Menus
Menu Flow Summaries
Main Menu
Press or c, e to select Sleep Timer then press d
Press or c, e to select the value then press Enter g
Main Menu
Menu Settings Summary Tables
Sleep Timer
RAM
Maintenance
When to Replace an Ink Tank
When the X Ink Check Message is Displayed
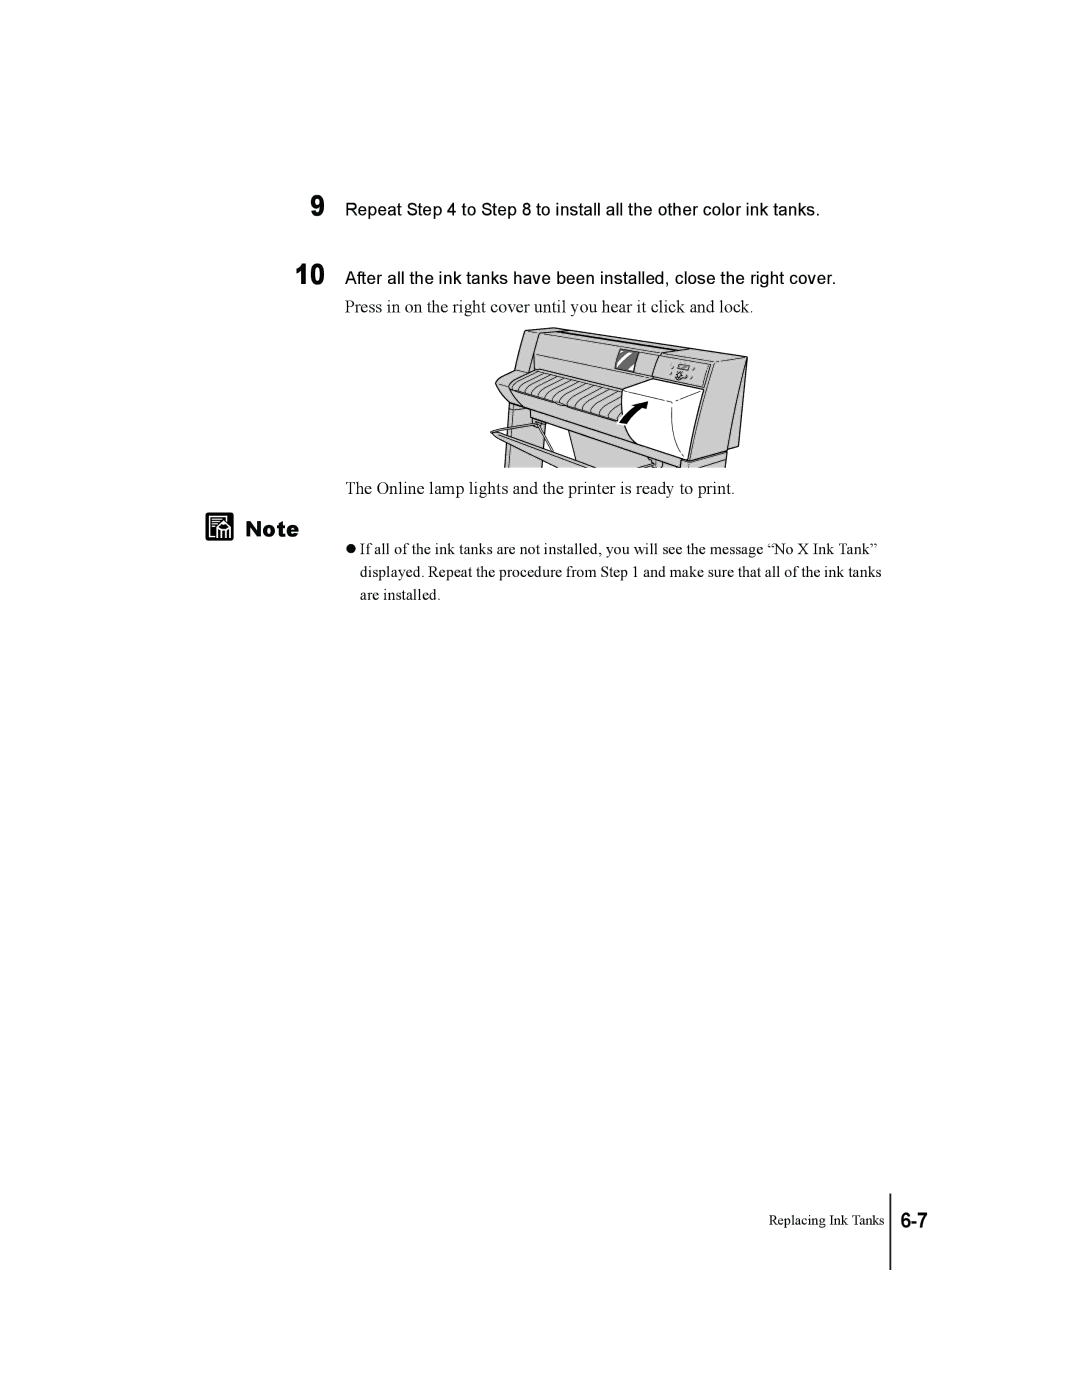
Replacing Ink Tanks
When the Replace X Tank Message Is Displayed
Handling Ink Tank Precautions
Press or to display Rep. Ink Tank then press
Replacing an Ink Tank
Remove the new ink tank from its protective cover
Close the ink tank cover until you hear it catch
Replacing Ink Tanks
Executing Print Job
Switching Off Ink Level Detection
Cleaning the Printer Surfaces
Cleaning the Printer
Maintenance
Cleaning Inside the Upper Cover
Maintenance
Printer off
Cleaning the Paper Restraint
Be sure to clean the entire surface of the paper restraint
Cleaning the Carriage Rail
Maintenance
Cleaning the Printer
Replacing the Printhead
Handing Printhead Precautions
How to Replace the Printhead
Press or to select Replace P.Head then press
Press or to select System Setup then press
Replacing the Printhead
Remove the old printhead
Make sure that the printhead is inserted completely
Maintenance
Close the upper cover
Maintenance
Troubleshooting
Having a Problem?
Printer Not Operating Correctly
Printer Not Switched On
Cannot Print
Printer Is On But Not Online
Cannot Install Windows Printer Driver
Cannot Install Macintosh Printer Driver
System Does Not Recognize the Printer
Printer Not Operating Correctly
No error message is displayed
Error message is displayed
Printing Does Not Start
Printing Halts During Print Job
Blank paper is ejected from the printer
Poor Print Quality
Print Job Results Abnormal
Printing is faint
Ink Smeared
Black Streaks Visible
Edges Smeared with Ink
Colors Wrong
Print Results Do Not Match Print Job Content
Other Problems
Image Color Borders Printing Dark
Ink consumption is exceedingly high
Message Is Displayed
Cut Failed
Ink level ?
Load Cut Sheet
Eject Cut Sheet
Feed Limit
Turn Power Off
Size Undetected
Remove Ink Tank
Check Printhead
No Printhead
Memory Overflow
No Media
Media Jam
Media Too Small
Incorrect Media
End of Roll
Removing Paper Jams
Removing a Roll Media Jam
Jam During Roll Media Preparation
Removing Paper Jams
After closing the roll media tray, close the tray
Roll Media Jam During Printing or Cutting
Off
Troubleshooting
Removing Paper Jams
Firmly push the roll media tray completely into the printer
Removing Paper Jams
Removing a Cut Sheet Jam
Removing Paper Jams
Troubleshooting
Checking the Print Status
Press the Online button twice to display Main Menu
Press or to display Test Print then press
Press or to select Nozzle Check then press Enter button
Types of Printhead Cleaning
Cleaning the Printhead
Printhead Cleaning Procedure
Head Cleaning a
Press or to select the cleaning method then press Enter
Press or to display Head Cleaning then press
Aligning the Printhead
Press or to select Adjust Printer then press
Repeat for B ~ E on Pattern a to make adjustments
Press or to select Print Pattern a then press Enter
Repeat for K on Pattern a to make adjustments
Adjusting Amount of Media Feed
Press or to select Print Pattern B then press Enter
Reducing the Amount of Cut Waste
Press or to select the setting then press Enter
Press or to display System Setup then press
Press or to display CutDustReduct. then press
Press or to select the media type then press
Adjusting and Replacing the Cutter
Press and hold for over 1 second
Troubleshooting
Attach the cutter blade to the carriage
Troubleshooting
Other Important Information
Options
Media Take-up Unit
Stand
Roll Holder Sets
Ieee 1394 Expansion Board
Print Media
Consumables
Media Types
Roll Sizes
Printhead
Ink Tanks
Cutter Blades
Updating the Firmware
Obtaining the Firmware Update
Confirming the Firmware Version
Press or to select Information then press
Deleting Old USB/IEEE 1394 Printer Drivers
Uninstalling the Software
Uninstall begins
Uninstalling the Printer Driver
Windows
Macintosh
Page
Other Important Information
Printing Characteristics W7200 W7250
Specifications
Print Media W7200 W7250
Index
Symbols
Display
2-29
Printhead 6-18, 6-22
Software