•The condenser water limit needs to be verified depending on design parameters and application, whether geothermal or boiler/tower.
7.To view unit configuration settings:
a.Select the Unit Configuration softkey, then select Unit.
b.Scroll through the unit settings by using the up and down arrow keys. Unit settings include:
•Fan Mode: Default Continuous
•Fan Delay:
•Minimum SAT Cooling: Default 50 F
•Maximum SAT Heating: Default 110 F
•Filter Service Alarm: Must be set from 0 to 9999 hr
8.To set local schedules:
a.Select the Schedule softkey from the Configuration screen, then press enter.
b.Select Weekly, then press enter (7 schedules available).
c.Select day and press enter.
d.Press enter again and select ADD or DEL (DECR or INCR) set schedule.
e.Enter ON/OFF time, then press continue.
f.Press OK to apply and save to a particular day of the week.
g.Continue to add the same or different schedule spe- cific days of the week.
To add exceptions to the schedule:
i.Press Add softkey.
ii.Select exception type from following:
•Date
•Date Range
•Week-N-Day
•Calender Reference
9.Go back to Home Screen.
10.Remove BACview6 cable from SPT sensor by reversing the process in Step 1.
11.Perform system test.
Flow Regulation — Flow regulation can be accom- plished by two methods. Most water control valves have a flow adjustment built into the valve. By measuring the pressure drop through the unit heat exchanger, the flow rate can be deter- mined. See Table 23. Adjust the water control valve until the flow of 1.5 to 2 gpm is achieved. Since the pressure constantly varies, two pressure gages may be needed in some applications.
An alternative method is to install a flow control device. These devices are typically an orifice of plastic material de- signed to allow a specified flow rate that are mounted on the outlet of the water control valve. Occasionally these valves produce a velocity noise that can be reduced by applying some back pressure. To accomplish this, slightly close the leaving isolation valve of the well water setup.
 WARNING
To avoid possible injury or death due to electrical shock, open the power supply disconnect switch and secure it in an open position before flushing system.
Flushing — Once the piping is complete, units require final purging and loop charging. A flush cart pump of at least 1.5 hp is needed to achieve adequate flow velocity in the loop to purge air and dirt particles from the loop. Flush the loop in both directions with a high volume of water at a high velocity. Fol- low the steps below to properly flush the loop:
1. Verify power is off.
2.Fill loop with water from hose through flush cart before using flush cart pump to ensure an even fill. Do not allow the water level in the flush cart tank to drop below the pump inlet line to prevent air from filling the line.
3.Maintain a fluid level in the tank above the return tee to avoid air entering back into the fluid.
4.Shutting off the return valve that connects into the flush cart reservoir will allow 50 psig surges to help purge air pockets. This maintains the pump at 50 psig.
5.To purge, keep the pump at 50 psig until maximum pumping pressure is reached.
6.Open the return valve to send a pressure surge through the loop to purge any air pockets in the piping system.
7.A noticeable drop in fluid level will be seen in the flush cart tank. This is the only indication of air in the loop.
NOTE: If air is purged from the system while using a 10 in. PVC flush tank, the level drop will only be 1 to 2 in. since liquids are incompressible. If the level drops more than this, flushing should continue since air is still being compressed in the loop. If level is less than 1 to 2 in., reverse the flow.
8.Repeat this procedure until all air is purged.
9.Restore power.
Antifreeze may be added before, during or after the flushing process. However, depending on when it is added in the process, it can be wasted. Refer to the Antifreeze section for more detail.
Loop static pressure will fluctuate with the seasons. Pres- sures will be higher in the winter months than during the warmer months. This fluctuation is normal and should be con- sidered when charging the system initially. Run the unit in either heating or cooling for several minutes to condition the loop to a homogenous temperature.
When complete, perform a final flush and pressurize the loop to a static pressure of 40 to 50 psig for winter months or 15 to 20 psig for summer months.
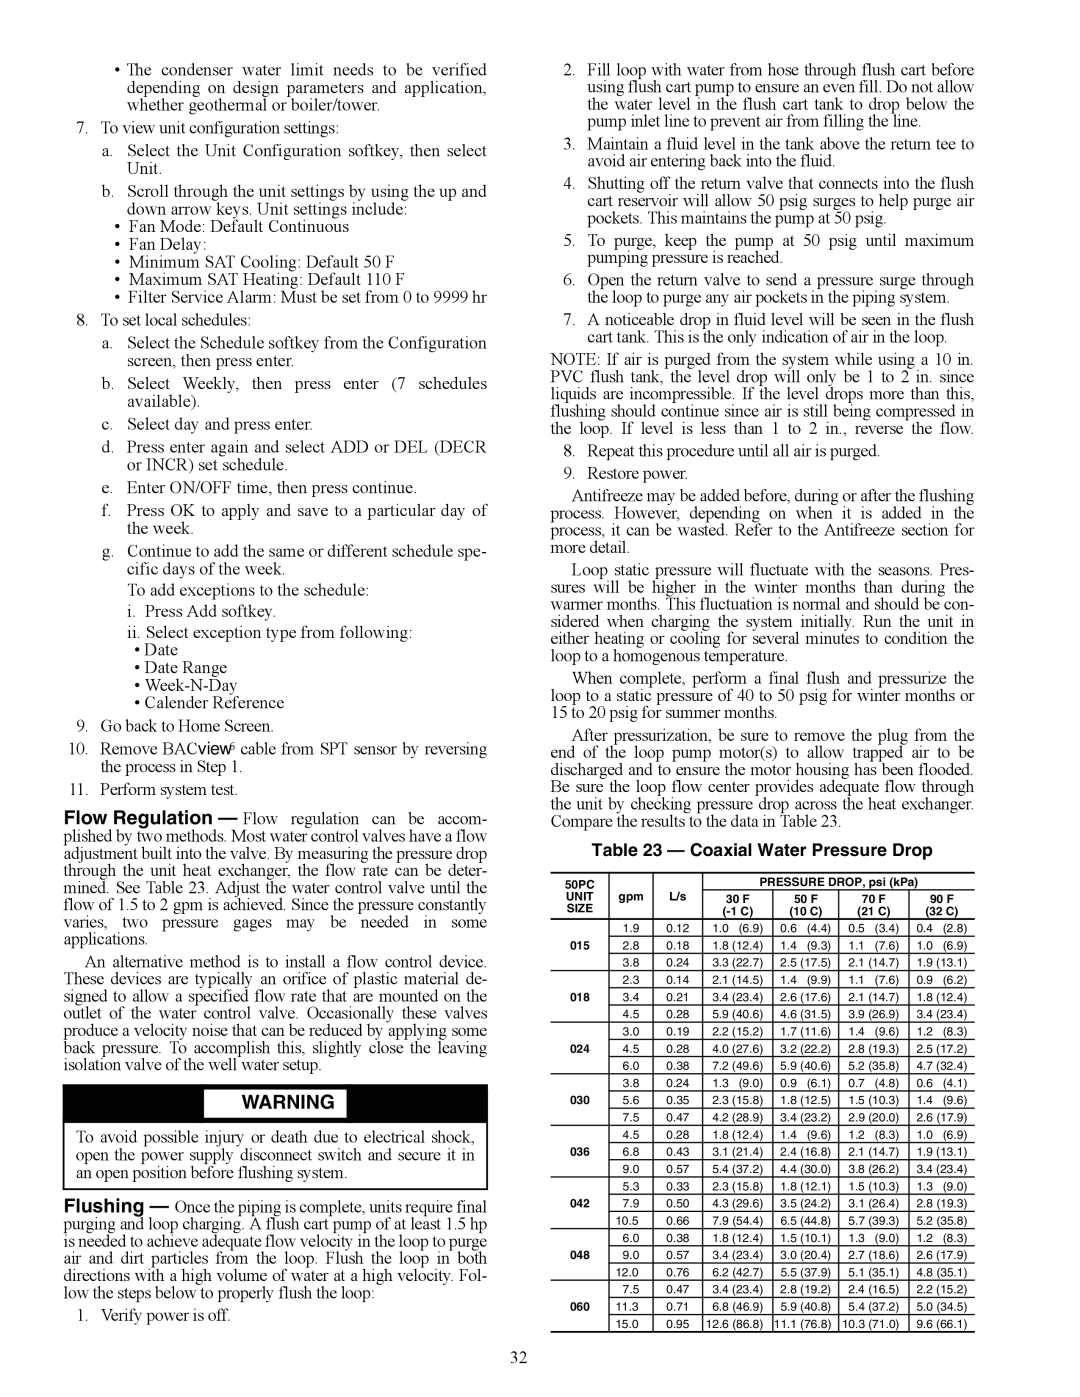
After pressurization, be sure to remove the plug from the end of the loop pump motor(s) to allow trapped air to be discharged and to ensure the motor housing has been flooded. Be sure the loop flow center provides adequate flow through the unit by checking pressure drop across the heat exchanger. Compare the results to the data in Table 23.
Table 23 — Coaxial Water Pressure Drop
50PC | | | | PRESSURE DROP, psi (kPa) | |
UNIT | gpm | L/s | 30 F | 50 F | 70 F | 90 F |
SIZE | | | (-1 C) | (10 C) | (21 C) | (32 C) |
| 1.9 | 0.12 | 1.0 | (6.9) | 0.6 | (4.4) | 0.5 | (3.4) | 0.4 | (2.8) |
015 | 2.8 | 0.18 | 1.8 | (12.4) | 1.4 | (9.3) | 1.1 | (7.6) | 1.0 | (6.9) |
| 3.8 | 0.24 | 3.3 | (22.7) | 2.5 | (17.5) | 2.1 | (14.7) | 1.9 (13.1) |
| 2.3 | 0.14 | 2.1 | (14.5) | 1.4 | (9.9) | 1.1 | (7.6) | 0.9 | (6.2) |
018 | 3.4 | 0.21 | 3.4 | (23.4) | 2.6 | (17.6) | 2.1 | (14.7) | 1.8 (12.4) |
| 4.5 | 0.28 | 5.9 | (40.6) | 4.6 | (31.5) | 3.9 | (26.9) | 3.4 (23.4) |
| 3.0 | 0.19 | 2.2 | (15.2) | 1.7 | (11.6) | 1.4 | (9.6) | 1.2 | (8.3) |
024 | 4.5 | 0.28 | 4.0 | (27.6) | 3.2 | (22.2) | 2.8 | (19.3) | 2.5 (17.2) |
| 6.0 | 0.38 | 7.2 | (49.6) | 5.9 | (40.6) | 5.2 | (35.8) | 4.7 (32.4) |
| 3.8 | 0.24 | 1.3 | (9.0) | 0.9 | (6.1) | 0.7 | (4.8) | 0.6 | (4.1) |
030 | 5.6 | 0.35 | 2.3 | (15.8) | 1.8 | (12.5) | 1.5 | (10.3) | 1.4 | (9.6) |
| 7.5 | 0.47 | 4.2 | (28.9) | 3.4 | (23.2) | 2.9 | (20.0) | 2.6 (17.9) |
| 4.5 | 0.28 | 1.8 | (12.4) | 1.4 | (9.6) | 1.2 | (8.3) | 1.0 | (6.9) |
036 | 6.8 | 0.43 | 3.1 | (21.4) | 2.4 | (16.8) | 2.1 | (14.7) | 1.9 (13.1) |
| 9.0 | 0.57 | 5.4 | (37.2) | 4.4 | (30.0) | 3.8 | (26.2) | 3.4 (23.4) |
| 5.3 | 0.33 | 2.3 | (15.8) | 1.8 | (12.1) | 1.5 | (10.3) | 1.3 | (9.0) |
042 | 7.9 | 0.50 | 4.3 | (29.6) | 3.5 | (24.2) | 3.1 | (26.4) | 2.8 (19.3) |
| 10.5 | 0.66 | 7.9 | (54.4) | 6.5 | (44.8) | 5.7 | (39.3) | 5.2 (35.8) |
| 6.0 | 0.38 | 1.8 | (12.4) | 1.5 | (10.1) | 1.3 | (9.0) | 1.2 | (8.3) |
048 | 9.0 | 0.57 | 3.4 | (23.4) | 3.0 | (20.4) | 2.7 | (18.6) | 2.6 (17.9) |
| 12.0 | 0.76 | 6.2 | (42.7) | 5.5 | (37.9) | 5.1 | (35.1) | 4.8 (35.1) |
| 7.5 | 0.47 | 3.4 | (23.4) | 2.8 | (19.2) | 2.4 | (16.5) | 2.2 (15.2) |
060 | 11.3 | 0.71 | 6.8 | (46.9) | 5.9 | (40.8) | 5.4 | (37.2) | 5.0 (34.5) |
| 15.0 | 0.95 | 12.6 | (86.8) | 11.1 | (76.8) | 10.3 | (71.0) | 9.6 (66.1) |