Objectives and Organization
Audience
Conventions
Convention Description
Bewaar Deze Instructies
Safety Warnings
Warnung Wichtige Sicherheitshinweise
Avvertenza Importanti Istruzioni Sulla Sicurezza
Aviso Instruções Importantes DE Segurança
Guarde Estas Instrucciones
GEM Disse Anvisninger
Page
Safety Warnings Introduction to Hardware Documentation
Cisco Product Document
Related Documentation
Cisco 90-Day Limited Hardware Warranty Terms
Duration of Hardware Warranty
Replacement, Repair, or Refund Policy for Hardware
Obtaining Documentation
To Receive a Return Materials Authorization RMA Number
Cisco.com
Ordering Documentation
Documentation Feedback
Submitting a Service Request
Obtaining Technical Assistance
Cisco Technical Support Website
Obtaining Additional Publications and Information
Definitions of Service Request Severity
Copyright 2004 Cisco Systems, Inc. All rights reserved
Router Descriptions
Overview of Cisco 3800 Series Routers
Front View of Cisco 3825 Router
Rear Panel of Cisco 3825 Router
Front Panel of Cisco 3845 Router
Product Identification
Product Identification
Cisco Product Identification Tool
Built-In Ports
Network Modules
Module and Interface Card Capacity
Interface Cards
Aims and PVDMs
Port Numbering
Built-In Ports
Network Module Ports
Asynchronous Interface Numbering
Interface Card Ports
Power
Router Power Option Input IP Phone Power Output
Memory
Real-Time Clock and Battery
LED Indicators
Technical Specifications
Specification Value
Information, see the Cisco 2800 Series and Cisco
Information, see the Cisco 2800 Series and Cisco
Regulatory Compliance
Regulatory Compliance Overview of Cisco 3800 Series Routers
Statement
Safety Recommendations
Safety with Electricity
Power Supply Considerations
General Site Requirements
Preventing Electrostatic Discharge Damage
Site Environment
Equipment Racks
Site Configuration
Task Verified by Date
Installation Checklist
Inspecting the Router
Creating a Site Log
OL-5967-01
Installing Cisco 3800 Series Routers in an Equipment Rack
Bracket pair for 19-inch rack
Rack-Mounting the Router
Rack-Mounting Brackets for Cisco 3845 Routers
Attaching Brackets to the Router for Rack Mounting
Bracket Installation for Front Mounting
Right bracket For 19-inch rack Use six screws on each side
Installing the Router in a Rack
Attaching the Optional Cable Management Bracket
Grounding the Router
Ground lug attachment
Ring Terminal Ground Connection on Cisco 3825 Router
Ring Terminal Ground Connection on Cisco 3845 Router
OL-5969-01
Connecting Cables to Cisco 3800 Series Routers
Power Connections
Connecting Routers to DC Power
Connecting Routers to AC Power
120 VAC, 45 a 240 VAC, 30 A. Statement
120 VAC, 30 a 240 VAC, 20 A. Statement
Wire Size Wire Terminal Lug Protection
DC Input1 Safety Ground Overcurrent
60 VDC, 20 A. Statement
60 VDC, 30 A. Statement
DC Input Wiring Procedure
+ + B
Dual DC Power Supply Configuration in Cisco 3825 Routers
Connecting to One Source Only-Source a or Source B
Va voltage = Vb voltage greater than 0.25
Source a and Source B Wired with Opposite-Polarity Grounds
Connecting Routers to Backup Power
RPS Connector on Cisco 3825 Router
Connecting WAN, LAN, and Voice Cables
Connecting a Console or Modem
Connecting a Computer to the Cisco 3825 Router Console Port
Connecting a Console to the Console Port
Connecting a Computer to the Cisco 3845 Router Console Port
Connecting a Modem to the Auxiliary Port
Modem
Prerequisites
Powering Up Cisco 3800 Series Routers
Verifying LED Indications
Power-Up Procedure
SYS
Color and State Meaning
Setting the Date and Time
Verifying the Hardware Configuration
Troubleshooting Cisco 3800 Series Routers
Troubleshooting the Power and Cooling Systems
Solving Problems
Environmental Reporting Features
Troubleshooting Modules, Cables, and Connections
Cisco 3825 Front-Panel LEDs
LEDs
Cisco 3825 Rear-Panel LEDs
3825 3845
LED
AIM0
PS1
Show environment Command
Cisco 3800 Series Routers
Error Messages
Cisco 3845 Router Error Messages
Jumper Settings
Recovering a Lost Password
More Troubleshooting Help
OL-5972-01
Installing Network Modules
Installing Network Modules Cisco 3800 Series Routers
Installing Network Modules
Modifying the Width of Network Module Slots
Slot divider Slot adapters
Slot Adapters for Double-Wide Network Modules Generic Router
Installing and Removing Slot Dividers
Slot Divider for Network Module Slot
Installing Slot Dividers
121385
Removing Slot Dividers
Installing Slot Adapters
Installing and Removing Slot Adapters
Removing Slot Adapters
Installing Blank Faceplates
Installing Interface Cards
Installing Interface Cards in Cisco 3800 Series Routers
Slot Divider for Cisco 3825 Hwic Slot
Installing Slot Dividers in Hwic Slots
Slot Divider for Cisco 3845 Hwic Slot
Inserting Slot Divider into Hwic Slot Cisco 3825 Router
Slot divider Screw tab Screw hole Track
Pull the slot divider straight out of the Hwic slot
Removing Slot Dividers from Hwic Slots
Show a blank faceplate for an interface card slot
Installing Blank Faceplates over Empty Hwic Slots
Installing Blank Faceplates over Empty Hwic Slots
Maximum
Cisco Part Number SFP Transceiver Micrometer Mode Distance
Laser Safety Guidelines
Installing SFP Modules
Removing SFP Modules
Disconnecting SFP Latch Mechanisms
OL-5968-01
Preventing Electrostatic Discharge Damage
Compact
Removing CompactFlash Memory Cards
CompactFlash Slot Location in Cisco 3845 Router
Installing CompactFlash Memory Cards
Using the Compact Flash Guard
Copyright 2004-2005 Cisco Systems, Inc. All rights reserved
OL-5975-04
Safety with Electricity
Removing the Cover from a Cisco 3825 Router
Removing the Power Supply Assembly from a Cisco 3825 Router
Removing the Plug-In Motherboard from a Cisco 3845 Router
Removing the Motherboard from a Cisco 3845 Router
Component Locations on the Motherboard
PVDM3 Memory PVDM2 PVDM1
Component Locations on a Cisco 3845 Motherboard
Sdram Dimm Removal and Installation
Removing an Sdram Dimm
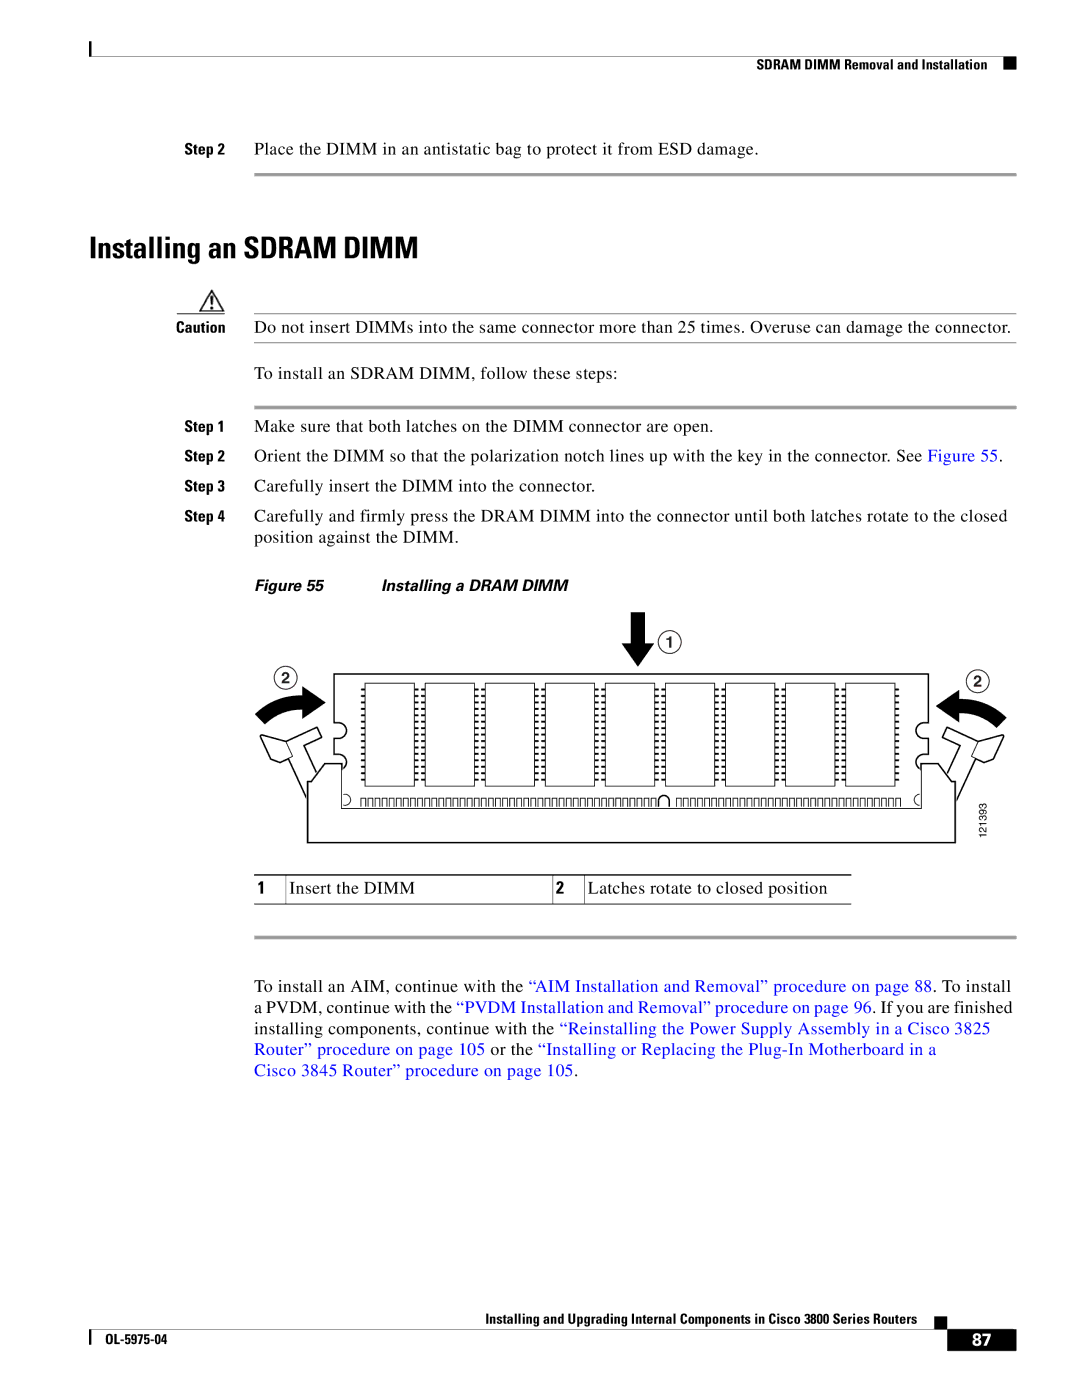
Dimm Location and Orientation
Cisco 3845 Router procedure on
Installing an Sdram Dimm
Accessory Kits
AIM Installation and Removal
Installing an AIM
Overview
Removing Screws from a Motherboard for AIM Installation
Connecting the AIM to the Motherboard
Metal Standoffs
Attaching an AIM to a Motherboard
AIM Installed on a Motherboard
Applying the AIM Label
Verifying AIM Installation
Removing Screws from an AIM
Removing an AIM
CompactFlash Memory Card Location on the AIM
Installing a CompactFlash Memory Card on the AIM
Pvdm Location and Orientation
Pvdm Installation and Removal
Tilt Pvdm up to vertical Clips snap into place
Installing a Pvdm
Removing a Pvdm
Installing a Power Supply in a Cisco 3825 Router
Installing an AC Power Supply
Removing the Existing Power Supply
100
101
Installing a DC Power Supply
102
103
Installing an IP Phone Power Supply
104
105
Reinstalling the Cover on a Cisco 3825 Router
106
107
108