Chapter 1 Cisco ASR 903 Router Overview
Cisco ASR 903 Router Features
•AC Power Specifications, page
Redundancy
The Cisco ASR 903 Router chassis includes a slot for an optional redundant power supply. The redundant power supply option provides a second, identical power supply to ensure that power to the chassis continues uninterrupted if one power supply fails or input power on one line fails. The Cisco ASR 903 Router supports current sharing between the power supplies.
If you install a redundant power supply on the Cisco ASR 903 Router, we recommend that you connect each power supply to a separate input power source in order to ensure that the router maintains power in the event of a power interruption caused by an electrical failure, a wiring fault, or a tripped circuit breaker.
Dying Gasp
The Cisco ASR 903 Router DC power supply supports the Dying Gasp feature, which allows the router to provide an input power loss notification to the RSP so that the RSP can send appropriate SNMP traps or OAM messages and update log files on the router. With the DC power supply, the router supports a minimum input power loss detection time of 2 milliseconds (DC) and continued operation of at least 6 milliseconds (DC) after the notification.
Note Continued DC power supply operation may vary for voltages other than
Status LEDs
LEDs are also provided on each power supply to indicate the status of the input power and the health of the power supply. For more information about the LEDs on the Cisco ASR 903 Router, see Chapter 5, “Troubleshooting.”
DC Power Specifications
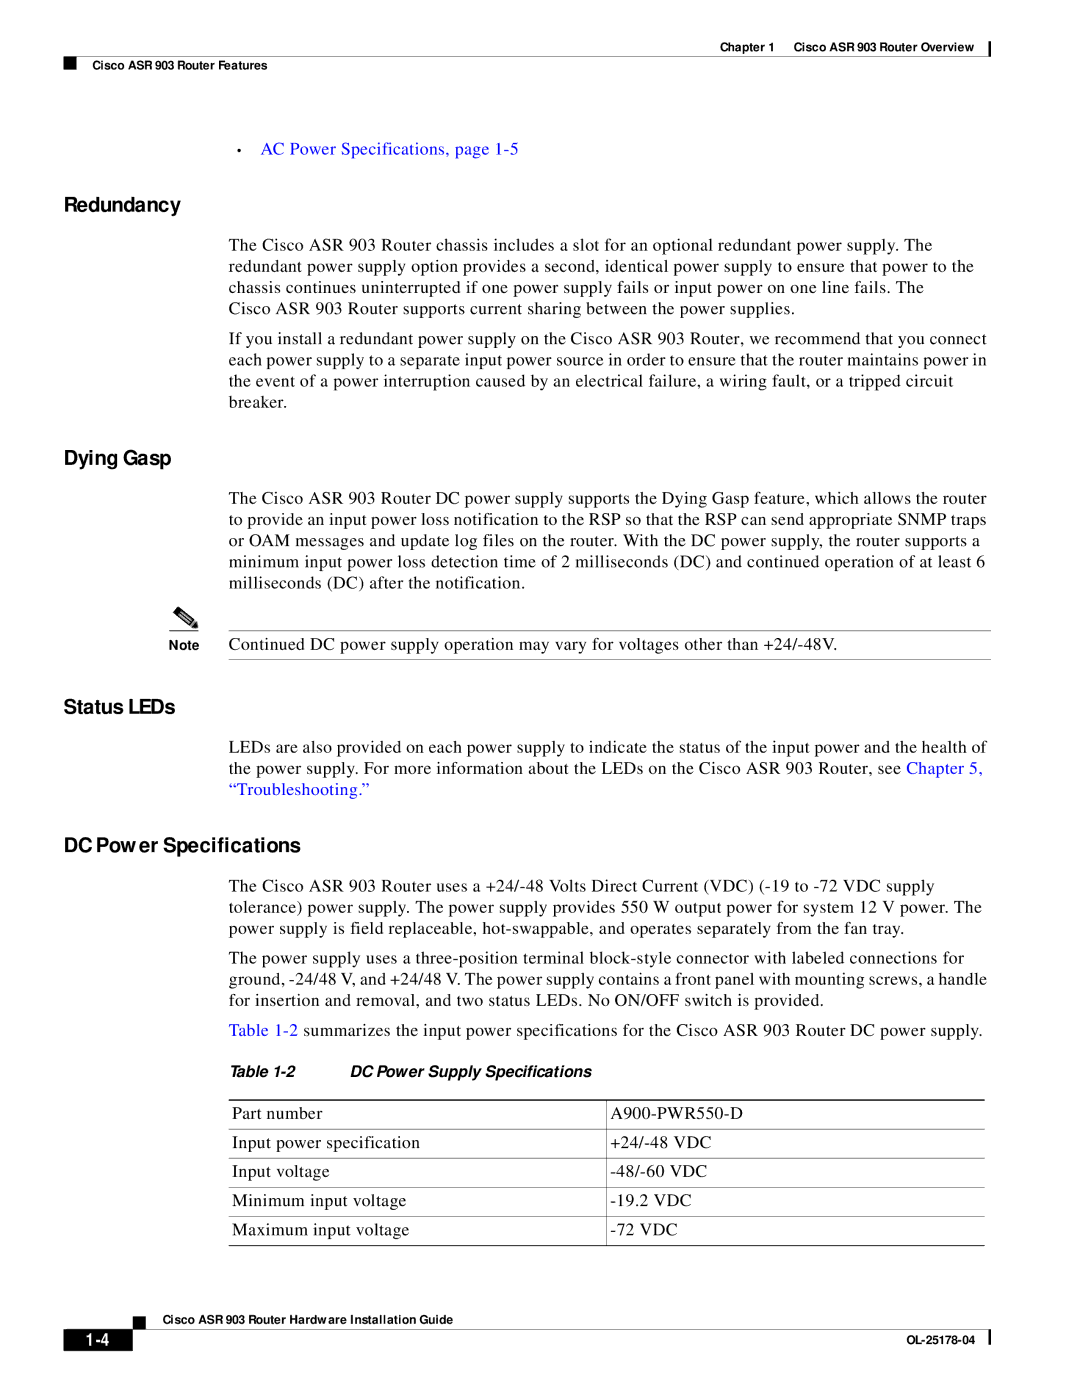
The Cisco ASR 903 Router uses a
The power supply uses a
Table
|
|
|
| Table | DC Power Supply Specifications |
|
|
|
|
|
|
|
|
|
|
| |
|
|
|
| Part number |
| |||
|
|
|
|
|
|
| ||
|
|
|
| Input power specification | ||||
|
|
|
|
|
|
|
| |
|
|
|
| Input voltage |
| |||
|
|
|
|
|
|
| ||
|
|
|
| Minimum input voltage | ||||
|
|
|
|
|
|
| ||
|
|
|
| Maximum input voltage | ||||
|
|
|
|
|
|
|
| |
|
|
| Cisco ASR 903 Router Hardware Installation Guide |
|
|
| ||
|
|
|
|
|
| |||
|
|
|
|
|
|
|
|
|
|
|
|
|
|
| |||
|
|
|
|
|
| |||