CBM-270 User’s Manual
5.DIP SWITCH SETTING
5.1Location of DIP Switch
1.Turn off the power.
2.Detach the printer cover, and take out the paper roll. (The switch is found under the paper roll.)
3.There are 2 switches
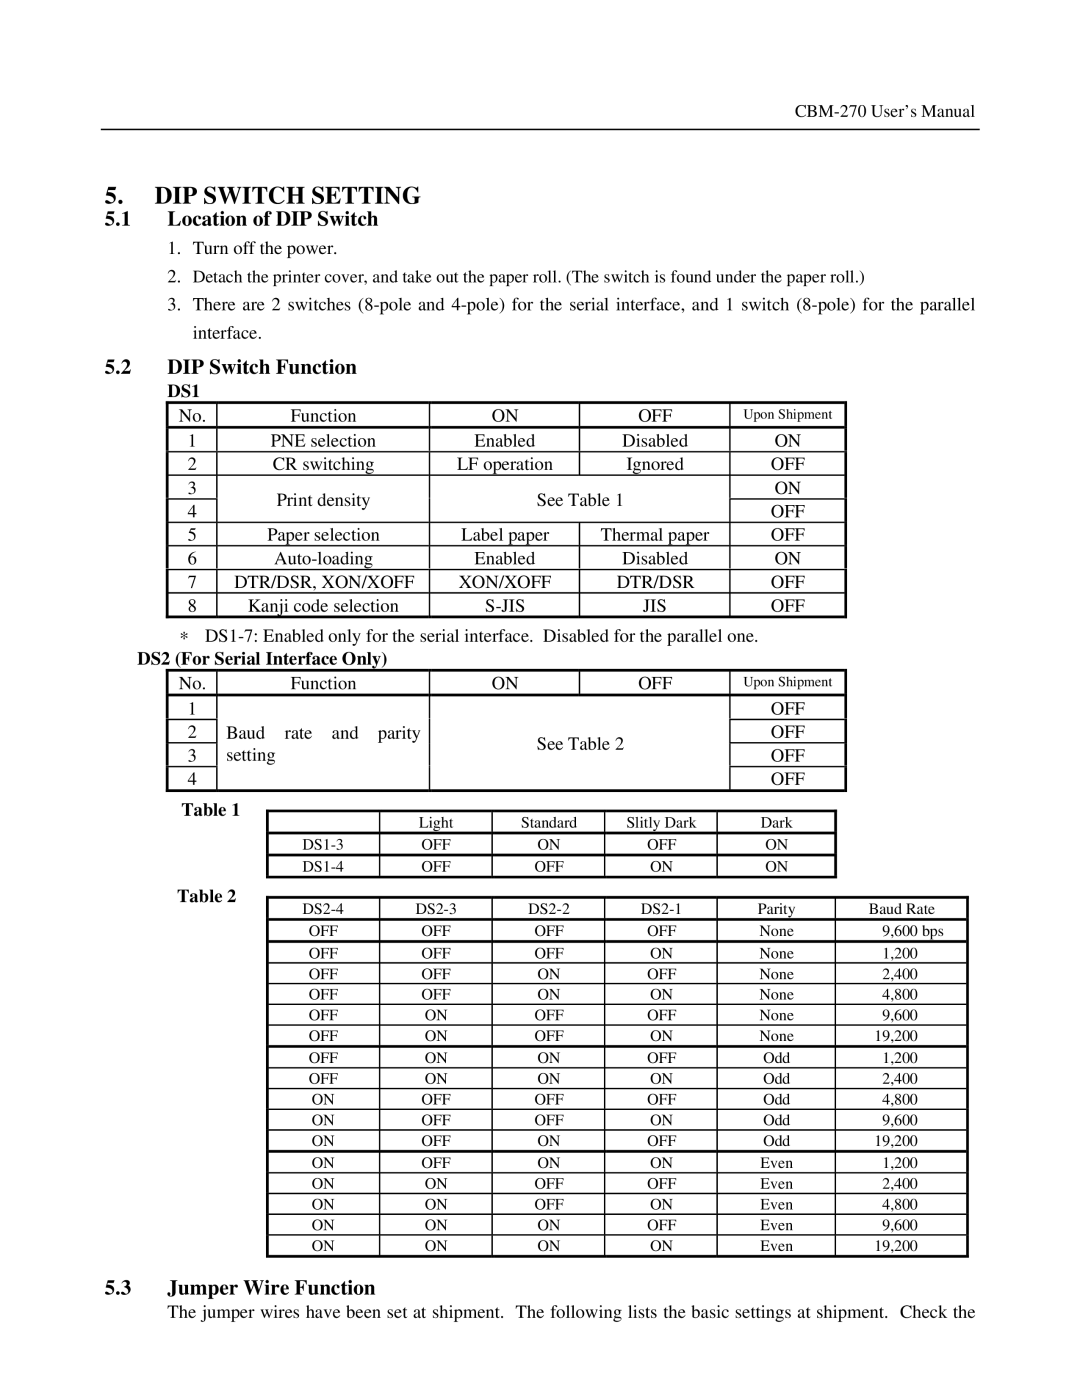
5.2DIP Switch Function
DS1
No. | Function | ON | OFF | Upon Shipment | |
1 | PNE selection | Enabled | Disabled | ON | |
2 | CR switching | LF operation | Ignored | OFF | |
3 | Print density | See Table 1 | ON | ||
4 | OFF | ||||
|
|
| |||
5 | Paper selection | Label paper | Thermal paper | OFF | |
6 | Enabled | Disabled | ON | ||
7 | DTR/DSR, XON/XOFF | XON/XOFF | DTR/DSR | OFF | |
8 | Kanji code selection | JIS | OFF | ||
∗
DS2 (For Serial Interface Only)
No. |
| Function |
|
| ON |
|
| OFF | Upon Shipment |
| ||
1 |
|
|
|
|
|
|
|
|
| OFF |
| |
2 | Baud rate and | parity |
| See Table 2 |
|
| OFF |
| ||||
3 | setting |
|
|
|
| OFF |
| |||||
|
|
|
|
|
|
|
| |||||
4 |
|
|
|
|
|
|
|
|
| OFF |
| |
Table 1 |
|
|
|
|
|
|
|
|
|
|
| |
| Light | Standard |
| Slitly Dark |
| Dark |
|
| ||||
|
|
|
|
|
|
| ||||||
|
| OFF | ON |
| OFF |
| ON |
|
| |||
|
| OFF | OFF |
| ON |
| ON |
|
| |||
Table 2 |
|
|
|
|
|
|
|
|
|
|
| |
|
| Parity |
| Baud Rate | ||||||||
|
|
|
|
| ||||||||
|
| OFF | OFF | OFF |
| OFF |
| None |
| 9,600 bps | ||
|
| OFF | OFF | OFF |
| ON |
| None |
| 1,200 | ||
|
| OFF | OFF | ON |
| OFF |
| None |
| 2,400 | ||
|
| OFF | OFF | ON |
| ON |
| None |
| 4,800 | ||
|
| OFF | ON | OFF |
| OFF |
| None |
| 9,600 | ||
|
| OFF | ON | OFF |
| ON |
| None |
| 19,200 | ||
|
| OFF | ON | ON |
| OFF |
| Odd |
| 1,200 | ||
|
| OFF | ON | ON |
| ON |
| Odd |
| 2,400 | ||
|
| ON | OFF | OFF |
| OFF |
| Odd |
| 4,800 | ||
|
| ON | OFF | OFF |
| ON |
| Odd |
| 9,600 | ||
|
| ON | OFF | ON |
| OFF |
| Odd |
| 19,200 | ||
|
| ON | OFF | ON |
| ON |
| Even |
| 1,200 | ||
|
| ON | ON | OFF |
| OFF |
| Even |
| 2,400 | ||
|
| ON | ON | OFF |
| ON |
| Even |
| 4,800 | ||
|
| ON | ON | ON |
| OFF |
| Even |
| 9,600 | ||
|
| ON | ON | ON |
| ON |
| Even |
| 19,200 | ||
5.3Jumper Wire Function
The jumper wires have been set at shipment. The following lists the basic settings at shipment. Check the