Dell Inspiron
W . d e l l . c o m s u p p o r t . d e l l . c o m
Abbreviations and Acronyms
Contents
Using a Battery
Using CDs, DVDs, and Other Multimedia
Adding and Replacing Parts
Appendix
109
Contents
Finding Information
Dell Product Information Guide
Help File
Dell Support Website support.dell.com
W . d e l l . c o m s u p p o r t . d e l l . c o m
Tour of Your Computer
Front View
Keyboard Status Lights
Solid green The battery is charging
PC Card slot CD or DVD drive Audio connectors
Left Side View
Modem connector Air vents
Right Side View
Modem Connector
AC adapter AC adapter connector Tour of Your Computer
Back View
Connects USB devices, such as a mouse, keyboard, or printer
Bottom View
Card cover Bay Hard drive Air vent Memory module cover
Tour of Your Computer
Setting Up Your Computer
Connecting to the Internet
Setting Up Your Internet Connection
Modem and Internet Connection Problems
Next window, click the appropriate option
Mail Problems
Setting Up a Printer
Connecting a USB Printer
Printer Cable
Printer Problems
Power Protection Devices
Surge Protectors
Line Conditioners
Uninterruptible Power Supplies
Turning Off Your Computer
Computer turns off after the shutdown process finishes
Using a Battery
Battery Performance
Power Meter
Checking the Battery Charge
Charging the Battery
Low-Battery Warning
Storing a Battery
Removing a Battery
Installing a Battery
Battery and Power Problems
If the battery is not charging
If battery life is short
Numeric Keypad
Using the Keyboard and Touch Pad
Dell AccessDirect Button
Reprogramming the Button
System Functions
Power Management
Keyboard Shortcuts
CD or DVD Tray
Speaker Functions
Microsoft Windows Logo Key Functions
Touch Pad
Customizing the Touch Pad
Touch Pad or Mouse Problems
External Keyboard Problems
Click Mouse
Unexpected Characters
Using CDs, DVDs, and Other Multimedia
Using CDs and DVDs
CD or DVD Problems
If you have a problem with external speakers
Sound and Speaker Problems
If you have a problem with integrated speakers
Reenable the integrated speakers
How to Copy a CD or DVD
Using Blank CD-Rs and CD-RWs
Copying CDs and DVDs
Helpful Tips
Setting Up a Home and Office Network
Connecting to a Network Adapter
Network Setup Wizard
Network Problems
On the welcome screen, click Next
Connecting to a Wireless Local Area Network
Connecting to a Wireless Network in Microsoft Windows XP
Determining Your Network Type
Setting Up a Home and Office Network
Setting Up a Home and Office Network
Setting Up a Home and Office Network
Solving Problems
Dell Diagnostics
When to Use the Dell Diagnostics
Option Function
Error Messages
Tab Function
Video and Display Problems
If the display is blank
If the display is difficult to read
Scanner Problems
If only part of the display is readable
Drive Problems
If you cannot save a file to a floppy drive
If you have problems with a hard drive
PC Card Problems
General Program Problems
Program crashes
If Your Computer Gets Wet
Resolving Other Technical Problems
Error messages appear
Program stops responding
If You Drop or Damage Your Computer
Drivers
What Is a Driver?
Reinstalling Drivers
Identifying Drivers
Manually Reinstalling Drivers for Windows XP
Resolving Software and Hardware Incompatibilities
Click the Hardware tab and click Device Manager
Using Microsoft Windows XP System Restore
Restoring Your Operating System
Using Dell PC Restore by Symantec
Select a restore point and click Next
PC Restore
Click System
Properties
Recommended Tools
Adding and Replacing Parts
Before You Begin
Shutting Down Your Computer
Hard Drive
Screws Hard drive
Memory
Returning a Hard Drive to Dell
Captive screw
Adding and Replacing Parts
Modem and Mini PCI Card
Replacing the Modem
Adding a Mini PCI Card
Mini PCI card
Mini PCI card
CD or DVD Drive
Remove the screw labeled O next to the memory module cover
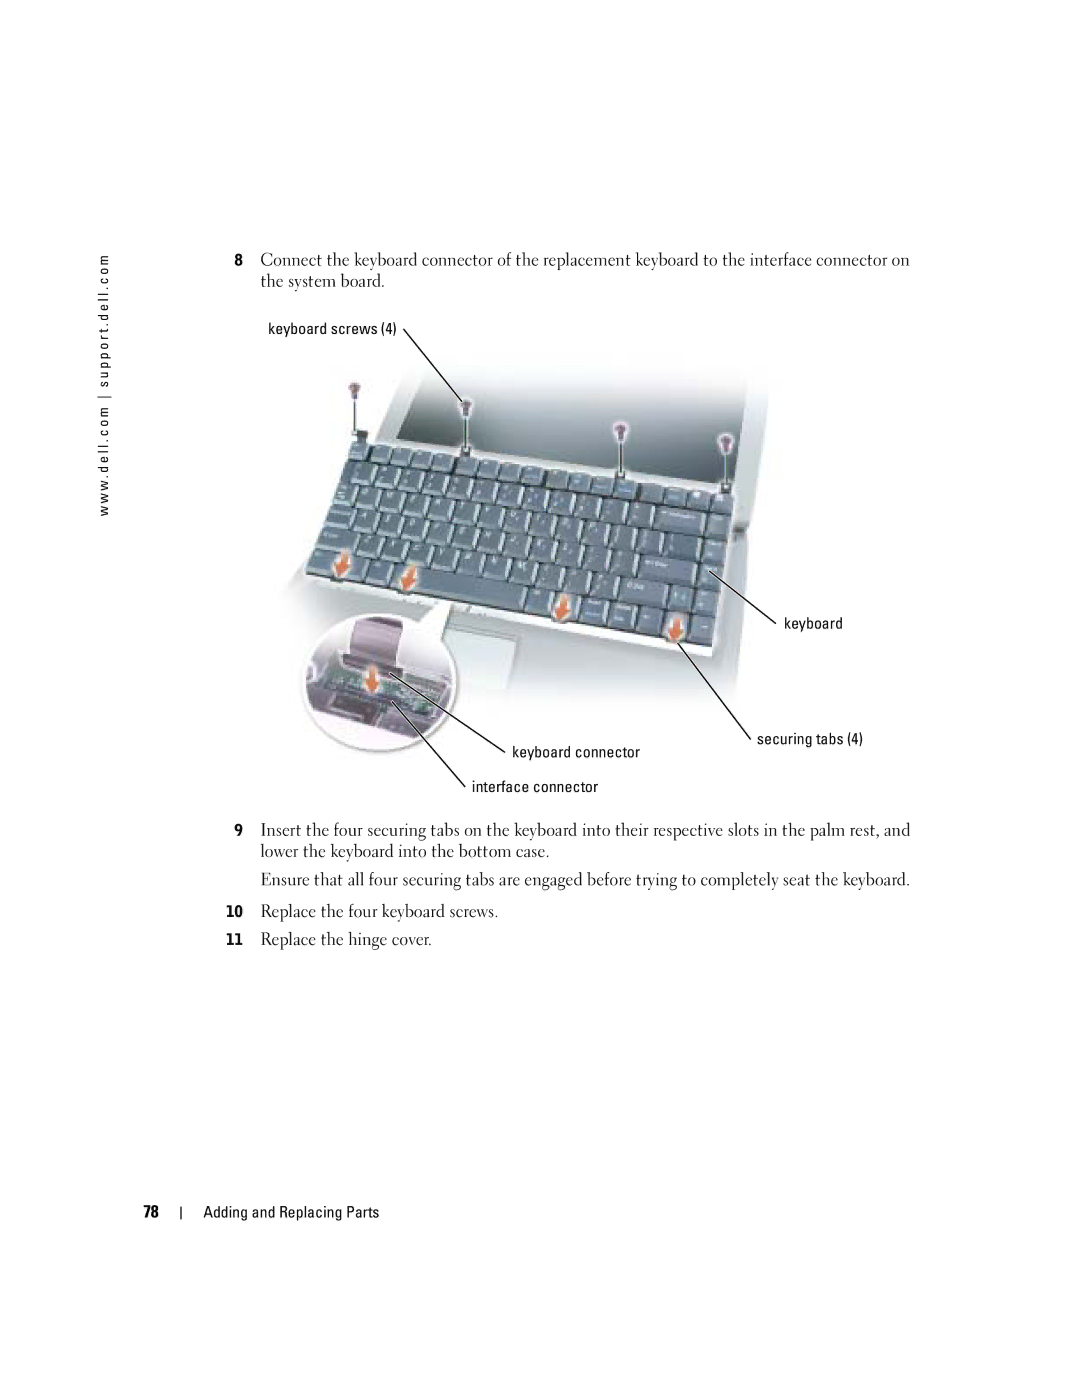
Keyboard
Remove the keyboard from the bottom case
Adding and Replacing Parts
Specifications
Appendix
Sodimm
SPWG-B
XGA
Power-intensive conditions
W . d e l l . c o m s u p p o r t . d e l l . c o m
Kg 7.57 lb
Using the System Setup Program
Viewing the System Setup Screens
Overview
System Setup Screens
Commonly Used Options
System and Battery Performance Optimization
System Performance Overview
Optimizing Power Consumption and Battery Charge Time
Dell Technical Support Policy U.S. Only
Variable Speed Fan
Definition of Third-Party Software and Peripherals
Definition of Dell-Installed Software and Peripherals
FCC Notices U.S. Only
Class a Class B
Contacting Dell
FCC Identification Information
Tech Support
AutoTech automated technical support
Sales, Customer Support, and Technical Support
General Support 01-899-753-0777
International Access Code Country Code
Greece Website support.euro.dell.com
Ireland Sales
Technical Support servers
100
101
102
103
104
105
106
107
Appendix
D ex
110 D e
Printer cable, 26 connecting, 26 setting up, 26 USB Problems
Uninterruptible power supplies See UPS