ENTER ui
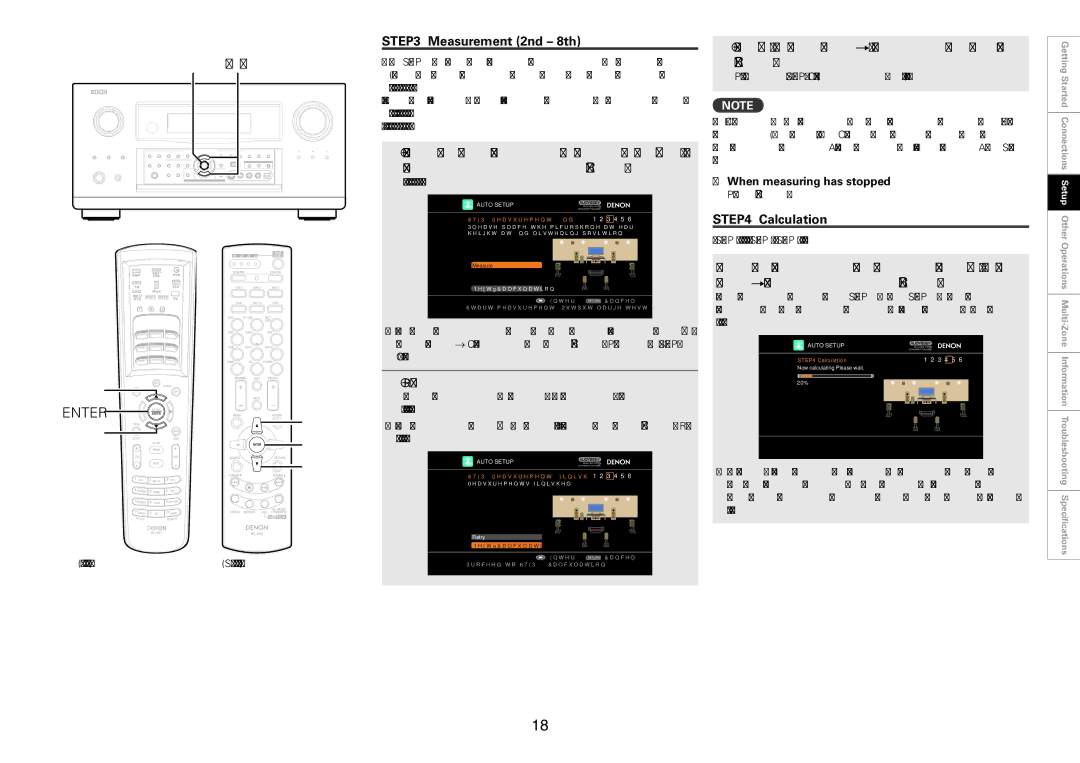
STEP3 Measurement (2nd – 8th)
•In STEP 3, you will perform measurements at multiple positions (two to eight positions) other than the main listening position. Measurements can be made in up to eight positions.
•You can achieve a more effective correction of distortion within the listening area by performing measurements at multiple positions.
•Move the provided set up microphone to the measurement point.
1Move the setup microphone to position 2, use ui toselect “Measure”, and then press ENTER.
The measurement of the second position starts.
AUTO SETUP |
STEP3 Measurement (2nd) | 1 2 3 4 5 6 |
Please place the microphone at ear height at 2nd listening position.
3Use i to select “Next ![]() Calculation” and then press
Calculation” and then press
ENTER.
Proceed to “STEP4 Calculation” (vpage 18).
NOTE
If “Caution!” is displayed on the television screen, see “Error messages” (vpage 21). Check the related items, and implement the necessary measures. After resolving the error, perform Auto Setup again.
nWhen measuring has stopped
Press ENTER.
STEP4 Calculation
In STEP 4, the measured results from STEP 2 and STEP 3 are analyzed.
Getting Started Connections Setup Other
|
|
| Measure |
|
|
|
| Next→Calculation |
|
|
|
| Enter | RETURN Cancel |
|
|
| Start measurement. Output large test tone during measuring | |
|
| b To omit measurements from the 2nd position onwards, press i, | ||
|
| select “Next | Calculation” and press ENTER. Proceed to “STEP4 | |
|
| Calculation”. |
|
|
u |
| Repeat step 1, measuring positions 3 to 8. | ||
| 2When measurement of position 8 is completed, a“Measurements | |||
ENTER | u | finished.” message is displayed. |
| |
i | b To | |||
ENTER | measure the previous point. |
| ||
|
|
|
| |
| i |
| AUTO SETUP |
|
|
|
|
| |
|
| STEP3 Measurement (Finish) | 1 2 3 4 5 6 |
|
| Measurements finished. |
|
|
| Retry |
|
|
| Next→Calculation |
|
(Main remote control unit) | (Sub remote control unit) | Enter | RETURN Cancel |
Proceed to STEP 4 (Calculation) |
|
When the measurements are completed, press i to select “Next![]() Calculation”, and press ENTER.
Calculation”, and press ENTER.
The measured results from STEP 2 and STEP 3 are automatically analyzed, and the frequency response of each speaker in the listening room is determined.
AUTO SETUP |
STEP4 Calculation | 1 2 3 4 5 6 |
Now calculating…Please wait. |
|
20% |
b It takes a few minutes for analysis to complete. The time required for this analysis depends on the number of speakers connected. The more connected speakers there are, the longer it takes to perform analysis.
Operations
18