ENGLISH
• PURE DIRECT (AUDIO) MODE: |
The circuits not being used (output signals) |
can be turned off. |
NORMAL: |
This turns the PURE DIRECT mode off. All |
signals are output. |
VIDEO OFF: |
This turns the video output off. Use this when |
only using audio signals. |
DIGITAL OFF: |
This turns the digital output off. |
ALL OFF: |
This turns the digital output, display and video |
output off. |
• DVI (VIDEO output) SETUP MODE: |
Use this to set the DVI connector’s video |
signal output. |
DVI OFF: |
No signal from the |
480P: |
480P video signals are output from the |
connector. |
720P: |
720P video signals are output from the |
connector. |
1080i: |
1080i video signals are output from the |
connector. |
✽ When the |
signals, no programme signals from the |
component video connector. |
• DVI BK (Black) LEVEL: |
This switches the digital RGB video level (data |
range) of the |
NORMAL: |
Video level (data range): 16 (black) to 235 |
(white) |
ENHANCED: |
Video level (data range): 0 (black) to 246 |
(white) |
✽ When the |
the black may seem to stand out, |
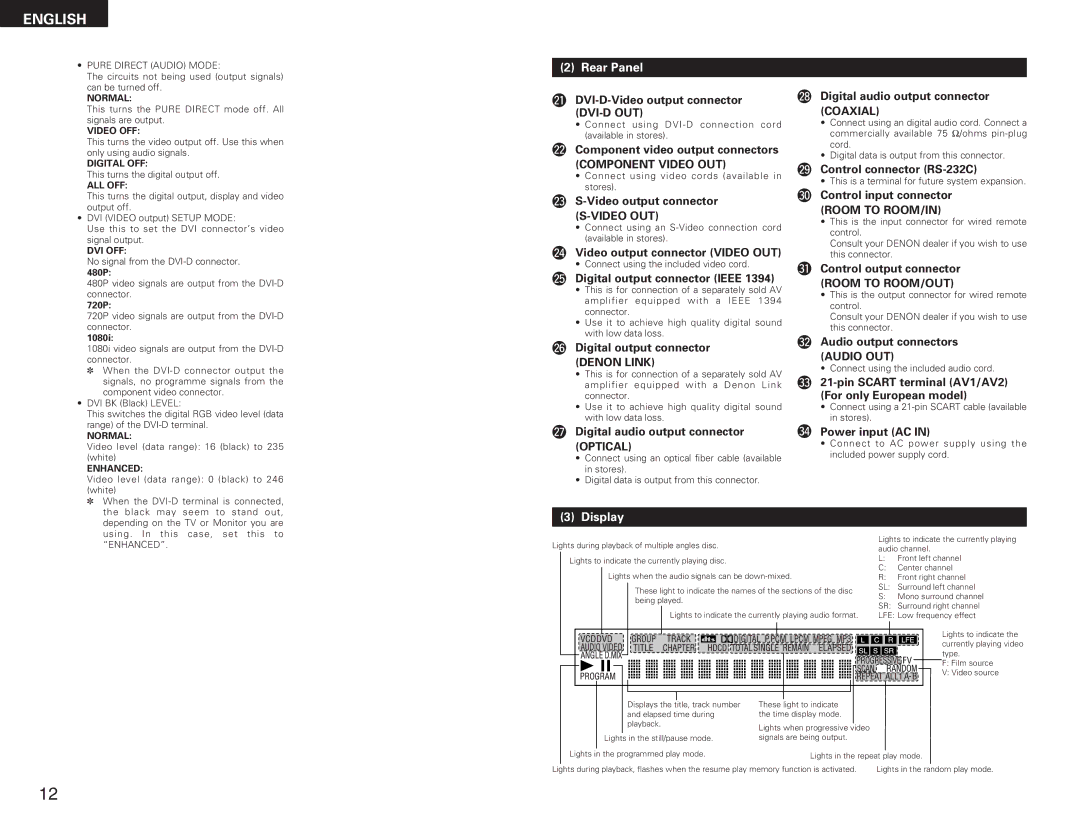
(2) Rear Panel
@1
•Connect using
@2 Component video output connectors
(COMPONENT VIDEO OUT)
•Connect using video cords (available in stores).
@3
•Connect using an
@4 Video output connector (VIDEO OUT)
•Connect using the included video cord.
@5 Digital output connector (IEEE 1394)
•This is for connection of a separately sold AV amplifier equipped with a IEEE 1394 connector.
•Use it to achieve high quality digital sound with low data loss.
@6 Digital output connector
(DENON LINK)
•This is for connection of a separately sold AV amplifier equipped with a Denon Link connector.
•Use it to achieve high quality digital sound with low data loss.
@7 Digital audio output connector (OPTICAL)
•Connect using an optical fiber cable (available in stores).
•Digital data is output from this connector.
@8 Digital audio output connector (COAXIAL)
•Connect using an digital audio cord. Connect a commercially available 75 Ω/ohms
•Digital data is output from this connector.
@9 Control connector
•This is a terminal for future system expansion.
#0 Control input connector (ROOM TO ROOM/IN)
•This is the input connector for wired remote control.
Consult your DENON dealer if you wish to use this connector.
#1 Control output connector
(ROOM TO ROOM/OUT)
•This is the output connector for wired remote control.
Consult your DENON dealer if you wish to use this connector.
#2 Audio output connectors (AUDIO OUT)
•Connect using the included audio cord.
#3
•Connect using a
#4 Power input (AC IN)
•Connect to AC power supply using the included power supply cord.
depending on the TV or Monitor you are |
using. In this case, set this to |
“ENHANCED”. |
(3) Display
Lights to indicate the currently playing
Lights during playback of multiple angles disc. |
|
|
|
|
|
|
|
| audio channel. | ||||||||||||||
|
|
|
|
|
|
|
|
|
|
|
|
|
|
|
| ||||||||
|
|
|
|
|
|
|
|
|
|
|
|
|
|
|
| L: | Front left channel | ||||||
| Lights to indicate the currently playing disc. |
|
|
|
|
|
| ||||||||||||||||
|
|
|
|
|
|
|
|
| C: | Center channel | |||||||||||||
|
|
|
|
|
|
|
|
|
|
|
|
|
|
|
| ||||||||
|
|
|
|
|
|
|
|
|
|
|
|
|
| ||||||||||
|
|
|
| Lights when the audio signals can be |
|
|
|
|
| R: | Front right channel | ||||||||||||
|
|
|
|
|
|
|
|
|
|
|
|
|
|
|
| SL: | Surround left channel | ||||||
|
|
|
|
|
| These light to indicate the names of the sections of the disc |
|
| |||||||||||||||
|
|
|
|
|
|
|
|
| S: | Mono surround channel | |||||||||||||
|
|
|
|
|
| being played. |
|
|
|
|
|
|
|
| |||||||||
|
|
|
|
|
|
|
|
|
|
|
|
|
| SR: | Surround right channel | ||||||||
|
|
|
|
|
|
|
|
|
|
|
|
|
|
|
| ||||||||
|
|
|
|
|
|
| Lights to indicate the currently playing audio format. |
|
|
| LFE: Low frequency effect | ||||||||||||
|
|
|
|
|
|
|
|
|
|
|
|
|
|
|
|
|
|
|
|
|
|
| Lights to indicate the |
|
|
|
|
|
|
|
|
|
|
|
|
|
|
|
|
|
|
|
|
|
|
| |
|
|
|
|
|
|
|
|
|
|
|
|
|
|
|
|
|
|
|
|
|
|
| |
|
|
|
|
|
|
|
|
|
|
|
|
|
|
|
|
|
|
|
|
|
|
| currently playing video |
|
|
|
|
|
|
|
|
|
|
|
|
|
|
|
|
|
|
|
|
| |||
|
|
|
|
|
|
|
|
|
|
|
|
|
|
|
|
|
|
|
|
|
|
| type. |
|
|
|
|
|
|
|
|
|
|
|
|
|
|
|
|
|
|
| |||||
|
|
|
|
|
|
|
|
|
|
|
|
|
|
|
|
|
|
|
|
|
|
| F: Film source |
|
|
|
|
|
|
|
|
|
|
|
|
|
|
|
|
|
|
|
|
|
|
| |
|
|
|
|
|
|
|
|
|
|
|
|
|
|
|
|
|
|
|
|
|
|
| V: Video source |
|
|
|
|
|
|
|
|
|
|
|
|
|
|
|
|
|
|
|
|
|
|
| |
|
|
|
|
|
|
|
|
|
|
|
|
|
|
|
|
|
|
| |||||
|
|
|
|
| Displays the title, track number | These light to indicate |
|
|
|
|
|
|
|
|
|
| |||||||
|
|
|
|
| and elapsed time during |
| the time display mode. |
|
|
|
|
|
|
|
|
|
|
| |||||
|
|
|
|
| playback. |
|
|
|
|
|
|
|
|
|
|
|
|
|
|
|
| ||
|
|
|
|
|
| Lights when progressive video |
|
|
|
|
|
|
|
|
|
| |||||||
|
|
|
|
|
|
|
|
|
|
|
|
|
|
|
|
|
|
| |||||
|
|
| Lights in the still/pause mode. |
| signals are being output. |
|
|
|
|
|
|
|
|
|
| ||||||||
|
|
|
|
|
|
|
|
|
|
|
|
|
|
|
|
|
|
|
|
|
|
|
|
|
|
|
|
|
|
|
|
|
|
|
|
|
|
|
|
|
|
|
|
|
|
|
|
| Lights in the programmed play mode. |
|
|
|
| ||||||||||||||||||
|
|
| Lights in the repeat play mode. |
| |||||||||||||||||||
|
|
|
|
|
|
|
|
|
|
|
|
|
|
|
|
|
|
|
|
|
|
|
|
|
|
|
|
|
|
|
|
|
|
|
|
|
|
|
|
|
|
|
|
|
|
|
|
Lights during playback, flashes when the resume play memory function is activated. |
|
| Lights in the random play mode. | ||||||||||||||||||||
|
|
|
|
|
|
|
|
|
|
|
|
|
|
|
|
|
|
|
|
|
|
|
|
12