2
B When “FILTER” is selected: | SELECT | |
Turning the select knob will display the following | 50kHz | |
| ||
setting modes on the display. |
| |
50 kHz: (Factory default) | PUSH ENTER | |
When playing Super Audio CDs, high | 100kHz | |
frequencies of 50 kHz and higher are cut. | ||
Main unit | ||
100 kHz: When playing Super Audio CDs, high | ||
| ||
frequencies of 100 kHz and higher are cut. |
|
✽Set to 100 kHz when a high frequency compatible AV amplifier is connected.
Select the item that you wish to set and press the select knob to define it.
(Exit the setting mode automatically.)
B When “PURE DIRECT” is selected: | SELECT |
|
|
|
|
|
| |
Turning the select knob will display the following |
|
|
|
|
|
| ||
| NORMAL |
| ||||||
|
|
|
|
|
|
| ||
setting modes on the display. |
|
|
|
|
|
|
| |
NORMAL: (Factory default) | PUSH ENTER |
|
|
|
|
| ||
| All signals out. (Stop the direct mode) |
|
|
|
|
|
|
|
|
|
|
|
|
|
|
| |
|
| VIDEO | OFF |
| ||||
VIDEO OFF: Video signals are not output. |
|
|
|
|
|
|
| |
Main unit |
|
|
|
|
| |||
DIGITAL OFF: Digital signals are not output. |
|
|
|
|
|
|
| |
ALL OFF: | No indicate in Display of the main unit, |
| DIGITAL | OFF |
|
|
| |
| and video and digital signals are not |
|
| |||||
|
|
|
|
|
|
|
| |
| output. (except analog audio output) |
|
|
|
|
|
|
|
Select the item that you wish to set and press the |
|
|
|
|
|
|
| |
select knob to define it. |
| ALL OFF |
| |||||
(Exit the setting mode automatically.) |
|
|
|
|
|
|
| |
|
|
|
|
|
|
| ||
|
|
|
|
|
|
|
| |
B When “DVI SETUP” is selected: | SELECT |
|
|
|
|
|
| |
Turning the select knob will display the following |
| DVI OFF |
| |||||
|
|
|
|
|
|
| ||
setting modes on the display. |
|
|
|
|
|
|
| |
DVI OFF: (Factory default) | PUSH ENTER |
|
|
|
|
| ||
No output the signals from |
| 480P |
|
|
|
|
| |
|
|
|
|
|
| |||
|
|
|
|
|
| |||
480P: Outputs the image from the |
|
|
|
|
|
|
| |
Main unit |
|
|
|
|
| |||
at 480P. |
|
|
|
|
| |||
|
|
|
|
|
|
| ||
720P: Outputs the image from the |
|
|
|
|
|
|
| |
at 720P. |
| 720P |
|
|
|
|
| |
1080i: Outputs the image from the |
|
|
|
|
|
|
| |
|
|
|
|
|
|
| ||
at 1080i. |
|
|
|
|
|
|
| |
Select the item that you wish to set and press the |
|
|
|
|
|
|
| |
select knob to define it. |
| 1080i |
| |||||
When playing back a |
|
|
|
|
|
|
| |
connector outputs a 576P signal. |
|
|
|
|
|
|
| |
For output of a 480P, 720P or 1080i signal, be sure to |
|
|
|
|
|
|
| |
set the TV TYPE option to NTSC. (See page 18.) |
|
|
|
|
|
|
| |
|
|
|
|
|
|
|
| |
B When “DVI BK (Black) LEVEL” is selected: | SELECT |
|
|
|
|
|
| |
Turning the select knob will display the following |
| NORMAL |
| |||||
|
|
|
|
|
|
| ||
|
|
|
|
|
|
| ||
setting modes on the display. |
|
|
|
|
|
|
| |
NORMAL: (Factory default) | PUSH ENTER |
|
|
|
|
| ||
|
|
|
|
|
|
| ||
|
|
|
|
|
|
| ||
Signals are output from the |
| ENHANCED |
| |||||
digital RGB video level (data range) of 16 (black) to |
|
|
|
|
|
|
| |
Main unit |
|
|
|
|
| |||
235(white).
ENHANCED:
Signals are output from the
246(white).
✽When the
Select the item that you wish to set and press the select knob to define it.
(Exit the setting mode automatically.)
ENGLISH
11ADJUSTING THE PICTURE QUALITY
ON | OFF |
|
|
| PROG / DIR |
1 | 2 | 3 |
|
| CLEAR |
4 | 5 | 6 |
|
| SRS.TS |
7 | 8 | 9 |
|
| CALL RETURN |
0 | +10 |
|
TOP MENU |
| DISPLAY |
T. MENU |
| DISP. |
2, 3, 4, 5, 6, 7 |
| ENTER |
|
| ||
2, 3, 4, 5, 6, 7 |
|
|
| PLAY |
| |
| MENU |
| STILL / |
|
| |
|
| STOP | PAUSE |
| ||
| SKIP | SLOW / SEARCH |
| |||
| ANGLE | SUBTITLE AUDIO | SEARCH MODE |
| ||
| REPEAT | RANDOM | MARKER |
| ||
| SETUP | DIMMER PIC.ADJ |
| 1 | ||
|
| ZOOM | PAGE | |||
|
|
|
| |||
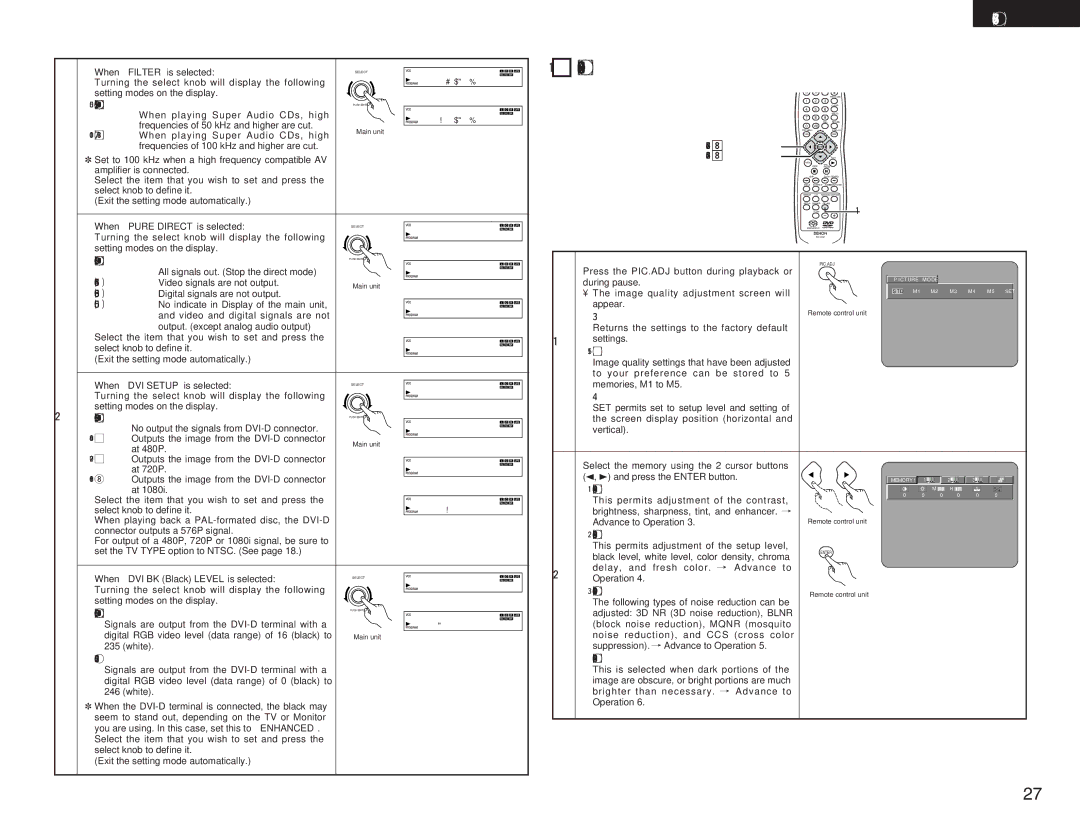
Press the PIC.ADJ button during playback or |
|
| PIC.ADJ |
| ||
|
|
|
|
| ||
during pause. |
|
|
|
| P I C TURE MODE | |
|
|
|
|
| ||
• The image quality adjustment screen will |
|
|
|
| S TD M 1 M 2 M 3 M 4 M 5 SET | |
appear. | Remote control unit | |||||
STD | ||||||
|
|
|
|
| ||
Returns the settings to the factory default |
|
|
|
|
| |
1settings.
M1 TO M5
Image quality settings that have been adjusted to your preference can be stored to 5 memories, M1 to M5.
SET
SET permits set to setup level and setting of the screen display position (horizontal and vertical).
Select the memory using the 2 cursor buttons |
|
|
|
|
|
|
(0, 1) and press the ENTER button. | MEMORY 1 | 1 |
| 2 | 3 |
|
IMAGE QUALITY ADJUSTMENT 1 |
|
| M | H |
|
|
This permits adjustment of the contrast, | 0 | 0 | 0 | 0 | 0 | 0 |
|
|
|
|
|
| |
brightness, sharpness, tint, and enhancer. / |
|
|
|
|
|
|
Advance to Operation 3. | Remote control unit |
|
|
|
|
|
| IMAGE QUALITY ADJUSTMENT 2 |
|
|
| This permits adjustment of the setup level, | ENTER | |
| black level, white level, color density, chroma | ||
|
| ||
2 | delay, and fresh color. / Advance | to |
|
Operation 4. |
|
| |
| NOISE REDUCTION (ADJUSTMENT 3) |
| Remote control unit |
The following types of noise reduction can be adjusted: 3D NR (3D noise reduction), BLNR (block noise reduction), MQNR (mosquito noise reduction), and CCS (cross color suppression). / Advance to Operation 5.
GAMMA CORRECTION
This is selected when dark portions of the image are obscure, or bright portions are much brighter than necessary. / Advance to Operation 6.
27