ENGLISH
7LOADING DISCS
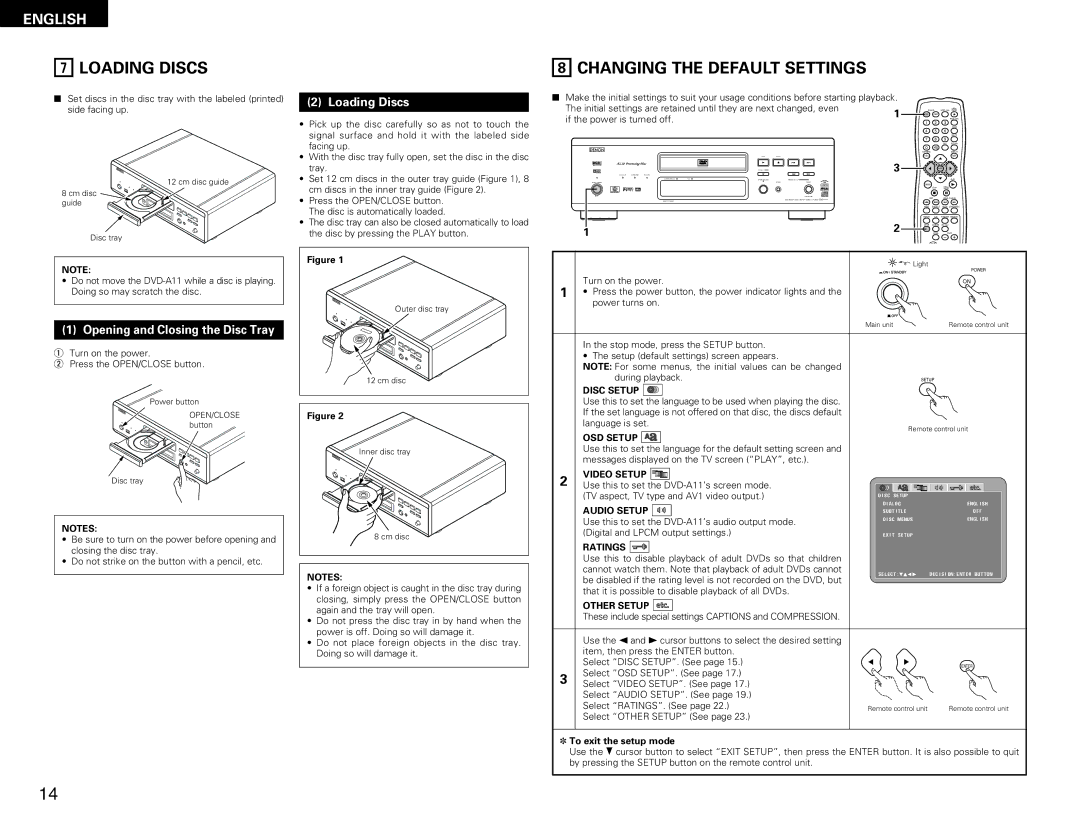
8CHANGING THE DEFAULT SETTINGS
2Set discs in the disc tray with the labeled (printed) side facing up.
12 cm disc guide
8 cm disc![]() guide
guide
Disc tray
(2)Loading Discs
•Pick up the disc carefully so as not to touch the signal surface and hold it with the labeled side facing up.
•With the disc tray fully open, set the disc in the disc tray.
•Set 12 cm discs in the outer tray guide (Figure 1), 8 cm discs in the inner tray guide (Figure 2).
•Press the OPEN/CLOSE button. The disc is automatically loaded.
•The disc tray can also be closed automatically to load the disc by pressing the PLAY button.
2Make the initial settings to suit your usage conditions before starting playback.
The initial settings are retained until they are next changed, even | 1 | |||
if the power is turned off. |
|
|
| |
|
|
|
| |
B |
|
|
|
|
PLAY | STOP |
|
|
|
1 | 2 | 8 | 9 | 3 |
STILL / PAUSE |
|
|
| |
3 |
| 6 | 7 | |
OPEN 5/ CLOSE |
| MODE SET UP |
|
|
|
| DVD |
| |
1 |
|
|
| 2 |
|
|
|
| |
POWER | NTSC / PAL | OPEN / | |
CLOSE | |||
ON | OFF |
|
|
|
|
| PROG / DIR |
1 | 2 | 3 |
|
|
|
| CLEAR |
4 | 5 | 6 |
|
|
|
| SRS.TS |
7 | 8 | 9 |
|
|
| CALL | RETURN |
0 | +10 |
|
|
TOP MENU |
|
| DISPLAY |
T. MENU |
|
| DISP. |
| ENTER |
| |
|
|
| PLAY |
MENU |
| STILL / |
|
| STOP |
| |
| PAUSE |
| |
SKIP | SLOW / SEARCH | ||
ANGLE SUBTITLE AUDIO SEARCH MODE
REPEAT
SETUP DIMMER PIC.ADJ
ZOOMPAGE
NOTE:
•Do not move the
(1) Opening and Closing the Disc Tray
qTurn on the power.
wPress the OPEN/CLOSE button.
Power button
OPEN/CLOSE button
Disc tray
NOTES:
•Be sure to turn on the power before opening and closing the disc tray.
•Do not strike on the button with a pencil, etc.
Figure 1 |
|
| Light |
|
|
|
|
| POWER |
1 | Turn on the power. |
|
| ON |
• Press the power button, the power indicator lights and the |
|
|
| |
Outer disc tray | power turns on. |
|
|
|
|
|
|
| |
|
| Main unit |
| Remote control unit |
| In the stop mode, press the SETUP button. |
|
|
|
| • The setup (default settings) screen appears. |
|
|
|
| NOTE: For some menus, the initial values can be changed |
|
|
|
12 cm disc | during playback. |
| SETUP | |
| DISC SETUP |
|
|
|
| Use this to set the language to be used when playing the disc. |
|
|
|
Figure 2 | If the set language is not offered on that disc, the discs default |
|
|
|
language is set. |
|
|
| |
| Remote control unit | |||
| OSD SETUP | |||
|
|
|
| |
Inner disc tray | Use this to set the language for the default setting screen and |
|
|
|
messages displayed on the TV screen (“PLAY”, etc.). |
|
|
| |
|
|
|
| |
2 | VIDEO SETUP |
|
|
|
Use this to set the |
|
|
| |
| (TV aspect, TV type and AV1 video output.) | D I SC SE TUP |
|
|
| AUDIO SETUP | D I AL OG |
| ENGL I SH |
| SUBT I TL E |
| OF F | |
| Use this to set the | D I SC MENUS |
| ENGL I SH |
|
|
|
| |
8 cm disc | (Digital and LPCM output settings.) | E X I T SE TUP |
|
|
|
|
|
| |
| RATINGS |
|
|
|
| Use this to disable playback of adult DVDs so that children |
|
|
|
NOTES: | cannot watch them. Note that playback of adult DVDs cannot | SE L ECT : |
| DEC I S I ON : ENTER BUT TON |
be disabled if the rating level is not recorded on the DVD, but |
| |||
|
|
| ||
• If a foreign object is caught in the disc tray during | that it is possible to disable playback of all DVDs. |
|
|
|
closing, simply press the OPEN/CLOSE button | OTHER SETUP |
|
|
|
again and the tray will open. |
|
|
| |
These include special settings CAPTIONS and COMPRESSION. |
|
|
| |
• Do not press the disc tray in by hand when the |
|
|
| |
|
|
|
| |
power is off. Doing so will damage it. | Use the 0 and 1 cursor buttons to select the desired setting |
|
|
|
• Do not place foreign objects in the disc tray. |
|
|
| |
Doing so will damage it. | item, then press the ENTER button. |
|
|
|
| Select “DISC SETUP”. (See page 15.) |
|
| ENTER |
3 | Select “OSD SETUP”. (See page 17.) |
|
|
|
Select “VIDEO SETUP”. (See page 17.) |
|
|
| |
| Select “AUDIO SETUP”. (See page 19.) |
|
|
|
| Select “RATINGS”. (See page 22.) | Remote control unit | Remote control unit | |
| Select “OTHER SETUP” (See page 23.) |
|
|
|
✽To exit the setup mode
Use the ª cursor button to select “EXIT SETUP”, then press the ENTER button. It is also possible to quit by pressing the SETUP button on the remote control unit.
14