When the Display Position is Selected and Adjusted:
• Press the cursor button (ª), then select the |
P I C TURE MODE
S TD M 1 M 2 M 3 M 4 M 5 SET
12USING THE ON-SCREEN DISPLAY
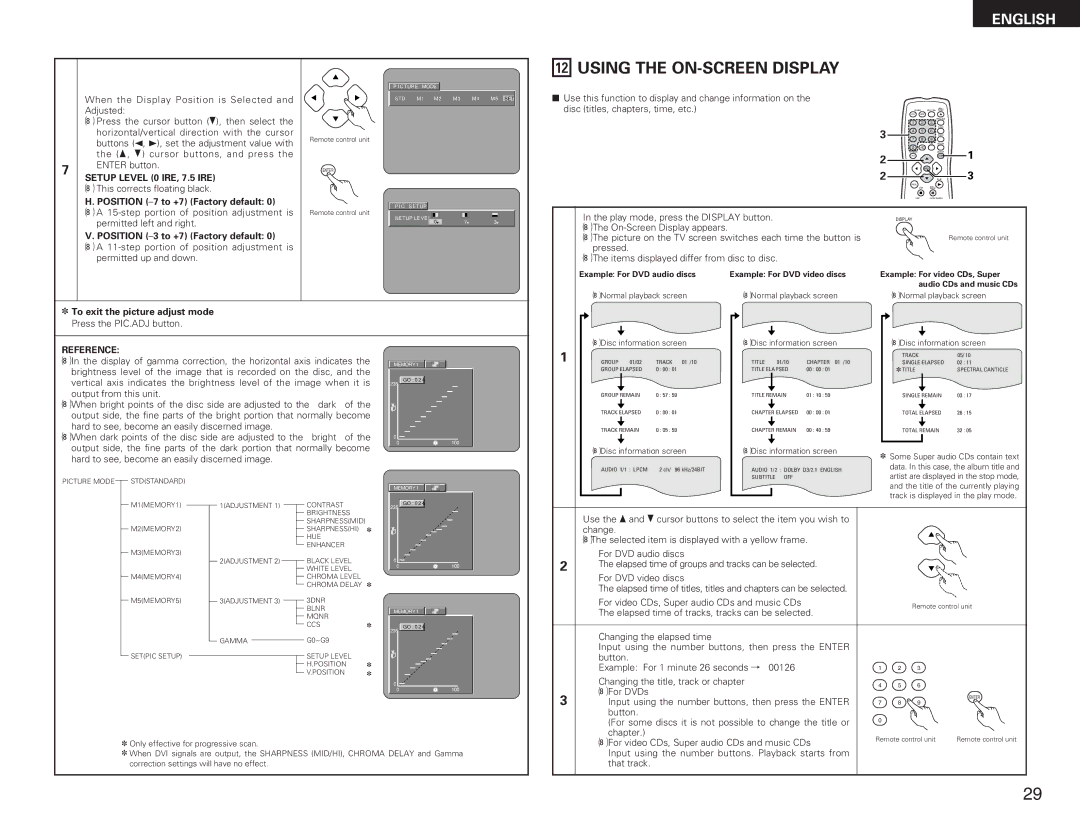
2Use this function to display and change information on the disc (titles, chapters, time, etc.)
ENGLISH
| POWER | OPEN / |
| NTSC / PAL CLOSE | |
ON | OFF |
|
|
| PROG / DIR |
7
horizontal/vertical direction with the cursor |
buttons (0, 1), set the adjustment value with |
the (•, ª) cursor buttons, and press the |
ENTER button. |
SETUP LEVEL (0 IRE, 7.5 IRE)
•This corrects floating black.
H. POSITION
•A
V. POSITION (–3 to +7) (Factory default: 0)
•A
Remote control unit
ENTER
Remote control unit
P I C | S E T UP |
|
|
S E T UP LE VE L | 7 | 3 | |
| 0 | ||
| 1 | 2 | 3 |
|
3 |
|
| CLEAR |
|
4 | 5 | 6 |
| |
|
| SRS.TS |
| |
7 | 8 | 9 |
| |
|
|
| CALL RETURN |
|
| 0 | +10 |
| 1 |
| TOP MENU |
| DISPLAY | |
2 | T. MENU |
| DISP. |
|
|
|
|
| |
2 |
| ENTER |
| 3 |
|
| PLAY | ||
| MENU |
| STILL / |
|
|
| STOP |
| |
|
| PAUSE |
| |
| SKIP | SLOW / SEARCH |
| |
In the play mode, press the DISPLAY button. | DISPLAY |
•The
• The picture on the TV screen switches each time the button is | Remote control unit |
pressed. |
|
•The items displayed differ from disc to disc.
✽To exit the picture adjust mode Press the PIC.ADJ button.
Example: For DVD audio discs | Example: For DVD video discs | Example: For video CDs, Super |
|
| audio CDs and music CDs |
• Normal playback screen | • Normal playback screen | • Normal playback screen |
• Disc information screen | • Disc information screen | • Disc information screen |
REFERENCE:
•In the display of gamma correction, the horizontal axis indicates the brightness level of the image that is recorded on the disc, and the vertical axis indicates the brightness level of the image when it is output from this unit.
•When bright points of the disc side are adjusted to the “dark” of the output side, the fine parts of the bright portion that normally become hard to see, become an easily discerned image.
•When dark points of the disc side are adjusted to the “bright” of the output side, the fine parts of the dark portion that normally become hard to see, become an easily discerned image.
MEMORY 1
GO : 0 2 4
235
0
0 | 100 |
1 |
|
|
|
|
|
|
|
| TRACK | 05/ 10 | |
GROUP 01/02 | TRACK | 01 /10 | TITLE | 01/10 | CHAPTER 01 /10 | SINGLE ELAPSED | 02 : 11 | ||||
| GROUP ELAPSED | 0 : 00 : 01 | TITLE ELAPSED | 00 : 00 : 01 | ✽ TITLE | SPECTRAL CANTICLE | |||||
|
|
|
|
|
|
|
|
|
|
|
|
| GROUP REMAIN | 0 : 57 : 59 | TITLE REMAIN | 01 : 10 : 59 | SINGLE REMAIN | 03 : 17 | |||||
|
|
|
|
|
|
|
|
|
|
|
|
| TRACK ELAPSED | 0 : 00 : 01 | CHAPTER ELAPSED | 00 : 00 : 01 | TOTAL ELAPSED | 26 : 15 | |||||
|
|
|
|
|
|
|
|
|
|
|
|
| TRACK REMAIN | 0 : 05 : 59 | CHAPTER REMAIN | 00 : 40 : 59 | TOTAL REMAIN | 32 : 05 | |||||
|
|
|
|
|
|
|
|
|
|
|
|
| • Disc information screen | • Disc information screen | ✽ Some Super audio CDs contain text | ||||||||
|
|
|
|
|
|
|
|
| |||
| AUDIO 1/1 : LPCM | 2 ch/ | 96 kHz/24BIT | AUDIO 1/2 : DOLBY D3/2.1 ENGLISH | data. In this case, the album title and | ||||||
|
|
|
|
| SUBTITLE | OFF |
| artist are displayed in the stop mode, | |||
PICTURE MODE
STD(STANDARD)
M1(MEMORY1)
M2(MEMORY2)
M3(MEMORY3)
M4(MEMORY4)
M5(MEMORY5)
SET(PIC SETUP)
1(ADJUSTMENT 1)
2(ADJUSTMENT 2)
3(ADJUSTMENT 3)
GAMMA
CONTRAST BRIGHTNESS SHARPNESS(MID) SHARPNESS(HI) ✽
HUE ENHANCER
BLACK LEVEL
WHITE LEVEL CHROMA LEVEL CHROMA DELAY ✽
3DNR
BLNR
MQNR
CCS✽
G0~G9
SETUP LEVEL
H.POSITION ✽
V.POSITION ✽
MEMORY 1
GO : 0 2 4
235
0
0 | 100 |
MEMORY 1
GO : 0 2 4
235
0
0 | 100 |
and the title of the currently playing |
track is displayed in the play mode. |
Use the • and ª cursor buttons to select the item you wish to change.
• The selected item is displayed with a yellow frame.
qFor DVD audio discs
2The elapsed time of groups and tracks can be selected.
w For DVD video discs |
| |
The elapsed time of titles, titles and chapters can be selected. |
| |
e For video CDs, Super audio CDs and music CDs | Remote control unit | |
The elapsed time of tracks, tracks can be selected. | ||
|
qChanging the elapsed time
Input using the number buttons, then press the ENTER
button. |
|
|
|
Example: For 1 minute 26 seconds / “00126” | 1 | 2 | 3 |
w Changing the title, track or chapter | 4 | 5 | 6 |
•For DVDs
✽Only effective for progressive scan.
✽When DVI signals are output, the SHARPNESS (MID/HI), CHROMA DELAY and Gamma correction settings will have no effect.
3 | Input using the number buttons, then press the ENTER | 7 8 9 | ENTER |
| |||
| button. |
|
|
| (For some discs it is not possible to change the title or | 0 |
|
|
|
| |
| chapter.) | Remote control unit | Remote control unit |
| • For video CDs, Super audio CDs and music CDs | ||
|
|
| |
| Input using the number buttons. Playback starts from |
|
|
| that track. |
|
|
29