Other connections | 08 |
Using the SIRIUS Menu
The SIRIUS Menu provides additional SIRIUS Radio features.1
1Press TOP MENU.
2Use / to select a menu item then press ENTER. Choose between the following menu items:
•Channel Skip/Add – Use / and ENTER to select channels you would like to remove/restore from/to the channel guide.
•Parental Lock – Use / and ENTER to select channels you would like to place under parental lock. Channels put under parental lock are not displayed in the Channel Guide, but may be accessed by directly inputting their channel number and providing the parental lock password.
•Antenna Aiming – Check the strength of satellite and terrestrial reception.
•Memory Recall – Use / to browse your saved song information (see Tip above).
•Password Set – Set the parental lock password.
3When you’re finished press TOP MENU to return to the reception display.
TrueHD,
HDMI OUT
|
|
|
|
|
|
|
| ANTENNA | AUDIO |
| |||
& SOURCE |
|
|
|
|
|
| PHONO |
| |||||
/REC SEL |
|
|
|
|
|
|
|
| |||||
OUT1 |
|
|
|
| & SOURCE | FM UNBAL 75 Ω | AM LOOP |
|
| ||||
ZONE3 |
|
|
| IN |
| IR |
|
|
|
|
| IN |
|
|
|
|
| 1 |
|
| ZONE2 | ZONE2 |
| ||||
OUT2 |
|
|
|
|
| OUT |
|
| |||||
|
|
| MAIN |
|
|
|
| R | L |
|
| ||
|
|
|
|
|
|
|
| CD |
| ||||
|
|
|
| IN |
|
|
|
|
|
|
|
| |
|
|
|
|
|
|
|
|
| OUT |
| IN |
| |
LAN (10/100) |
| 2 |
|
|
|
|
|
|
| ||||
|
|
| HDMI | ZONE2 |
|
|
| MONI- |
|
|
|
|
|
OPTICAL |
|
| IN 1 |
| IN 1 (DVD/LD) | TOR | MONI- | DVD/LD |
|
|
| ||
|
|
|
| CONTROL | OUT | TOR |
|
|
| ||||
IN 1 |
|
|
|
| IN 2 (BD) |
|
| OUT | IN |
|
|
| |
|
|
| IN |
| ASSIGN- |
|
|
|
| OUT |
| ||
(TV/SAT) |
|
|
|
|
|
|
|
|
| ||||
|
|
|
|
|
| ABLE |
|
| BD |
|
|
| |
IN 2 |
|
| IN 2 | OUT |
| 1 | 2 |
|
| IN |
|
| |
(BD) |
|
|
|
|
|
|
|
|
|
|
| ||
|
|
|
| IN 1 |
|
| OUT |
|
|
|
| TAPE/ |
|
|
|
|
|
|
|
|
| TV/SAT |
| MD |
| ||
|
|
|
| Y |
|
| Y |
| IN 1 |
| IN |
| |
IN 3 |
|
|
|
|
|
| IN |
|
| ||||
(DVR/ |
|
|
| (DVD/ |
|
|
|
|
|
|
| R |
|
VCR 1) |
|
| LD) |
|
|
|
|
| VIDEO / |
| R |
| |
IN 4 |
|
| IN 3 | PB |
|
| PB |
|
|
|
|
| |
|
|
|
|
| IN 2 | GAME 1 |
|
|
| ||||
|
|
|
|
|
|
|
| IN |
| SUBW. | C | ||
| 1 | 4 |
|
|
|
|
|
|
|
|
| ||
ASSIGN- |
|
|
|
|
|
|
|
|
|
|
| ||
ABLE |
|
| PR |
|
| PR |
|
| OUT |
|
|
| |
IN 1 | 1 | 2 |
|
|
|
|
|
|
| DVR/ |
| SUR- |
|
(DVD/ |
|
| IN 4 | IN 2 |
|
| IN 3 |
|
| VCR 1 |
| ROUND |
|
LD) |
|
|
|
|
|
|
|
|
| ||||
IN 2 (CD) |
|
| Y |
|
| Y |
|
| IN |
|
|
| |
|
| (BD) |
|
|
|
|
|
|
| R |
| ||
COAXIAL |
|
|
|
|
|
|
|
|
| ||||
|
|
|
|
|
|
|
|
|
|
| |||
|
|
| OUT | PB |
|
| PB |
|
| OUT |
|
|
|
IN |
|
|
|
|
|
|
|
| DVR/ |
|
|
| |
|
|
|
|
|
|
|
|
|
| SURROUND B | |||
|
|
|
|
|
|
|
|
|
| VCR 2 |
| ||
XM |
|
|
| PR |
|
| PR |
|
| IN |
| 1 |
|
| ASSIGNABLE |
| (VIDEO/GAME 1) |
|
|
|
|
| |||||
|
|
|
| R | L | 12 V TRIGGE | |||||||
|
| 1 | 4 | ASSIGNABLE | 1 | 3 |
|
| (DC OUT 12V/ |
| |||
|
| DIGITAL | COMPONENT VIDEO | VIDEO | AUDIO | TOTAL 50 mA MAX) |
| ||||||
|
|
|
| ||||||||||
|
|
|
|
|
|
|
|
|
|
|
| ||
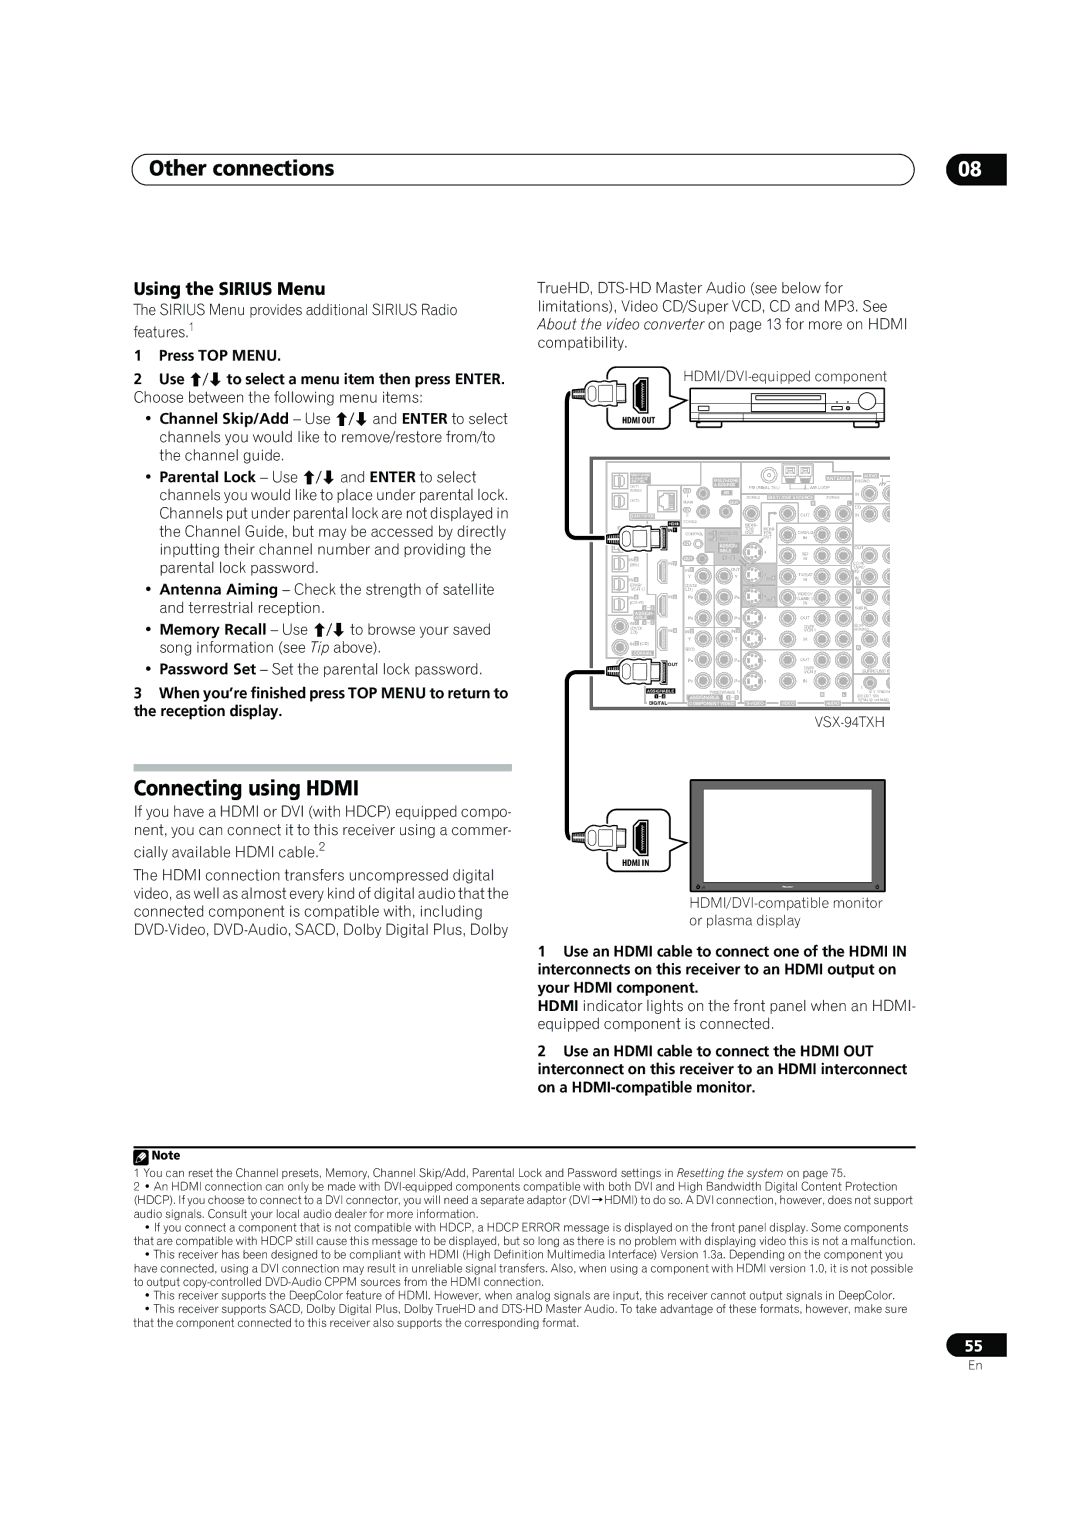
Connecting using HDMI
If you have a HDMI or DVI (with HDCP) equipped compo- nent, you can connect it to this receiver using a commer-
cially available HDMI cable.2
The HDMI connection transfers uncompressed digital video, as well as almost every kind of digital audio that the connected component is compatible with, including
HDMI IN
HDMI/DVI-compatible monitor or plasma display
1Use an HDMI cable to connect one of the HDMI IN interconnects on this receiver to an HDMI output on your HDMI component.
HDMI indicator lights on the front panel when an HDMI- equipped component is connected.
2Use an HDMI cable to connect the HDMI OUT interconnect on this receiver to an HDMI interconnect on a
![]() Note
Note
1You can reset the Channel presets, Memory, Channel Skip/Add, Parental Lock and Password settings in Resetting the system on page 75.
2• An HDMI connection can only be made with
•If you connect a component that is not compatible with HDCP, a HDCP ERROR message is displayed on the front panel display. Some components that are compatible with HDCP still cause this message to be displayed, but so long as there is no problem with displaying video this is not a malfunction.
•This receiver has been designed to be compliant with HDMI (High Definition Multimedia Interface) Version 1.3a. Depending on the component you have connected, using a DVI connection may result in unreliable signal transfers. Also, when using a component with HDMI version 1.0, it is not possible to output
•This receiver supports the DeepColor feature of HDMI. However, when analog signals are input, this receiver cannot output signals in DeepColor.
•This receiver supports SACD, Dolby Digital Plus, Dolby TrueHD and
55
En