Additional information | 13 |
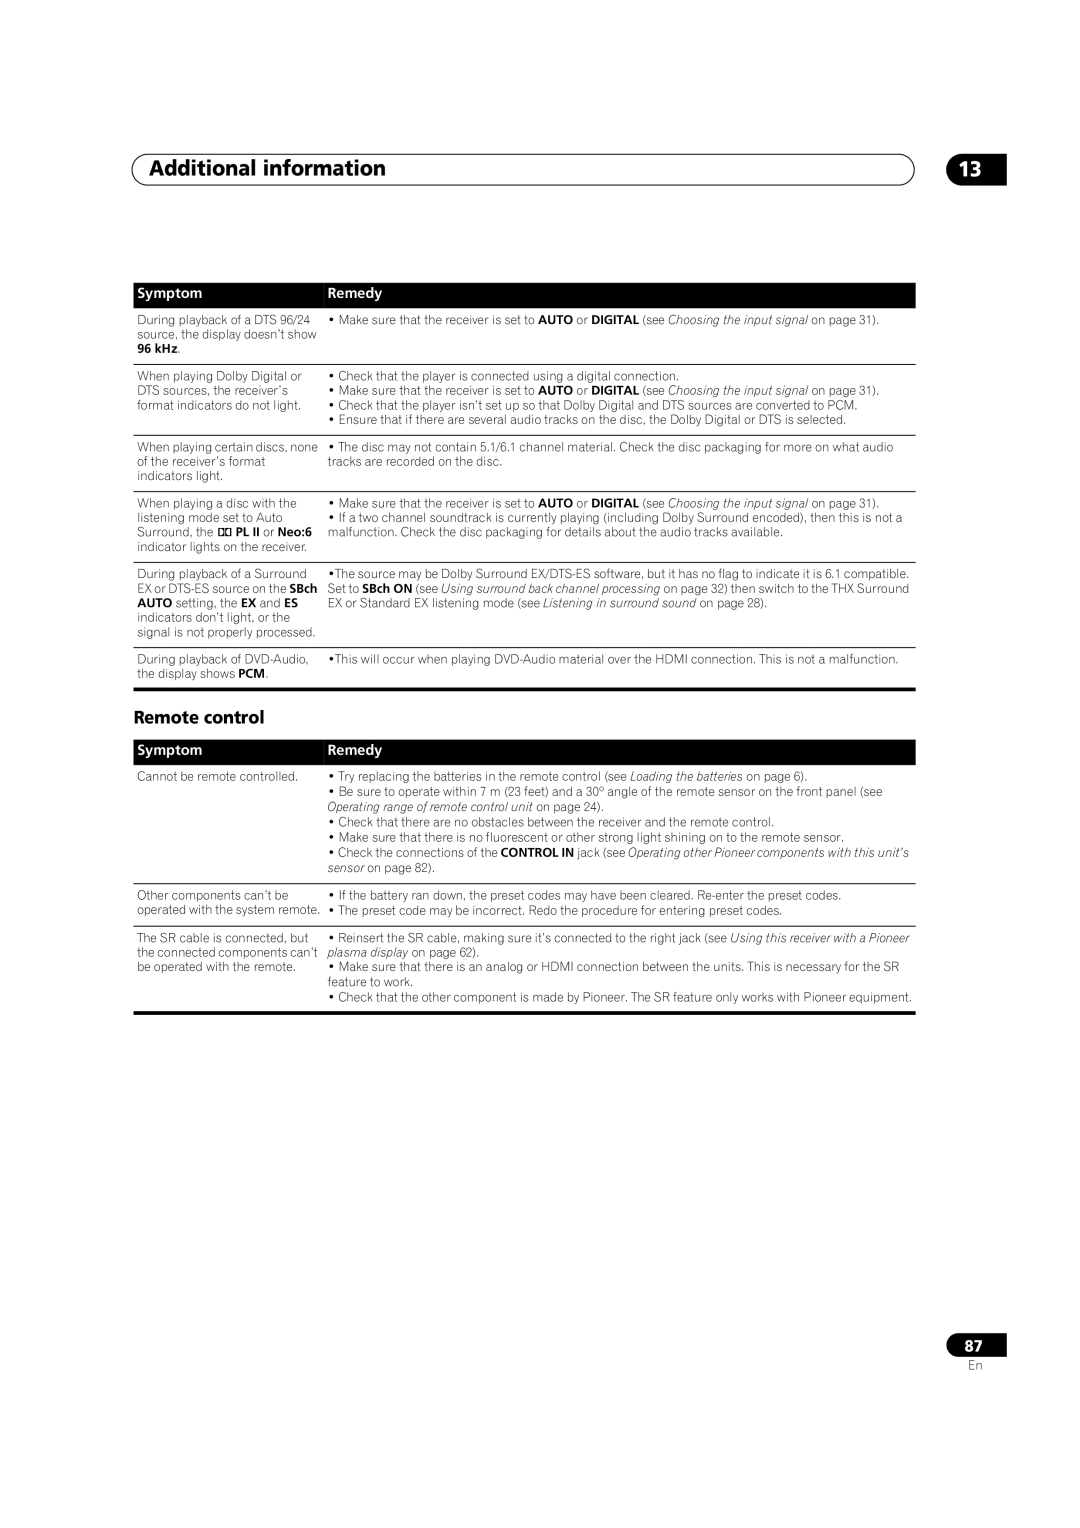
Symptom | Remedy |
During playback of a DTS 96/24 | • Make sure that the receiver is set to AUTO or DIGITAL (see Choosing the input signal on page 31). |
source, the display doesn’t show |
|
96 kHz. |
|
|
|
When playing Dolby Digital or | • Check that the player is connected using a digital connection. |
DTS sources, the receiver’s | • Make sure that the receiver is set to AUTO or DIGITAL (see Choosing the input signal on page 31). |
format indicators do not light. | • Check that the player isn’t set up so that Dolby Digital and DTS sources are converted to PCM. |
| • Ensure that if there are several audio tracks on the disc, the Dolby Digital or DTS is selected. |
|
|
When playing certain discs, none | • The disc may not contain 5.1/6.1 channel material. Check the disc packaging for more on what audio |
of the receiver’s format | tracks are recorded on the disc. |
indicators light. |
|
|
|
When playing a disc with the | • Make sure that the receiver is set to AUTO or DIGITAL (see Choosing the input signal on page 31). |
listening mode set to Auto | • If a two channel soundtrack is currently playing (including Dolby Surround encoded), then this is not a |
Surround, the 2 PL II or Neo:6 | malfunction. Check the disc packaging for details about the audio tracks available. |
indicator lights on the receiver. |
|
|
|
During playback of a Surround | •The source may be Dolby Surround |
EX or | Set to SBch ON (see Using surround back channel processing on page 32) then switch to the THX Surround |
AUTO setting, the EX and ES | EX or Standard EX listening mode (see Listening in surround sound on page 28). |
indicators don’t light, or the |
|
signal is not properly processed. |
|
|
|
During playback of | •This will occur when playing |
the display shows PCM. |
|
|
|
Remote control
Symptom | Remedy |
Cannot be remote controlled. | • Try replacing the batteries in the remote control (see Loading the batteries on page 6). |
| • Be sure to operate within 7 m (23 feet) and a 30º angle of the remote sensor on the front panel (see |
| Operating range of remote control unit on page 24). |
| • Check that there are no obstacles between the receiver and the remote control. |
| • Make sure that there is no fluorescent or other strong light shining on to the remote sensor. |
| • Check the connections of the CONTROL IN jack (see Operating other Pioneer components with this unit’s |
| sensor on page 82). |
|
|
Other components can’t be | • If the battery ran down, the preset codes may have been cleared. |
operated with the system remote. | • The preset code may be incorrect. Redo the procedure for entering preset codes. |
|
|
The SR cable is connected, but | • Reinsert the SR cable, making sure it’s connected to the right jack (see Using this receiver with a Pioneer |
the connected components can’t | plasma display on page 62). |
be operated with the remote. | • Make sure that there is an analog or HDMI connection between the units. This is necessary for the SR |
| feature to work. |
| • Check that the other component is made by Pioneer. The SR feature only works with Pioneer equipment. |
|
|
87
En
