USER’S Guide
Epson Stylus Pro 7890/9890
Trademarks
FCC Compliance Statement
Page
Setting Up the Printer
Contents Introduction
Handling Paper and Other Media
Printing With Epson Drivers for Windows
Printing With Epson Drivers for Mac OS
Maintaining and Transporting the Printer
Managing Color With Profiles
Specifications
Solving Problems
Control Panel
Using the Optional Auto Take-Up Reel
Index
Page
Introduction
Option Part number
Options and Accessories
Part Part number
Macintosh System Requirements
Where To Get Help
Windows System Requirements
Important Safety Instructions
Introduction
Ink Cartridge Safety Instructions
Front
Printer Parts
Back
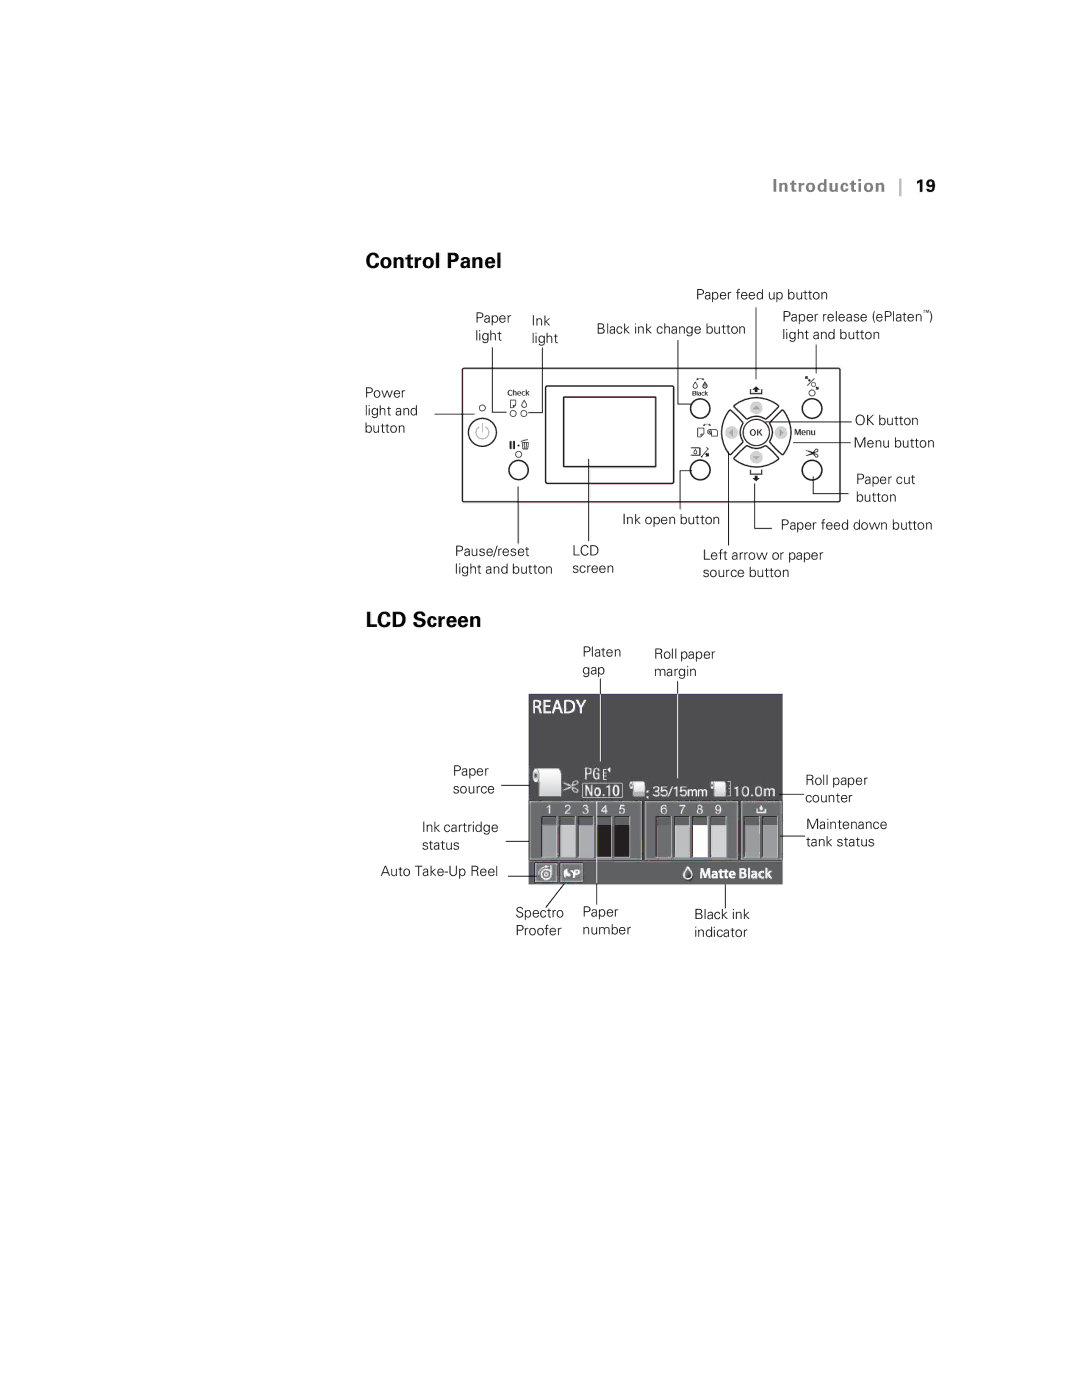
LCD Screen
Control Panel
Introduction
Unpacking and Assembling the Printer
Chapter Setting Up Printer
Unpacking and Assembling the Stand
Setting Up the Printer
Unpacking the Printer and Mounting It on the Stand
Setting Up the Printer
Attaching the Paper Basket Epson Stylus Pro
Setting Up the Printer
Black plastic connectors
Setting Up the Printer
Completing Setup and Connecting the Power Cord
Setting Up the Printer
Power cord on left side
Installing Ink
Left ink bay Right ink bay Slot no Cartridge
Connecting to Your System
Installing the Software for Macintosh
Installing the Software for Windows
Click your printer model Click the Install button
Checking the Current Firmware Version
Updating Your Printer Firmware
Downloading and Updating the Firmware
Configuring the Printer’s Network Adapter
Selecting Media for Your Printer
Available Epson Special Media
Guidelines for Using Epson Media
Roll Paper Guidelines
Using Roll Paper
Selecting the Paper Type
Proofing Paper
For this media Select this Media Type setting Photo Paper
Plain Paper
Matte Paper
Others
Setting Up Automatic Media Tracking and Identification
Placing the Paper in the Printer
Handling Paper and Other Media
Loading the Paper for Printing
Handling Paper and Other Media
Printing Trim Lines
Cutting Paper Manually with the Built-in Cutter
Removing Paper from the Printer
Handling Paper and Other Media
Loading Cut Sheets
Using Cut Sheet Paper
Handling Paper and Other Media
Loading Heavy Sheets
Adjusting the Platen Gap for Thick or Thin Paper
Catching Printouts in Front of the Printer
Using the Paper Basket
Handling Paper and Other Media
Catching Printouts Under the Printer
Larger than 23.4 × 33.1 inches A1
Storing the Paper Basket
Creating Paper Configurations
Optimizing the Settings for Your Paper
Handling Paper and Other Media
Selecting Paper Configurations
Printing Your Paper Configurations
Handling Paper and Other Media
Printing With Epson Drivers for Mac OS
Sizing Images for Borderless Printing on Roll Paper
Choosing Page Setup and Basic Print Options
Choose your printer from the Printer menu
Also be sure to select roll paper options, as described on
If you are printing on a cut sheet, skip to step
Select Printer Settings
Printing With Epson Drivers for Mac OS
Choosing Color Management Options
Choosing Advanced Media Control Options
Printing With Epson Drivers for Mac OS X
Choosing Roll Paper Options
Printing With Epson Drivers for Mac OS X
Controlling Borderless Image Expansion
Choosing Advanced Black and White Photo Settings
Printing With Epson Drivers for Mac OS
Creating a Custom Preset and Printing
Printing With Epson Drivers for Mac OS
Managing Print Jobs
Selecting the Correct Media Type Setting
For this media Select this Media Type setting
For this media Select this Media Type setting Plain Paper
Printing With Epson Drivers for Windows
Choosing Basic Print Options
Auto Acquire
Selecting the Correct Media Type Setting
Cold Press Bright Cold Press Natural Hot Press Bright
For this media Select this Media Type setting
Tip If you turn off color management, you can
Printing With Epson Drivers for Windows
You expect
Printing With Epson Drivers for Windows
Auto Expand or Retain Size, then click OK
Choosing Cut Sheet Paper Options
Printing With Epson Drivers for Windows
Custom and enter a scaling percentage
Choosing Page Layout Options
Choosing Advanced Black and White Photo Settings
Printing With Epson Drivers for Windows
Choosing Paper Configuration Options
Printing With Epson Drivers for Windows
Saving and Exporting a Custom Settings Group
Saving, Exporting, and Importing Custom Settings
Loading a Pre-Defined Settings Group
Importing a Custom Settings Group
Editing Printer Driver Settings
Using the Progress Meter
Optimizing Print Speed
Printing With Epson Drivers for Windows
Setting Monitoring Preferences
Printing With Epson Drivers for Windows
Mac OS X Printing With a Color Profile
Setting Up Photoshop and Assigning a Profile
You see this window
Managing Color With Profiles
Selecting Print Settings and Printing
Windows Printing With a Color Profile
Managing Color With Profiles
Click OK, then click Print to print your photo
Managing Color With Profiles
Checking Printer Status
Maintaining and Transporting the Printer
Viewing Status Information
Printing Status Information
Checking Printer Status From the Printer Driver
Running the Nozzle Check and Head Cleaning Utilities
Checking and Cleaning the Print Head
Checking and Cleaning the Print Head Using the Control Panel
Automatically Checking and Cleaning the Print Head
Running Cleaning Cycles
Select Head ALIGNMENT, then select Alignment
Aligning the Print Head
Ink bay Slot no Cartridge 150 ml 350 ml 700 ml
Replacing Ink Cartridges
Maintaining and Transporting the Printer
Changing the Date and Time
Switching Black Ink Mode
Using Maintenance Mode
Removing the Old Cutter
Replacing the Paper Cutter
Maintaining and Transporting the Printer
Installing the New Cutter
Maintaining and Transporting the Printer
Replacing the Maintenance Tank
Maintaining and Transporting the Printer
Cleaning the Printer
Maintaining and Transporting the Printer
Preparing the Printer for Shipment
Transporting or Storing the Printer
Maintaining and Transporting the Printer
Moving the Printer on the Stand
Setting Up the Printer After Transportation
Diagnosing Problems
Chapter Solving Problems
Message Explanation Response
Checking Error Messages and Lights
Cleaning Error
INK Cartridge Error
Not Enough Empty
Do YOU CONTINUE?
Auto Take-Up Reel Error Messages
Improving Print Quality
Problem Solution
ProblemSolution
Configuration, be sure to return the setting to standard STD
If none of these suggestions help, try the solutions below
Solving Operational Problems
Solving Miscellaneous Printing Problems
Solving Problems
Solving Paper Problems
Fixing Paper Eject Problems
Clearing Paper Jams
Solving Problems
Uninstalling and Reinstalling the Printer Driver
Solving Problems With the Optional Auto Take-Up Reel
Mac OS
Windows 7 and Windows Vista Click
Windows
Environmental
Clearing Stored Print Information
Operation Storage
Electrical
Dimensions and Weight
Specification Description
Specification Epson Stylus Pro
Media
Safety Approvals
Roll Paper
Epson Roll Paper Information and ICC Profiles
46 mm
Size group Size name Measurements
Cut Sheets
US-ARCH Arch a
Specifications
Paper name Thickness ICC profile
Epson Cut Sheet Paper Information and ICC Profiles
Printable Area
Ink Cartridges
Sensor light status Description
Appendix B Using Optional Auto Take-Up Reel
Loading Roll Paper Onto the Take-Up Reel
Winding Prints Forward
Winding Prints Backward
Printing Using the Auto Take-Up Reel
Reversing the Paper Stops for a 2-inch Paper Reel Core
Using the Optional Auto Take-Up Reel
Installing a Take-Up Reel Core
Using the Optional Auto Take-Up Reel
Turn the lever to the front to lock the movable unit
Buttons
Control Panel Buttons and Lights
Button Description
Control Panel
Light Description
Lights
LCD Screen Icons
Menu setting Description Printer Setup menu
Menu Setting Summary
Maintenance menu
Menu setting Description Test Print menu
Printer Status menu see page 146 for details
Custom Paper menu see page 81 for details
Roll Paper Remaining
Options Setup menu
Menu setting Description
Head Alignment menu see page 152 for details
Index a
Index
Index
Index
Index
Take-Up Reel, Auto, see Automatic Take-Up Reel, optional
Index