AVX & MX SERIES USER’S MANUAL
P/N: M42001-02A3
PRODUCT INTRODUCTION
SETUP
CONNECTING EXTERNAL DISC CHANGERS
Series User’s Manual
ADDITIONAL CONNECTION AND HOOKUP INFORMATION
LISTENING TO INTERNET RADIO
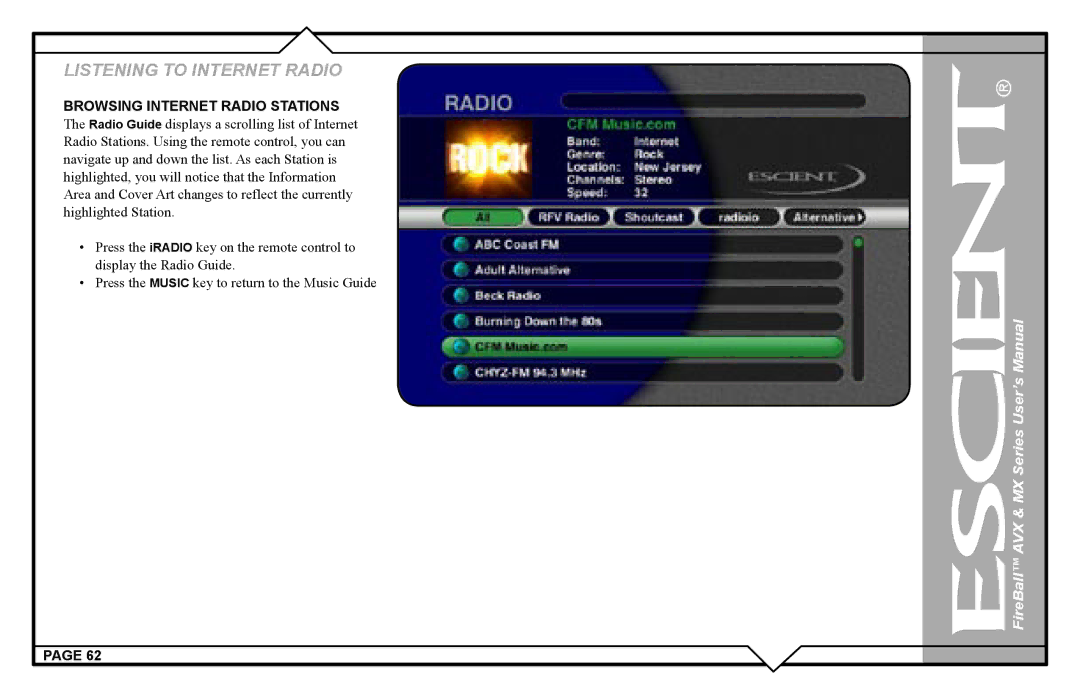
SETTING USER PREFERENCES
CREATING CDS
MANAGING YOUR MEDIA
EXTERNAL CONTROL
FireBall AVX & MX Series User’s Manual
FireBall Serial Number
FireBall AVX & MX Series User’s Manual
• Do not use this apparatus near water
FireBall AVX & MX Series User’s Manual
FireBall and Physital are trademarks of Escient
•Twelve 12 months service, parts and labor
FireBall AVX & MX Series User’s Manual
•Installation or removal charges
FireBall AVX & MX Series User’s Manual
Indianapolis, Indiana
FireBall AVX & MX Series User’s Manual
Escient 6640 Intech Blvd. Suite
Email: support@escient.com
FireBall AVX & MX Series User’s Manual
Following are terms used throughout this manual
FireBall AVX & MX Series User’s Manual
Please wait. This may take several minutes
FireBall AVX & MX Series
Manual
User’s
FireBall AVX & MX
Manual
Series
User’s
Series
Manual
User’s
FireBall AVX & MX
User’s
POWER
Manual
FireBall AVX & MX Series
PAGE
FireBall AVX & MX Series User’s Manual
REMOTE OVERVIEW
The remote control can be used to enter text in all text fields. This text entry capability is provided to allow you to fill out short text fields – such as those that occur in the setup and edit screens. FireBall’s wireless keyboard should be used when extended typing is required
FireBall AVX & MX Series User’s Manual
Alpha Mode
FireBall AVX & MX Series User’s Manual
ABOUT SACD AUDIO DISCS
FireBall AVX & MX Series User’s Manual
5CHANGER 2 ZONE BACK PANEL SHOWN
FireBall AVX & MX Series User’s Manual
LOADING DISCS INTO CHANGERS
PAGE
3.Select the LOOKUP DISCS menu
FireBall AVX & MX Series User’s Manual
2.Select the CHANGER MANAGEMENT menu
4.Select the QUICK LOOKUP menu
Lookup Range feature
2.Select the CHANGER MANAGEMENT menu
5 CHANGER BACK PANEL
FireBall AVX & MX Series User’s Manual
AUDIO OUTPUTS
3 CHANGER BACK PANEL
5 CHANGER BACK PANEL
FireBall AVX & MX Series User’s Manual
MULTI-ZONEVIDEO OUTPUTS
PAGE
PAGE
FireBall AVX & MX Series User’s Manual
SINGLE-ZONEVIDEO OUTPUTS
3 CHANGER BACK PANEL 1 CHANGER BACK PANEL
RS-232CONNECTIONS
Pin outs for the Wired IR input
FireBall AVX & MX Series User’s Manual
IR CONNECTIONS
PAGE
FireBall AVX & MX Series User’s Manual
ETHERNET CONNECTIONS
FireBall AVX & MX Series User’s Manual
Changer Types
FireBall AVX & MX Series User’s Manual
EXTERNAL CHANGER CONNECTIONS
Control Connections
FireBall AVX & MX Series User’s Manual
a.The ethernet link to your router or hub
PLAYING THE CURRENT MOVIE
FireBall AVX & MX Series User’s Manual
BROWSING YOUR MOVIE LIBRARY
PAGE
Movie Info
FireBall AVX & MX Series User’s Manual
SELECTING A DIFFERENT MOVIE
CHANGING THE GUIDE VIEW
FireBall AVX & MX Series User’s Manual
ZONE 1 - Multi-ZoneFireball
ZONE 2 - FireBall MP-200
Audio & Video
Playing Movie - The Abyss
FireBall AVX & MX Series User’s Manual
Mulit-ZoneFireBall - Zone 1: Browsing
FireBall MP-200- Zone 2: Browsing
FireBall AVX & MX Series User’s Manual
If you select a non-grayedout title, the movie
ROOMS
FireBall AVX & MX Series User’s Manual
WATCHING THE SAME MOVIE IN TWO
title currently playing in the other room and
•Record CDs using the internal CD Drive
FireBall AVX & MX Series User’s Manual
1.Press the EJECT key on the front panel
In addition to manually loading and recording CDs one by one using the front panel CD drive, you can record as many CD as you want directly from your external changers
2.Select the CHANGER MANAGEMENT menu
FireBall AVX & MX Series User’s Manual
• 10/100 Ethernet network
FireBall AVX & MX Series User’s Manual
2.Select the NETWORK menu item
FireBall’s File Server acts like a Windows File Server on your network, therefore you will need to connect using the MacOS X’s built-inWindows networking client. Make sure your Mac is connected to the same network as your FireBall and follow these steps to mount, transfer, and import music files from your PC to your FireBall
FireBall AVX & MX Series User’s Manual
4.Click on the Content pop-upmenu and select the Import directory
FireBall AVX & MX Series User’s Manual
Follow these steps to erase a re-writeableCD
Now that you have gotten your music into your FireBall, it’s time to enjoy it! The Music Guide allows you to browse, locate, and play all of your music in one easy to use on-screenguide. Press the MUSIC key on the remote control to access your music collection
FireBall AVX & MX Series User’s Manual
Playing the currently highlighted Title is the same as playing a CD in a conventional CD player. Simply press the PLAY key on the remote control and it begins to play from track
FireBall AVX & MX Series User’s Manual
• Artist • Artist - Title • Title - Artist • Song
FireBall AVX & MX Series User’s Manual
View By Title will order the list of Titles alphabetically from A to Z, according to the Album Name then the Artist Name
The default Play Mode will play the current Title from Track 1 to the last track in order, then stop. If you want to change the order of how tracks are played, there are six different Play Modes to choose from
FireBall AVX & MX Series User’s Manual
Queue
FireBall AVX & MX Series User’s Manual
2.Highlight the track you want to move
PAGE
FireBall AVX & MX Series User’s Manual
•Playing Internet Radio requires a valid Internet connection
•Party mixes •Workout mixes
FireBall AVX & MX Series User’s Manual
•Collections of your favorite songs
FireBall AVX & MX Series User’s Manual
•Group similar movies together
FireBall AVX & MX Series User’s Manual
•Windows Media WMA or MPEG II layer 3 streams
FireBall AVX & MX Series User’s Manual
3.Select the TUNE STATIONS menu item
2.Press the OPTIONS key on the remote control
FireBall AVX & MX Series User’s Manual
•Remove any punctuation marks from the Title
2.Press the OPTIONS key on the remote control
FireBall AVX & MX Series User’s Manual
2.Press the OPTIONS key on the remote control
FireBall AVX & MX Series User’s Manual
Guide
2.Press the OPTIONS key on the remote control
FireBall AVX & MX Series User’s Manual
•Remove Disc Numbers from the Titles
2.Press the OPTIONS key on the remote control
FireBall AVX & MX Series User’s Manual
Station
FireBall AVX & MX Series User’s Manual
•There is a 1000 song maxium for Playlists
FireBall AVX & MX Series User’s Manual
Follow these steps to edit a Group
You can remove any music you have recorded to the FireBall by using the Delete Music feature. You may want to do this if you have filled up your FireBall and you can not record any more music or if you want to remove songs that you just don’t listen to
FireBall AVX & MX Series User’s Manual
You may delete entire Playlists from the Music Guide. Follow these steps to permanently delete one or more Playlists from the Music Guide
FireBall AVX & MX Series User’s Manual
Follow these steps to delete Groups
FireBall AVX & MX Series User’s Manual
Follow these steps to create a custom Mix CD
9.After all of the songs have been read, FireBall will ask if you want to add any more tracks to the CD. Select ADD MORE if you do want to add more tracks or select DONE to continue creating the CD
FireBall AVX & MX Series User’s Manual
Follow these steps to duplicate a CD
FireBall AVX & MX Series User’s Manual
FireBall also allows you to record from the external inputs to a blank CD. This allows you to record live performances or any other analog source to a blank CD which can then be played on almost any standard CD Player
3.Select the LANGUAGE menu item
Follow these steps to set your preferred language
2.Select the GENERAL menu item
4.Select the desired language
3.Select the SCREEN SAVER Menu
FireBall AVX & MX Series User’s Manual
2.Select the GENERAL Menu
4.Select your Screen Saver Preferences
FireBall AVX & MX Series User’s Manual
3.Select the General menu
2.Select the General menu
1.Press the SETUP key on the remote
FireBall AVX & MX Series User’s Manual
3.Select the Screen Saver menu
3.Select the TIME ZONE Menu
Follow these steps to set your Time Zone
2.Select the GENERAL Menu
4.Select your select your Time Zone
1.Press the SETUP key on the remote
FireBall AVX & MX Series User’s Manual
3.Re-enterthe same password for verification
FireBall AVX & MX Series User’s Manual
Follow these steps to select a Movie Rating
FireBall AVX & MX Series User’s Manual
2.Select the NETWORK Menu
FireBall AVX & MX Series User’s Manual
2.Select the NETWORK menu
2.Select the Network menu
1.Press the SETUP key on the remote
FireBall AVX & MX Series User’s Manual
3.Select the Remote Server Connection menu
2.Select the AUDIO menu
FireBall AVX & MX Series User’s Manual
Follow these steps to select an audio encoder
3.Select the RECORDING PREFERENCES menu
3.Select the DISC INSERT PREFERENCES menu
FireBall AVX & MX Series User’s Manual
2.Select the AUDIO menu
4.Select Display and Play or Record and Eject
FireBall AVX & MX Series User’s Manual
Follow these steps to center the FireBall screen
2.Select the VIDEO menu
5.Press SELECT to return to the previous menu
2.Select the VIDEO menu
3.Select the CONTRAST menu
2.Select the VIDEO menu
1.Press the SETUP key on the remote control
FireBall AVX & MX Series User’s Manual
1.Place the FireBall into Standby
1.Press the SETUP key on the remote control
FireBall AVX & MX Series User’s Manual
Changing the Touch Panel Button Overlay
Using Your Touch Panel
FireBall AVX & MX Series User’s Manual
Button Frame Interface Toggle Bar Interface
PAGE
IR REMOTE CONTROL
FireBall AVX & MX Series User’s Manual
PAGE
DIRECT ACCESS CODES
FireBall AVX & MX Series User’s Manual
Function
Multi-KeyCombinations
User’s Manual
Function
Multi-KeyCombinations
•Control + Backspace •Control + Insert
FireBall AVX & MX Series User’s Manual
PLAYLIST HOT KEYS
•Control + Delete •Control + Top
SERIAL COM PORTS
PAGE
FireBall AVX & MX Series User’s Manual
• Net Streams
2.Select the UTILITIES menu
GETTING INFORMATION ABOUT YOUR FIREBALL
PAGE
3.Select the SYSTEM INFORMATION menu
PAGE
FireBall AVX & MX Series User’s Manual
RESTARTING THE SYSTEM
Follow these steps to manually update the software
FireBall AVX & MX Series User’s Manual
SETTING UP THE FIREBALL WEB SERVER
USING THE WEB USER INTERFACE
PAGE
FireBall AVX & MX Series User’s Manual
In addition to remotely controlling your FireBall, the built-inweb server also functions as a streaming audio server, providing an easy way to add multiple streaming music clients to your FireBall
PAGE
FIREBALL MUSIC BACKUP
FireBall AVX & MX Series User’s Manual
PAGE
FIREBALL MUSIC RESTORE
FireBall AVX & MX Series User’s Manual
NETWORKED AUDIO USING FIREBALL MUSIC CLIENTS
FireBall AVX & MX Series User’s Manual
•Direct IR input
A distributed FireBall installation means that your FireBall Servers and Clients are physically distributed or located in different rooms. Distributed FireBalls communicate over a wired or wireless network to share access to your media
FireBall AVX & MX Series User’s Manual
Every FireBall capable of server functions is automatically enabled to serve MP3, AAC, and FLAC audio whenever it is plugged in and properly configured for your network
FireBall AVX & MX Series User’s Manual
•Product Serial Number •Model Number
Audio vs. Data CDs
Manual Software Update Checks
FireBall AVX & MX Series User’s Manual
•NTSC •10 bit Video DACs •Frequency Response
TERMS BELOW
GRACENOTE END-USERLICENSE AGREEMENT
USE OF THIS PRODUCT IMPLIES ACCEPTANCE OF THE
FireBall AVX & MX Series User’s Manual