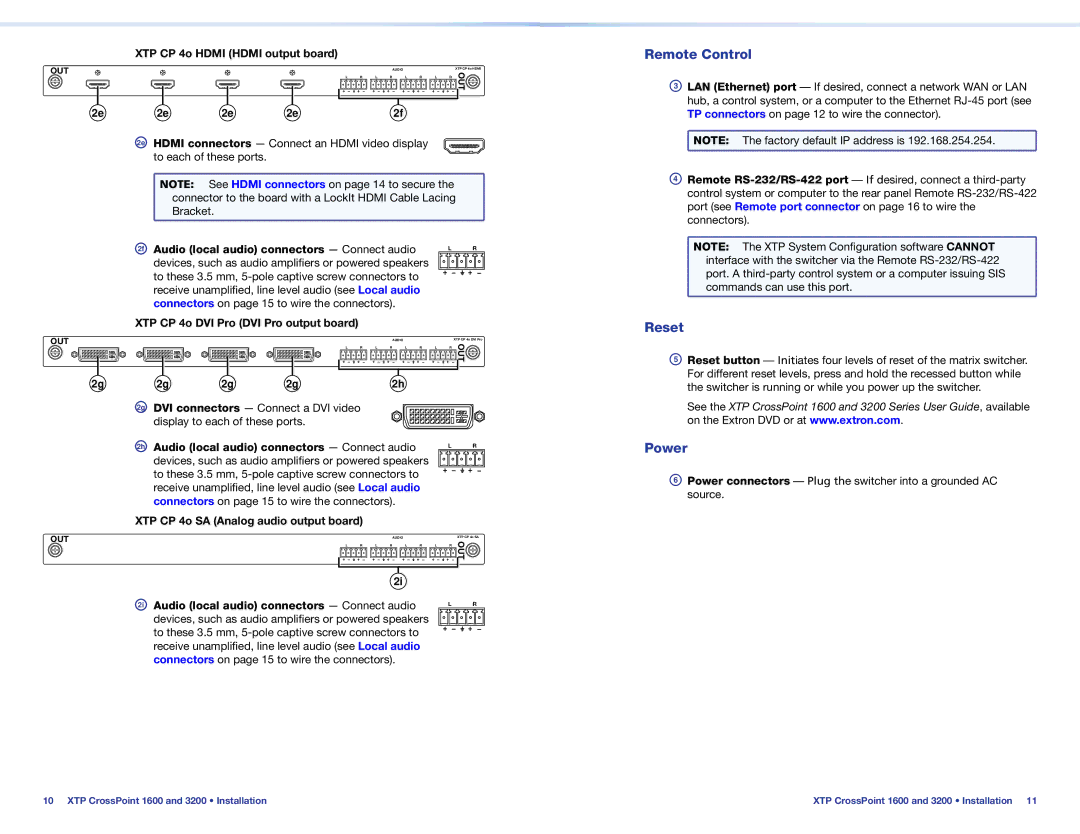
XTP CP 4o HDMI (HDMI output board)
OUT |
|
|
| AUDIO |
|
|
| XTP CP 4o HDMI |
L | R | L | R | L | R | L | R | OUT |
2e | 2e | 2e | 2e | 2f |
2e HDMI connectors — Connect an HDMI video display to each of these ports.
NOTE: See HDMI connectors on page 14 to secure the |
connector to the board with a LockIt HDMI Cable Lacing |
Bracket. |
2f | Audio (local audio) connectors — Connect audio | L | R |
| devices, such as audio amplifiers or powered speakers |
|
|
| to these 3.5 mm, |
|
|
| receive unamplified, line level audio (see Local audio |
|
|
| connectors on page 15 to wire the connectors). |
|
|
XTP CP 4o DVI Pro (DVI Pro output board)
OUT |
|
|
| AUDIO |
|
|
| XTP CP 4o DVI Pro |
L | R | L | R | L | R | L | R | OUT |
2g | 2g | 2g | 2g | 2h |
2g DVI connectors — Connect a DVI video display to each of these ports.
Remote Control
CLAN (Ethernet) port — If desired, connect a network WAN or LAN hub, a control system, or a computer to the Ethernet
![]() NOTE: The factory default IP address is 192.168.254.254.
NOTE: The factory default IP address is 192.168.254.254.
DRemote
NOTE: The XTP System Configuration software CANNOT |
interface with the switcher via the Remote |
port. A |
commands can use this port. |
Reset
EReset button — Initiates four levels of reset of the matrix switcher. For different reset levels, press and hold the recessed button while the switcher is running or while you power up the switcher.
See the XTP CrossPoint 1600 and 3200 Series User Guide, available on the Extron DVD or at www.extron.com.
2h Audio (local audio) connectors — Connect audio devices, such as audio amplifiers or powered speakers to these 3.5 mm,
XTP CP 4o SA (Analog audio output board)
L | R |
Power
FPower connectors — Plug the switcher into a grounded AC source.
OUT |
|
|
| AUDIO |
|
|
| XTP CP 4o SA |
L | R | L | R | L | R | L | R | OUT |
2i
2i Audio (local audio) connectors — Connect audio devices, such as audio amplifiers or powered speakers to these 3.5 mm,
L | R |
10 XTP CrossPoint 1600 and 3200 • Installation | XTP CrossPoint 1600 and 3200 • Installation 11 |