Viewing and adjusting the input audio level (HVA models only)
On HVA models, the audio level of each input can be displayed and adjusted through a range of
1. | Press and hold the Audio button until the Audio LED begins to blink, then | ||
| release the Audio button. | ||
2. | Press and release an input button to select an input. The audio level for the | ||
| selected input is displayed in the output LEDs and the polarity (+ or | ||
| displayed in the View or Esc LEDs. | ||
3. | Press and release the Esc ( ) and View ( ) buttons to increase and decrease | ||
| the audio level. | ||
4. | Press and release the Audio button to exit the audio display and adjust mode. | ||
| The Audio LED stops blinking and turns off. | ||
|
| 1. | There is one audio level setting per input. The audio level setting is |
|
| ||
|
|
| shared by the left and right audio inputs. |
| 2. | The audio level settings are stored in | |
|
|
| is removed and restored, the audio level settings are retained. |
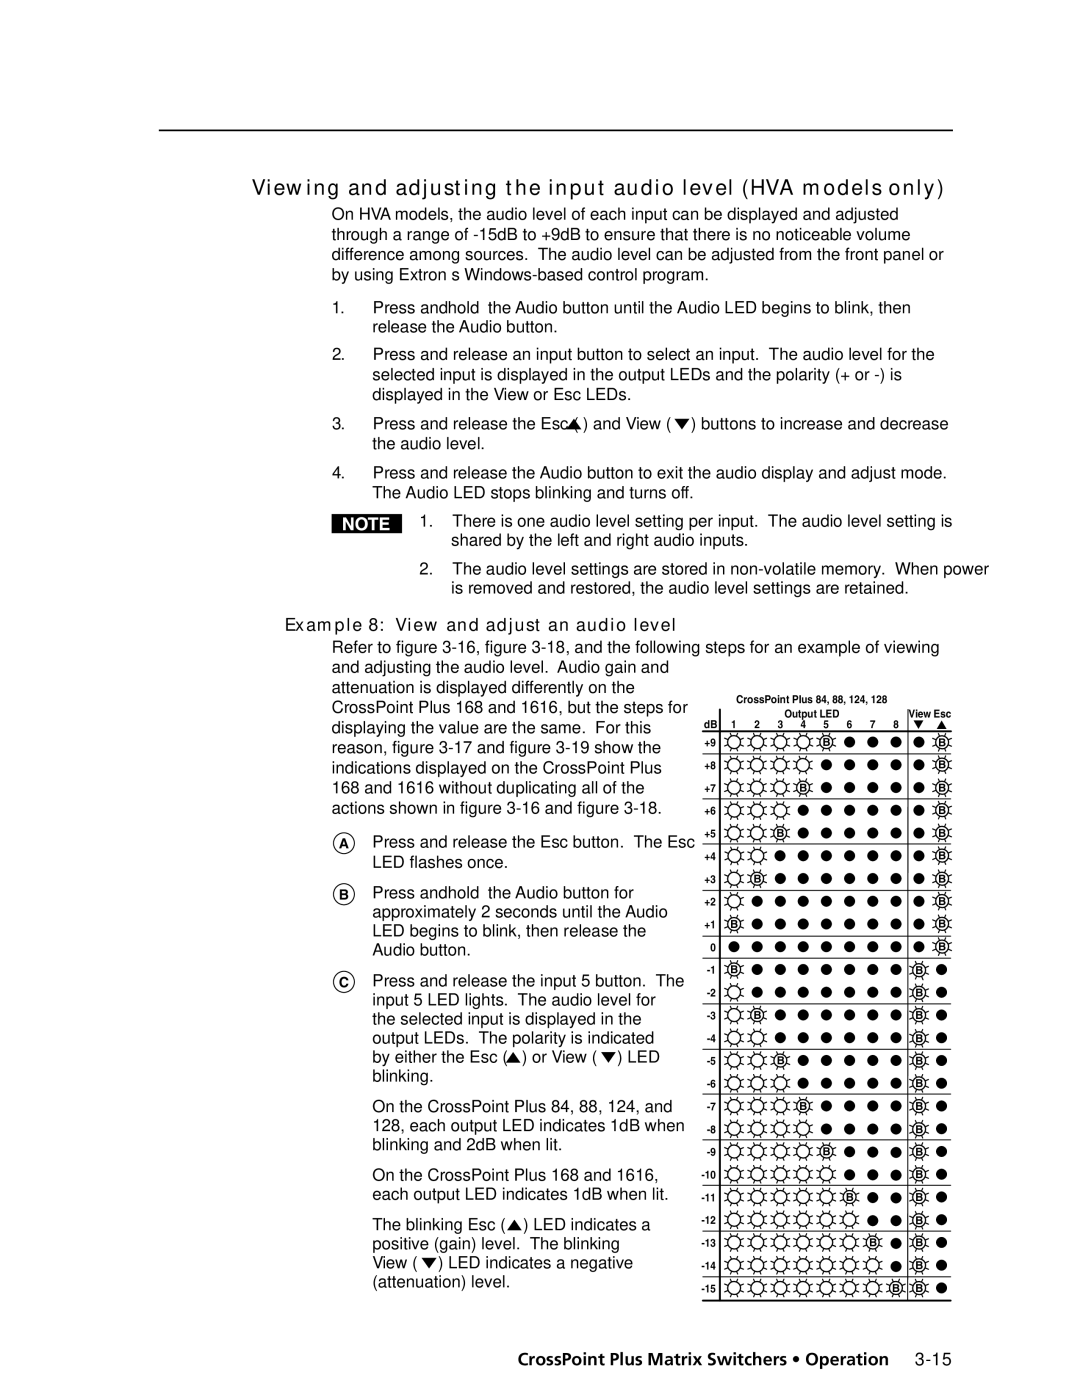
Example 8: View and adjust an audio level
Refer to figure
attenuation is displayed differently on the
CrossPoint Plus 168 and 1616, but the steps for |
| CrossPoint Plus 84, 88, 124, 128 |
| |||||||
|
|
|
| Output LED |
|
| View Esc | |||
displaying the value are the same. For this | dB | 1 | 2 | 3 | 4 | 5 | 6 | 7 | 8 | |
+9 |
|
|
|
| B |
|
| B | ||
reason, figure |
|
|
|
|
|
| ||||
|
|
|
|
|
|
|
|
| ||
indications displayed on the CrossPoint Plus | +8 |
|
|
|
|
|
|
| B | |
168 and 1616 without duplicating all of the | +7 |
|
|
| B |
|
|
| B | |
actions shown in figure | +6 |
|
|
|
|
|
|
| B | |
A Press and release the Esc button. The Esc | +5 |
|
| B |
|
|
|
| B | |
+4 |
|
|
|
|
|
|
| B | ||
LED flashes once. |
|
|
|
|
|
|
|
| ||
| +3 |
| B |
|
|
|
|
| B | |
B Press and hold the Audio button for |
|
|
|
|
|
| ||||
+2 |
|
|
|
|
|
|
| B | ||
approximately 2 seconds until the Audio |
|
|
|
|
|
|
| |||
+1 | B |
|
|
|
|
|
| B | ||
LED begins to blink, then release the |
|
|
|
|
|
| ||||
|
|
|
|
|
|
|
| B | ||
Audio button. |
| 0 |
|
|
|
|
|
|
| |
C Press and release the input 5 button. The | B |
|
|
|
|
|
| B | ||
|
|
|
|
|
|
| B | |||
input 5 LED lights. The audio level for |
|
|
|
|
|
|
| |||
| B |
|
|
|
|
| B | |||
the selected input is displayed in the |
|
|
|
|
|
| ||||
|
|
|
|
|
|
|
|
| ||
output LEDs. The polarity is indicated |
|
|
|
|
|
|
| B | ||
by either the Esc ( | ) or View ( ) LED |
|
| B |
|
|
|
| B | |
blinking. |
|
|
|
|
|
|
|
| B | |
|
|
|
|
|
|
|
|
| ||
On the CrossPoint Plus 84, 88, 124, and |
|
|
| B |
|
|
| B | ||
128, each output LED indicates 1dB when |
|
|
|
|
|
|
| B | ||
blinking and 2dB when lit. |
|
|
|
| B |
|
| B | ||
|
|
|
|
|
|
|
| |||
On the CrossPoint Plus 168 and 1616, |
|
|
|
|
|
|
| B | ||
each output LED indicates 1dB when lit. |
|
|
|
|
| B |
| B | ||
The blinking Esc ( | ) LED indicates a |
|
|
|
|
|
|
| B | |
|
|
|
|
|
|
|
|
| ||
positive (gain) level. The blinking |
|
|
|
|
|
| B | B | ||
View ( ) LED indicates a negative |
|
|
|
|
|
|
| B | ||
(attenuation) level. |
|
|
|
|
|
|
|
| B B | |