INSTALLATION

Note:

a)The horizontal run of vent should have a 1/4 inch rise for every 1 foot of run towards the termination. Never allow the vent to run downward. This could cause high temperatures and may present the possibility of a fi re.

b)The location of the horizontal vent termi- nation on an exterior wall must meet all local and national building codes, and must not be blocked or obstructed. See diagram in the "External Vent Terminal Locations" section.

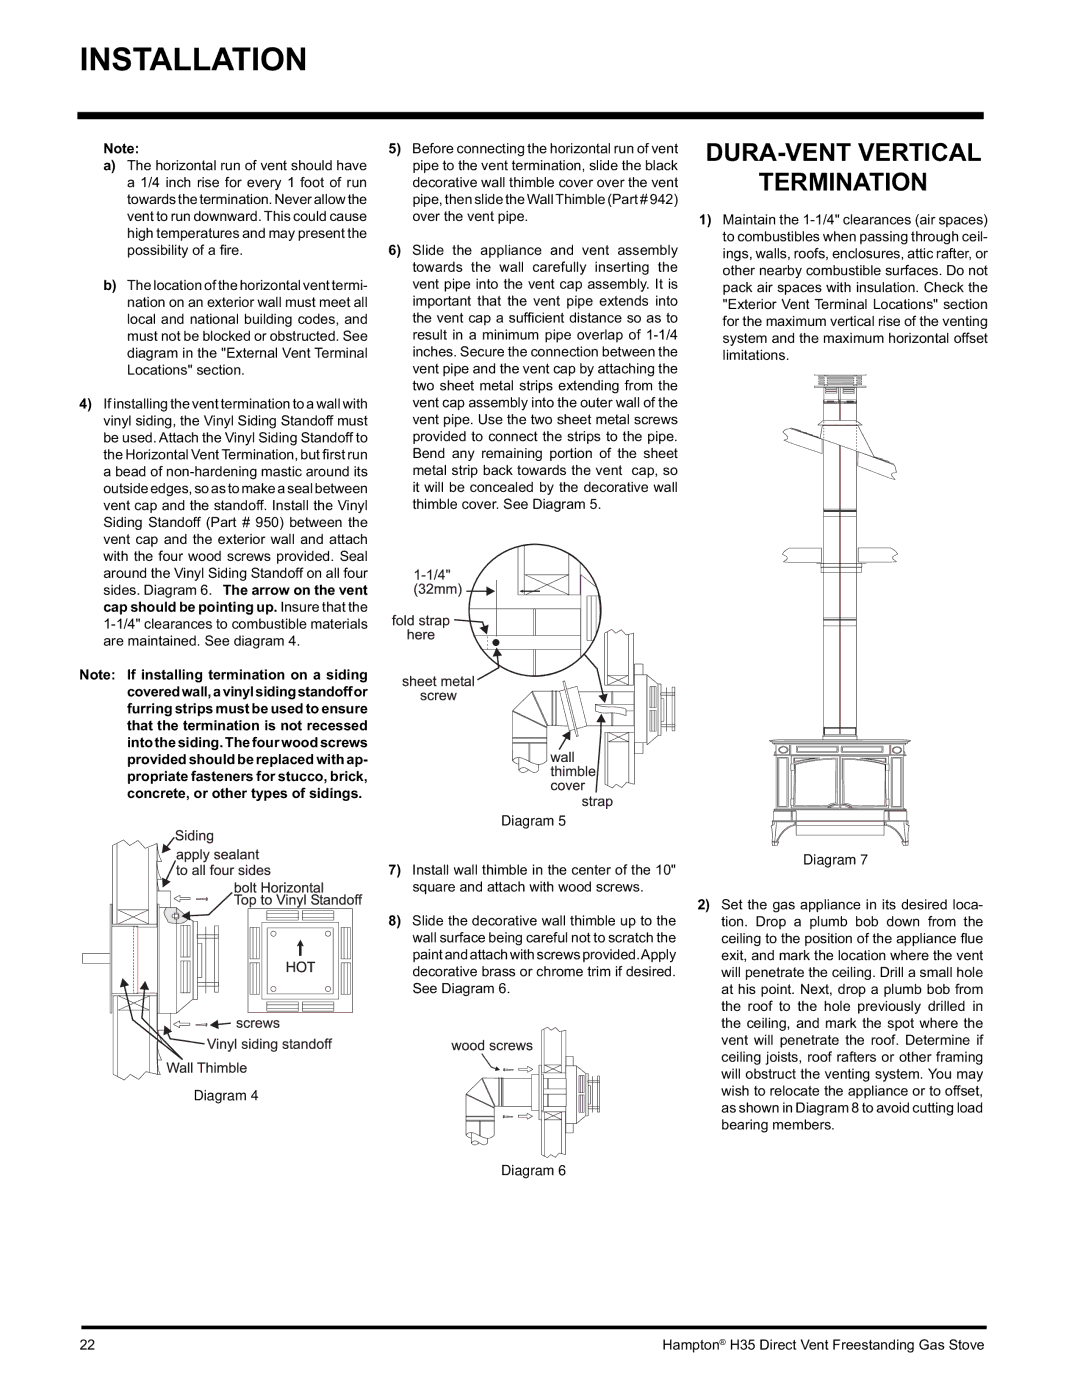
4)If installing the vent termination to a wall with vinyl siding, the Vinyl Siding Standoff must be used. Attach the Vinyl Siding Standoff to the Horizontal Vent Termination, but fi rst run a bead of non-hardening mastic around its outside edges, so as to make a seal between vent cap and the standoff. Install the Vinyl Siding Standoff (Part # 950) between the vent cap and the exterior wall and attach with the four wood screws provided. Seal around the Vinyl Siding Standoff on all four sides. Diagram 6. The arrow on the vent cap should be pointing up. Insure that the 1-1/4" clearances to combustible materials are maintained. See diagram 4.

Note: If installing termination on a siding coveredwall,avinylsidingstandoffor furring strips must be used to ensure that the termination is not recessed into the siding. The four wood screws provided should be replaced with ap- propriate fasteners for stucco, brick, concrete, or other types of sidings.

5)Before connecting the horizontal run of vent pipe to the vent termination, slide the black decorative wall thimble cover over the vent pipe, then slide the WallThimble (Part # 942) over the vent pipe.

6)Slide the appliance and vent assembly towards the wall carefully inserting the vent pipe into the vent cap assembly. It is important that the vent pipe extends into the vent cap a suffi cient distance so as to result in a minimum pipe overlap of 1-1/4 inches. Secure the connection between the vent pipe and the vent cap by attaching the two sheet metal strips extending from the vent cap assembly into the outer wall of the vent pipe. Use the two sheet metal screws provided to connect the strips to the pipe. Bend any remaining portion of the sheet metal strip back towards the vent cap, so it will be concealed by the decorative wall thimble cover. See Diagram 5.

DURA-VENT VERTICAL

TERMINATION

1)Maintain the 1-1/4" clearances (air spaces) to combustibles when passing through ceil- ings, walls, roofs, enclosures, attic rafter, or other nearby combustible surfaces. Do not pack air spaces with insulation. Check the "Exterior Vent Terminal Locations" section for the maximum vertical rise of the venting system and the maximum horizontal offset limitations.

Diagram 4

Diagram 5

7)Install wall thimble in the center of the 10" square and attach with wood screws.

8)Slide the decorative wall thimble up to the wall surface being careful not to scratch the paint and attach with screws provided.Apply decorative brass or chrome trim if desired. See Diagram 6.

Diagram 6

Diagram 7

2)Set the gas appliance in its desired loca- tion. Drop a plumb bob down from the ceiling to the position of the appliance fl ue exit, and mark the location where the vent will penetrate the ceiling. Drill a small hole at his point. Next, drop a plumb bob from the roof to the hole previously drilled in the ceiling, and mark the spot where the vent will penetrate the roof. Determine if ceiling joists, roof rafters or other framing will obstruct the venting system. You may wish to relocate the appliance or to offset, as shown in Diagram 8 to avoid cutting load bearing members.

22

Hampton® H35 Direct Vent Freestanding Gas Stove

Page 22
Image 22
Hampton Direct H35-NG1, H35-LP1 installation manual DURA-VENT Vertical Termination, Diagram

H35-NG1, H35-LP1 specifications

Hampton Direct has made significant strides in the home heating sector with its innovative products, particularly the H35-NG1 and H35-LP1 models. Both are designed to provide efficient heating solutions suitable for various residential settings.

The H35-NG1 is a natural gas unit, while the H35-LP1 runs on liquid propane, allowing homeowners to choose based on their available energy resources. One of the standout features of both models is their compact design, making them ideal for small spaces or rooms where traditional heaters would be impractical.

Another key characteristic is the user-friendly digital thermostat that comes with each unit. This feature allows homeowners to easily set and adjust their desired temperature, ensuring optimal comfort throughout the day while also promoting energy efficiency. The systems are equipped with smart technology that monitors usage patterns, helping homeowners make informed decisions about their heating needs.

Safety is also at the forefront of Hampton Direct's design. Both models include advanced safety features such as an automatic shut-off mechanism to prevent overheating and a fault detection system that alerts users to any issues. This commitment to safety provides peace of mind for homeowners as they enjoy the warmth provided by these heaters.

Additionally, both the H35-NG1 and H35-LP1 are engineered to minimize noise, ensuring a quiet operation that won't disrupt daily activities. This is particularly beneficial for bedrooms or living areas where a peaceful environment is desired.

The energy efficiency rating of these units is impressive, aligning with modern environmental standards. Homeowners can expect lower utility bills and a reduced carbon footprint as both heaters efficiently convert fuel into heat.

With robust construction materials designed to withstand high temperatures, both models promise durability and longevity with minimal maintenance required. This reliability ensures that consumers will not face frequent replacements, making the H35-NG1 and H35-LP1 sound investments for any home.

In summary, Hampton Direct's H35-NG1 and H35-LP1 models deliver effective and safe heating solutions with an emphasis on energy efficiency, user-friendliness, and quiet operation. Homeowners looking for a dependable heating system will find that these models embody quality and innovation, setting new standards in the home heating industry.