Operating the Main Menu (Cont.)
Setting and Adjusting Other Functions (OPTIONS) (Cont.)
Operating the Main Menu (Cont.)
Setting and Adjusting Other Functions (OPTIONS) (Cont.)
No.51666
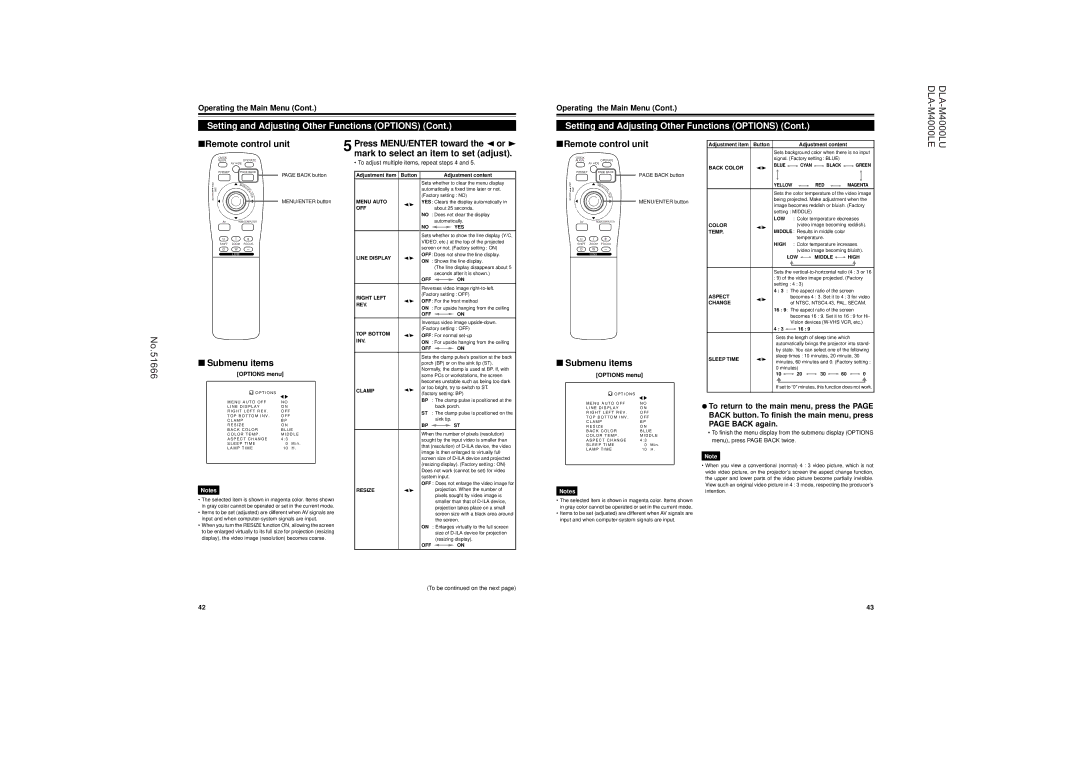
■Remote control unit
QUICK |
|
ALIGN. | OPERATE |
| AV HIDE |
PRESET | PAGE BACK |
LENS LOCK | PAGE BACK button |
N | |
| M |
| EN |
| U/ |
UNLOCK | E |
T | |
| E |
| R |
| MENU/ENTER button |
AV RGB/COMPUTER
U T +
SHIFT ZOOM FOCUS
D W –
LENS
■Submenu items
[OPTIONS menu]
O P T I O N S |
5 Press MENU/ENTER toward the 2 or 3 mark to select an item to set (adjust).
• To adjust multiple items, repeat steps 4 and 5.
Adjustment item | Button |
|
|
| Adjustment content | |||
|
| Sets whether to clear the menu display | ||||||
|
| automatically a fixed time later or not. | ||||||
|
| (Factory setting : NO) | ||||||
MENU AUTO | 2/3 | YES: Clears the display automatically in | ||||||
OFF |
|
| about 25 seconds. | |||||
|
| NO : Does not clear the display | ||||||
|
|
| automatically. | |||||
|
| NO |
|
|
|
| YES | |
|
|
|
|
| ||||
|
| Sets whether to show the line display (Y/C, | ||||||
|
| VIDEO, etc.) at the top of the projected | ||||||
|
| screen or not. (Factory setting : ON) | ||||||
LINE DISPLAY | 2/3 | OFF: Does not show the line display. | ||||||
ON : Shows the line display. | ||||||||
|
|
| (The line display disappears about 5 | |||||
|
|
| seconds after it is shown.) | |||||
|
| OFF |
|
|
|
| ON | |
|
|
|
|
|
| |||
|
| Reverses video image | ||||||
RIGHT LEFT |
| (Factory setting : OFF) | ||||||
2/3 OFF: For the front method | ||||||||
REV. | ||||||||
| ON : For upside hanging from the ceiling | |||||||
|
| |||||||
|
| OFF |
|
|
|
| ON | |
|
|
|
|
|
| |||
|
| Inversus video image | ||||||
TOP BOTTOM |
| (Factory setting : OFF) | ||||||
2/3 OFF: For normal | ||||||||
INV. | ||||||||
| ON : For upside hanging from the ceiling | |||||||
|
| OFF |
|
|
|
| ON | |
|
|
|
|
|
| |||
|
| Sets the clamp pulse’s position at the back | ||||||
|
| porch (BP) or on the sink tip (ST). | ||||||
|
| Normally, the clamp is used at BP. If, with | ||||||
|
| some PCs or workstations, the screen | ||||||
|
| becomes unstable such as being too dark | ||||||
CLAMP | 2/3 | or too bright, try to switch to ST. | ||||||
|
| (factory setting: BP) | ||||||
|
| BP : The clamp pulse is positioned at the | ||||||
■Remote control unit
QUICK |
|
ALIGN. | OPERATE |
| AV HIDE |
PRESET | PAGE BACK |
LENS LOCK | PAGE BACK button |
N | |
| M |
| EN |
| U/ |
UNLOCK | E |
T | |
| E |
| R |
| MENU/ENTER button |
AV RGB/COMPUTER
U T +
SHIFT ZOOM FOCUS
D W –
LENS
■Submenu items
[OPTIONS menu]
![]() O P T I O N S
O P T I O N S
Adjustment item | Button |
|
|
|
|
| Adjustment content |
|
|
|
| |||||||||||
|
| Sets background color when there is no input | ||||||||||||||||||||
|
| signal. (Factory setting : BLUE) |
|
|
|
| ||||||||||||||||
BACK COLOR | 2/3 | BLUE |
|
|
|
|
| CYAN |
| BLACK |
|
|
|
| GREEN | |||||||
|
|
|
|
|
|
| ||||||||||||||||
|
| YELLOW |
|
|
|
| RED |
|
|
|
| MAGENTA | ||||||||||
|
|
|
|
|
| |||||||||||||||||
|
| Sets the color temperature of the video image | ||||||||||||||||||||
|
| being projected. Make adjustment when the | ||||||||||||||||||||
|
| image becomes reddish or bluish. (Factory | ||||||||||||||||||||
|
| setting : MIDDLE) |
|
|
|
|
|
|
|
|
|
|
| |||||||||
|
| LOW : Color temperature decreases | ||||||||||||||||||||
COLOR | 2/3 |
|
|
|
|
| (video image becoming reddish). | |||||||||||||||
TEMP. | MIDDLE : Results in middle color |
|
|
|
| |||||||||||||||||
|
|
|
|
| ||||||||||||||||||
|
|
|
|
|
|
| temperature. |
|
|
|
| |||||||||||
|
| HIGH : Color temperature increases | ||||||||||||||||||||
|
|
|
|
|
|
| (video image becoming bluish). | |||||||||||||||
|
|
| LOW |
|
| MIDDLE |
|
| HIGH | |||||||||||||
|
|
|
|
| ||||||||||||||||||
|
|
|
|
|
|
|
|
|
|
| ||||||||||||
|
|
|
|
|
|
|
|
|
|
|
|
|
|
|
|
|
|
|
|
|
|
|
|
| Sets the | ||||||||||||||||||||
:9) of the video image projected. (Factory setting : 4 : 3)
4 : 3 : The aspect ratio of the screen
ASPECT | 2/3 |
|
|
| becomes 4 : 3. Set it to 4 : 3 for video | |||||||||||
CHANGE |
|
|
| of NTSC, NTSC4.43, PAL, SECAM. | ||||||||||||
|
|
|
| |||||||||||||
|
| 16 : 9: The aspect ratio of the screen |
|
| ||||||||||||
|
|
|
|
| becomes 16 : 9. Set it to 16 : 9 for Hi- | |||||||||||
|
|
|
|
| Vision devices |
|
| |||||||||
|
| 4 : 3 |
|
| 16 : 9 |
|
|
|
|
|
|
| ||||
|
|
|
|
|
|
|
|
|
| |||||||
|
| Sets the length of sleep time which |
|
| ||||||||||||
|
| automatically brings the projector into stand- | ||||||||||||||
|
| by state. You can select one of the following | ||||||||||||||
SLEEP TIME | 2/3 | sleep times : 10 minutes, 20 minute, 30 |
|
| ||||||||||||
minutes, 60 minutes and 0. (Factory setting : | ||||||||||||||||
|
| |||||||||||||||
|
| 0 minutes) |
|
|
|
|
|
|
| |||||||
|
| 10 |
|
| 20 |
| 30 |
| 60 |
|
| 0 | ||||
|
|
|
|
|
|
| ||||||||||
|
|
|
|
|
| |||||||||||
|
|
|
|
|
|
|
|
|
|
|
|
|
|
|
| |
|
| If set to “0” minutes, this function does not work. | ||||||||||||||
M E N U A U T O O F F | N O |
|
L I N E D I S P L A Y | O N |
|
R I G H T L E F T R E V . | O F F |
|
T O P B O T T O M I N V . | O F F |
|
C L A M P | B P |
|
R E S I Z E | O N |
|
B A C K C O L O R | B L U E | |
C O L O R T E M P . | M I D D L E | |
A S P E C T C H A N G E | 4 : 3 |
|
S L E E P T I M E | 0 | M i n . |
L A M P T I M E | 1 0 H . | |
| back porch. | |
ST : The clamp pulse is positioned on the | ||
| sink tip. | |
BP |
| ST |
| ||
|
|
|
When the number of pixels (resolution) | ||
sought by the input video is smaller than | ||
that (resolution) of | ||
image is then enlarged to virtually full | ||
M E N U A U T O O F F | N O |
| ¶ To return to the main menu, press the PAGE | |
L I N E D I S P L A Y | O N |
| ||
R I G H T L E F T R E V . | O F F |
| BACK button. To finish the main menu, press | |
T O P B O T T O M I N V . | O F F |
| ||
C L A M P | B P |
| PAGE BACK again. | |
R E S I Z E | O N |
| ||
B A C K C O L O R | B L U E | • To finish the menu display from the submenu display (OPTIONS | ||
C O L O R T E M P . | M I D D L E | |||
menu), press PAGE BACK twice. | ||||
A S P E C T C H A N G E | 4 : 3 |
| ||
S L E E P T I M E | 0 | M i n . |
| |
L A M P T I M E | 1 0 H . |
| ||
Notes
•The selected item is shown in magenta color. Items shown in gray color cannot be operated or set in the current mode.
•Items to be set (adjusted) are different when AV signals are input and when
•When you turn the RESIZE function ON, allowing the screen to be enlarged virtually to its full size for projection (resizing
display), the video image (resolution) becomes coarse.
| screen size of | |||
| (resizing display). (Factory setting : ON) | |||
| Does not work (cannot be set) for video | |||
| system input. | |||
| OFF : Does not enlarge the video image for | |||
RESIZE | 2/3 | projection. When the number of | ||
|
| pixels sought by video image is | ||
|
| smaller than that of | ||
|
| projection takes place on a small | ||
|
| screen size with a black area around | ||
|
| the screen. | ||
| ON : Enlarges virtually to the full screen | |||
|
| size of | ||
|
| (resizing display). | ||
| OFF |
|
| ON |
|
|
| ||
Notes
•The selected item is shown in magenta color. Items shown in gray color cannot be operated or set in the current mode.
•Items to be set (adjusted) are different when AV signals are input and when
Note
•When you view a conventional (normal) 4 : 3 video picture, which is not wide video picture, on the projector’s screen the aspect change function, the upper and lower parts of the video picture become partially invisible. View such an original video picture in 4 : 3 mode, respecting the producer’s intention.
(To be continued on the next page)
42 | 43 |