Operating the Main Menu (Cont.)
Operating the Main Menu (Cont.)
Changing (Setting) the Source
Changing (Setting) the Source (Cont.)
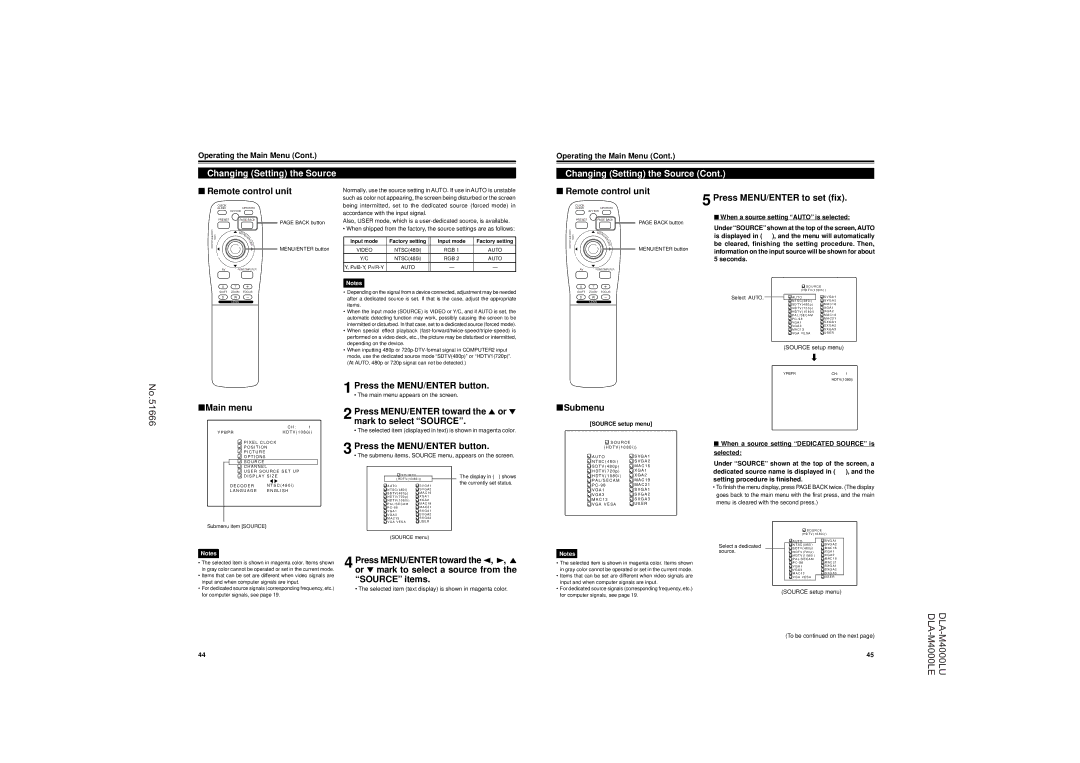
■Remote control unit
QUICK |
|
ALIGN. | OPERATE |
| AV HIDE |
PRESET | PAGE BACK |
LENS LOCK | PAGE BACK button |
N | |
| M |
| EN |
| U/ |
UNLOCK | E |
T | |
| E |
| R |
| MENU/ENTER button |
Normally, use the source setting in AUTO. If use in AUTO is unstable such as color not appearing, the screen being disturbed or the screen being intermitted, set to the dedicated source (forced mode) in accordance with the input signal.
Also, USER mode, which is a
• When shipped from the factory, the source settings are as follows:
Input mode | Factory setting | Input mode | Factory setting |
VIDEO | NTSC(480i) | RGB 1 | AUTO |
Y/C | NTSC(480i) | RGB 2 | AUTO |
Y, | AUTO | — | — |
■Remote control unit
QUICK |
|
ALIGN. | OPERATE |
| AV HIDE |
PRESET | PAGE BACK |
LENS LOCK | PAGE BACK button |
N | |
| M |
| EN |
| U/ |
UNLOCK | E |
T | |
| E |
| R |
| MENU/ENTER button |
5 Press MENU/ENTER to set (fix).
■When a source setting “A UTO” is selected:
Under “SOURCE” shown at the top of the screen, AUTO is displayed in ( ), and the menu will automatically be cleared, finishing the setting procedure. Then, information on the input source will be shown for about 5 seconds.
AV RGB/COMPUTER
U T +
SHIFT ZOOM FOCUS
D W –
LENS
Notes
•Depending on the signal from a device connected, adjustment may be needed after a dedicated source is set. If that is the case, adjust the appropriate items.
•When the input mode (SOURCE) is VIDEO or Y/C, and if AUTO is set, the automatic detecting function may work, possibly causing the screen to be intermitted or disturbed. In that case, set to a dedicated source (forced mode).
•When special effect playback
•When inputting 480p or
AV RGB/COMPUTER
U | T | + | S O U R C E |
SHIFT | ZOOM | FOCUS | ( H D T V ( 1 0 8 0 i ) ) |
|
D | W | – | Select AUTO. |
| A U T O | S V G A 1 |
| LENS |
|
|
| N T S C ( 4 8 0 i ) | S V G A 2 |
|
|
|
|
| S D T V ( 4 8 0 p ) | M A C 1 6 |
|
|
|
|
| H D T V ( 7 2 0 p ) | X G A 1 |
|
|
|
|
| H D T V ( 1 0 8 0 i ) | X G A 2 |
|
|
|
|
| P A L / S E C A M | M A C 1 9 |
|
|
|
|
| P C - 9 8 | M A C 2 1 |
|
|
|
|
| V G A 1 | S X G A 1 |
|
|
|
|
| V G A 3 | S X G A 2 |
|
|
|
|
| M A C 1 3 | S X G A 3 |
|
|
|
|
| V G A V E S A | U S E R |
(SOURCE setup menu)
«
YPBPRCH: 1
HDTV(1080i)
No.51666
■Main menu
| C H : | 1 |
Y P B P R | H D T V ( 1 0 8 0 i ) | |
| P I X E L C L O C K |
|
| P O S I T I O N |
|
| P I C T U R E |
|
1 Press the MENU/ENTER button.
• The main menu appears on the screen.
2 Press MENU/ENTER toward the 5 or ∞ mark to select “SOURCE”.
• The selected item (displayed in text) is shown in magenta color.
3 Press the MENU/ENTER button.
■Submenu
[SOURCE setup menu]
![]() S O U R C E
S O U R C E
( H D T V ( 1 0 8 0 i ) )
■ When a source setting “DEDICA TED SOURCE” is |
selected: |
O P T I O N S |
|
S O U R C E |
|
C H A N N E L |
|
U S E R S O U R C E S E T U P | |
D I S P L A Y S I Z E | |
D E C O D E R | N T S C ( 4 8 0 i ) |
L A N G U A G E | E N G L I S H |
Submenu item [SOURCE]
• The submenu items, SOURCE menu, appears on the screen.
S O U R C E |
|
| The display in ( ) shows |
( H D T V ( 1 0 8 0 i ) ) |
| the currently set status. | |
A U T O | S V G A 1 |
| |
|
| ||
N T S C ( 4 8 0 i ) | S V G A 2 |
|
|
S D T V ( 4 8 0 p ) | M A C 1 6 |
|
|
H D T V ( 7 2 0 p ) | X G A 1 |
|
|
H D T V ( 1 0 8 0 i ) | X G A 2 |
|
|
P A L / S E C A M | M A C 1 9 |
|
|
P C - 9 8 | M A C 2 1 |
|
|
V G A 1 | S X G A 1 |
|
|
V G A 3 | S X G A 2 |
|
|
M A C 1 3 | S X G A 3 |
|
|
V G A V E S A | U S E R |
|
|
(SOURCE menu)
![]() A U T O
A U T O
N T S C ( 4 8 0 i )
![]() S D T V ( 4 8 0 p )
S D T V ( 4 8 0 p )
H D T V ( 7 2 0 p )
![]() H D T V ( 1 0 8 0 i )
H D T V ( 1 0 8 0 i )
P A L / S E C A M
![]() P C - 9 8
P C - 9 8
V G A 1
![]() V G A 3
V G A 3
M A C 1 3
![]() V G A V E S A
V G A V E S A
![]() S V G A 1
S V G A 1
S V G A 2
![]() M A C 1 6
M A C 1 6
X G A 1
![]() X G A 2
X G A 2
M A C 1 9
![]() M A C 2 1
M A C 2 1
S X G A 1
![]() S X G A 2
S X G A 2
S X G A 3
 U S E R
Under “SOURCE” shown at the top of the screen, a dedicated source name is displayed in ( ), and the setting procedure is finished.
•To finish the menu display, press PAGE BACK twice. (The display goes back to the main menu with the first press, and the main menu is cleared with the second press.)
 S O U R C E
( H D T V ( 1 0 8 0 i ) )
Notes
•The selected item is shown in magenta color. Items shown in gray color cannot be operated or set in the current mode.
•Items that can be set are different when video signals are input and when computer signals are input.
•For dedicated source signals (corresponding frequency, etc.) for computer signals, see page 19.
4 Press MENU/ENTER toward the 2, 3, 5 or ∞ mark to select a source from the “SOURCE” items.
• The selected item (text display) is shown in magenta color.
Notes
•The selected item is shown in magenta color. Items shown in gray color cannot be operated or set in the current mode.
•Items that can be set are different when video signals are input and when computer signals are input.
•For dedicated source signals (corresponding frequency, etc.) for computer signals, see page 19.
|
| A U T O | S V G A 1 |
Select a dedicated |
| N T S C ( 4 8 0 i ) | S V G A 2 |
S D T V ( 4 8 0 p ) | M A C 1 6 | ||
source. | H D T V ( 7 2 0 p ) | X G A 1 | |
|
| H D T V ( 1 0 8 0 i ) | X G A 2 |
|
| P A L / S E C A M | M A C 1 9 |
|
| P C - 9 8 | M A C 2 1 |
|
| V G A 1 | S X G A 1 |
|
| V G A 3 | S X G A 2 |
|
| M A C 1 3 | S X G A 3 |
|
| V G A V E S A | U S E R |
(SOURCE setup menu)
44
(To be continued on the next page)
45