EX-A10
Consists of RX-EXA10, SP-EXA10 and XV-EXA10
For U.S.A
Information
Page
Important for Laser Products / Important Pour Produits Laser
For Canada/pour le Canada
Table of contents
Listening to the sound of other Audio equipment
Supplied accessories
Timer
Reference
Numbers refer to the pages in which the parts are explained
Part description
DVD player
23-26
Receiver
18, 20
Using the remote control
Inserting batteries into the remote control
Remote control operation
Operating the TV using the remote control
Press Enter and release Press number buttons 1-9
Release FTV
Connecting the AM loop antenna supplied
Standard setup
Connecting the antennas
Connections
Connecting the FM antenna supplied
Connecting the speakers
Connections
There is no difference between the left and right speakers
Connecting the receiver and the DVD player
Make sure to connect the three supplied cords
Slide the remote control mode selector to
Connecting other equipment
Connecting other speakers
Connecting the subwoofer
Connecting a TV
Connecting other audio equipment
Connecting a TV with the S-VIDEO terminal
Selected video signal type is displayed for a short time
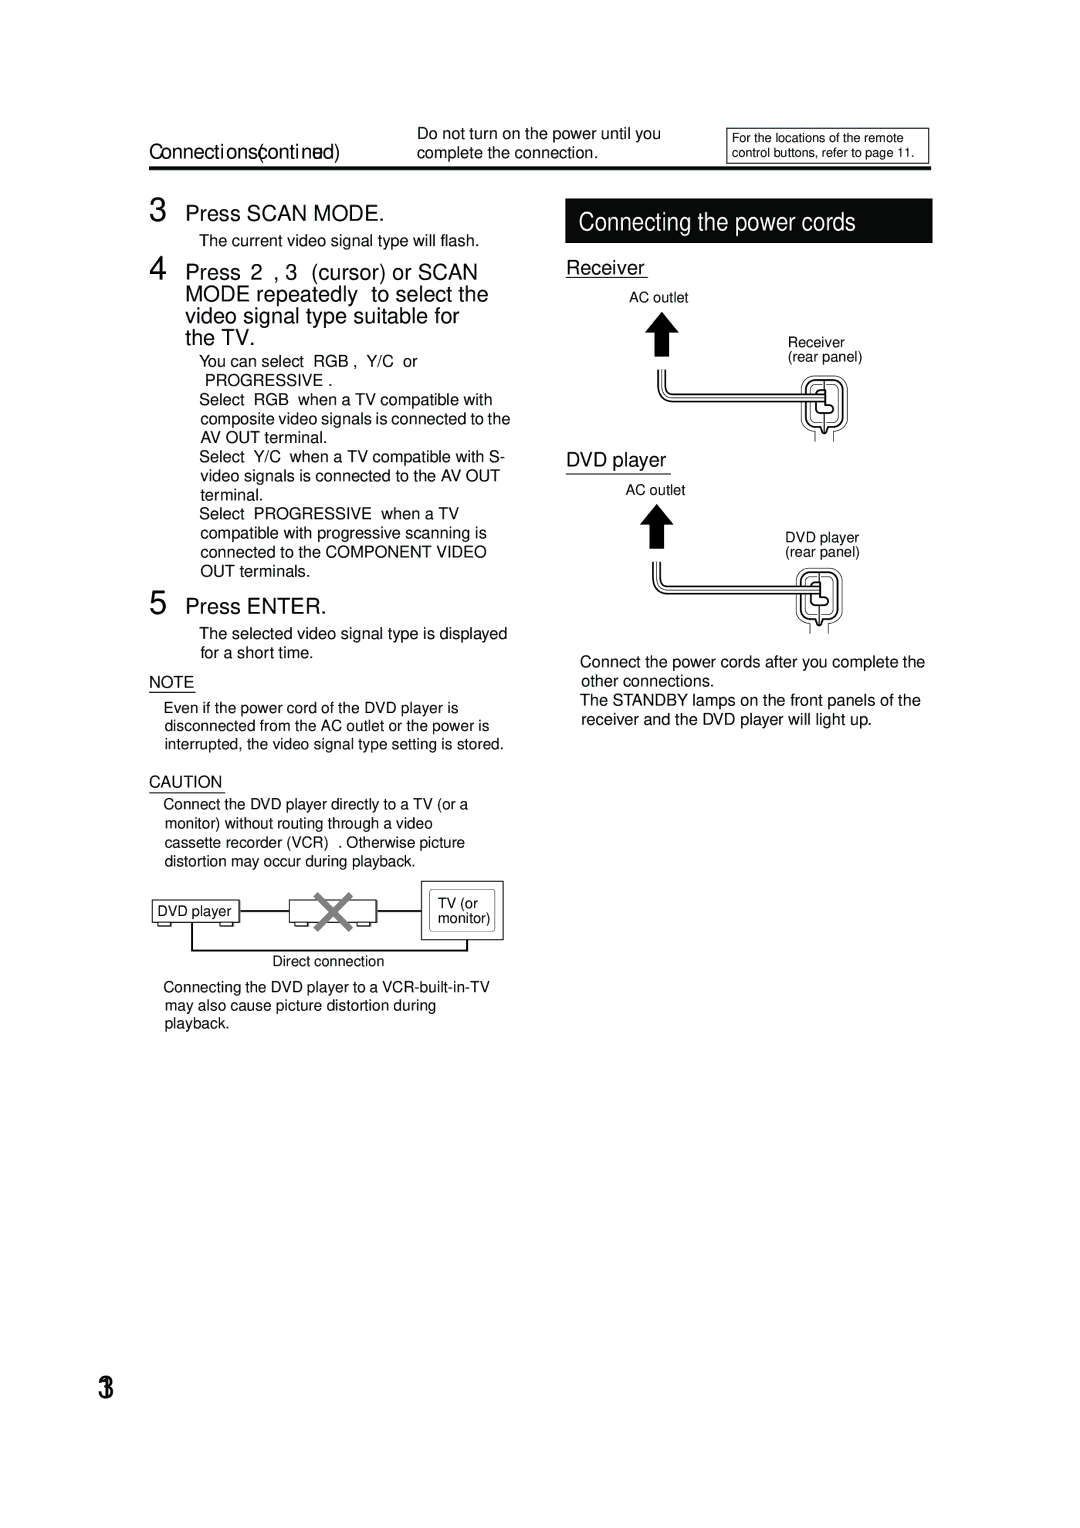
Connecting the power cords
Current video signal type will flash
Press Enter
Press F Audio or F on the receiver
Basic operations
Turning on/off the system
Preparation/Basic operations
Setting the clock
Dimmer
Adjusting the volume
Adjusting the sound quality
Turning off the sound temporarily Muting
Enhancing the playback sound CC Converter
Adjusting the bass sound
Press Bass Adjust
Press CC Converter
Press FM/AM to select FM or AM
Listening to radio broadcasts
Selecting a radio station
Basic operations/Listening to radio
You can also select the preset number by
Tuning in to a preset radio station
Presetting radio stations
Listening to radio broadcasts
Place a disc
Basic operations of the DVD player
Playing back a DVD/CD
Press 3 play or DVD
Slide-show playback
Slide the remote control mode selector to DVD Load a disc
Basic operations of the DVD player
Display window on the DVD player
VCD/SVCD
Changing the display in the display window
Selecting a chapter/track using the number buttons
Slide the remote control mode selector to DVD Press
Stopping playback
Pausing playback
Advancing the picture frame by frame
Fast reverse/fast forward search
Slow motion playback
Skipping to the beginning of a chapter/ track/file
DVDs/CDs
Slide the remote control mode selector to DVD Press 3 play
Skipping at about Resuming playback Minute intervals
Temporarily stopping playback
Selecting a track from the menu screen
Press 5//cursor to select the desired title Press Enter
Display on the DVD player for a DVD Video
Releasing Follow the same instructions as those for setting
Convenient functions of the DVD player
TV screen for a DVD Video Program screen
Select a title number, and then a chapter number
Select a group number, and then a track number
Slide the remote control mode selector to DVD Press Repeat
Playing back a DVD/CD in a random order Random playback
Playing back a DVD/CD repeatedly Repeat playback
Convenient functions of the DVD player
Saving the playback settings for next time
Playing back a specified part repeatedly Repeat playback
Press 2/3 cursor to select
Slide the remote control mode selector to DVD Press Audio
Selecting the subtitles Selecting the audio Language
Press 5// cursor to select a subtitle language Press Enter
Selecting the view angle
Slide the remote control mode selector to DVD Press Angle
Slide the remote control mode selector to DVD Press Zoom
Magnifying the picture Zoom
Adjusting the picture quality VFP
Playing back the bonus group
Browsable still pictures B.S.P
Creating realistic sound 3D Phonic
Two speakers produce an effect resembling surround-sound
Using the status bar and the menu bar
When a DVD Video is loaded
Function list
Designating the time Time search
Menu bar will appear a
Slide the remote control mode selector to DVD Press SET UP
Basic operations
Changing the initial settings with the preference screen
Picture
DTS DVD VIDEO/DVD Audio
Listening to the sound of other audio equipment
Listening to the sound of other audio equipment/Timer
Timer
Using the sleep timer
Press Sleep
Set the clock beforehand. a
Using the playback timer
Playback timer works
Weekly or every day
Playback timer is available only when the receiver is off
Press F Audio to turn off the receiver
Power of the TV is turned on
Using the AV Compu Link function
Connection and setup
Operation
Special cautions
Important cautions
ASF Advanced
About DVDs/CDs
Playable DVD/CD types
DivX
Discs that cannot be played back
Disc structure
About DVDs/CDs
Troubleshooting
DVD/CD ejection is locked → a
Troubleshooting Other
Language codes
Single Amp is selected on the receiver → Select Bi-Amp. a
Specifications
Receiver RX-EXA10
For U.S.A
For U.S.A
EX-A10 Compact Component System
LVT1403-004A B
Important for Laser Products
Important for the U.K
This symbol is only valid in the European Union
Information for Users on Disposal of Old Equipment
Above ALL
Table of contents
Using the playback timer Using the sleep timer
26-29
1010
18, 23
18 45
Batteries 3331, 33 15, 34, 45 15
TV Channel
DVD player Speaker Receiver
Connecting the FM antenna supplied
Connecting the speakers
Cord supplied Supplied
Connecting other equipment
Connecting a TV with the AV OUT terminal
Connecting the power cords
Basic operations
Refer to Changing the display in the display window. a
Dimmer
Adjusting the bass sound
FM Mode Memory Display
Changing the Radio Data System information
Radio Data System
Receiving FM radio broadcasts with Radio Data System
Shows commonly known radio station names
Searching for programs by PTY codes PTY search
When Document is selected as a PTY code
Press Display Radio Data System repeatedly
Press Search
PTY codes None
Switching to a program type of your choice temporarily
TA Traffic announcement
Playing back DVDs/CDs
Slide-show playback DVDs/CDs
Selected file will be played back
Basic operations of the DVD player
Changing the display in the display window
Pausing playback
Slow motion playback
Skipping at about 5 minute intervals Resuming playback
Date
Locking DVD/CD ejection
Unlocked appears in the display window on the DVD player
Press the number buttons to Program chapters/tracks
Display on the DVD player for DVD AUDIO/ MP3/WMA
Playing back a DVD/CD in a random order Random playback
Menu bar a page 39 will be displayed
Selecting the subtitles Selecting the audio language
Selecting the view angle
Adjusting the picture quality VFP
Browsable still pictures B.S.P
Information displayed on the status bar
Function list
Changing the initial settings with the preference screen
Select OFF. a
Changing the initial settings with the preference screen
Listening to the sound of other audio equipment
Timer
Press F Audio to turn off the receiver
Using the sleep timer
Timer/Reference
About DVDs/CDs
Reference
Disc structure
Reference Power source
Language codes
Specifications
0905SKMMODJEM
LVT1403-011A A, US, UN, UB, UW, UG
Important for Laser Products
European Union only
Table of contents
Supplied accessories
Part description
Receiver
Using the remote control
Operating the TV using the remote control
Connections
Connecting the FM antenna supplied
Connecting the speakers
Connecting the receiver and the DVD player
Connecting other equipment
Connecting a TV
Connecting the power cords
Display Faudio Open Fdvd Close AUX FM/AM Muting
Setting the clock
Dimmer
Adjusting the bass sound
Setting the AM tuner spacing
Tuning in to a preset radio station
Basic operations of the DVD player
Basic operations of the DVD player
Playing back DVDs/CDs
Changing the display in the display window
Press 1or ¡
Hold down Previous 4or NEXT¢
Slow motion playback
Skipping at about Resuming playback Minute intervals
Selecting a track from the menu screen
Convenient functions of the DVD player
Press 3 play
Playing back a DVD/CD in a random order Random playback
Playing back a specified part repeatedly Repeat playback
Selecting the subtitles Selecting the audio Language
Selecting the view angle
Adjusting the picture quality VFP
Browsable still pictures B.S.P
Using the status bar and the menu bar
Function list
Changing the initial settings with the preference screen
Monitor
PCM only Dolby DIGITAL/PCM STREAM/PCM
Listening to the sound of other audio equipment
Timer
Using the playback timer
Press F Audio to turn off the receiver
Using the AV Compu Link function
Special cautions
About DVDs/CDs
Discs that cannot be played back
Disc structure
Troubleshooting
Language codes
Tuner FM frequency 87.50 MHz 108.00 MHz AM frequency
EX-A10 Compact Component System