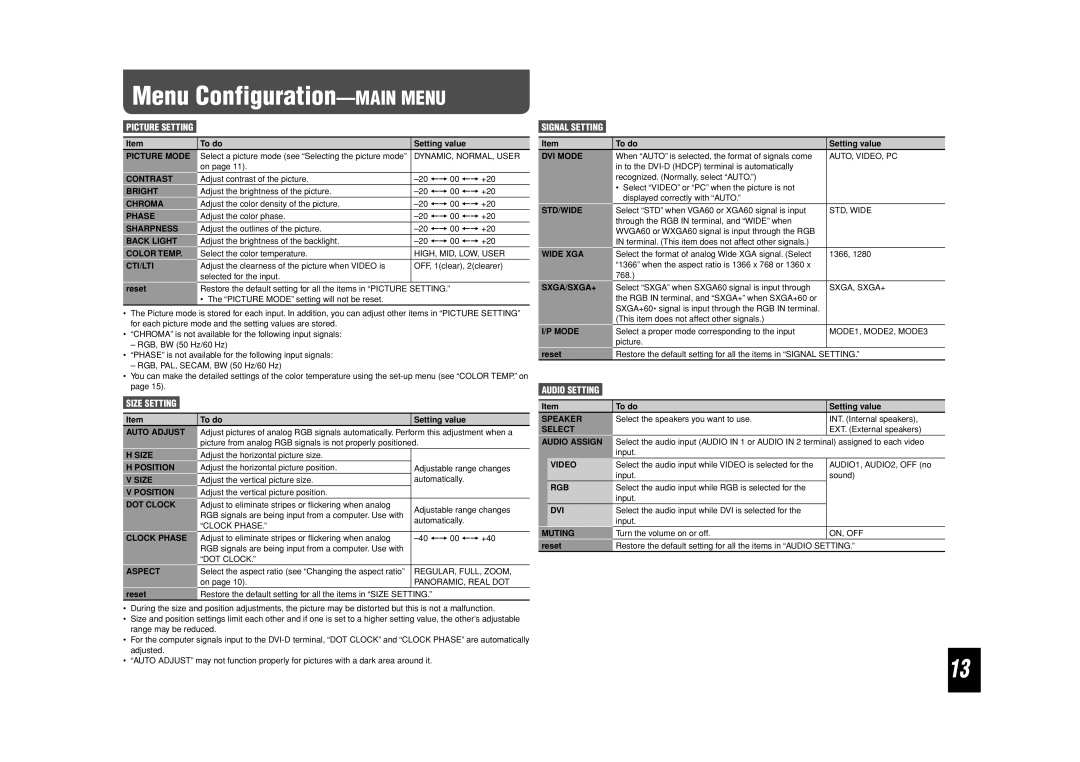
Menu Configuration—MAIN MENU
PICTURE SETTING
Item | To do | Setting value |
PICTURE MODE | Select a picture mode (see “Selecting the picture mode” | DYNAMIC, NORMAL, USER |
| on page 11). |
|
CONTRAST | Adjust contrast of the picture. | |
BRIGHT | Adjust the brightness of the picture. | |
CHROMA | Adjust the color density of the picture. | |
PHASE | Adjust the color phase. | |
SHARPNESS | Adjust the outlines of the picture. | |
BACK LIGHT | Adjust the brightness of the backlight. | |
COLOR TEMP. | Select the color temperature. | HIGH, MID, LOW, USER |
CTI/LTI | Adjust the clearness of the picture when VIDEO is | OFF, 1(clear), 2(clearer) |
| selected for the input. |
|
reset | Restore the default setting for all the items in “PICTURE SETTING.” | |
•The “PICTURE MODE” setting will not be reset.
•The Picture mode is stored for each input. In addition, you can adjust other items in “PICTURE SETTING” for each picture mode and the setting values are stored.
•“CHROMA” is not available for the following input signals:
–RGB, BW (50 Hz/60 Hz)
•“PHASE” is not available for the following input signals:
–RGB, PAL, SECAM, BW (50 Hz/60 Hz)
•You can make the detailed settings of the color temperature using the
SIZE SETTING
Item | To do | Setting value |
AUTO ADJUST Adjust pictures of analog RGB signals automatically. Perform this adjustment when a picture from analog RGB signals is not properly positioned.
SIGNAL SETTING
Item | To do | Setting value |
DVI MODE | When “AUTO” is selected, the format of signals come | AUTO, VIDEO, PC |
| in to the |
|
| recognized. (Normally, select “AUTO.”) |
|
| • Select “VIDEO” or “PC” when the picture is not |
|
| displayed correctly with “AUTO.” |
|
STD/WIDE | Select “STD” when VGA60 or XGA60 signal is input | STD, WIDE |
| through the RGB IN terminal, and “WIDE” when |
|
| WVGA60 or WXGA60 signal is input through the RGB |
|
| IN terminal. (This item does not affect other signals.) |
|
WIDE XGA | Select the format of analog Wide XGA signal. (Select | 1366, 1280 |
| “1366” when the aspect ratio is 1366 x 768 or 1360 x |
|
| 768.) |
|
SXGA/SXGA+ | Select “SXGA” when SXGA60 signal is input through | SXGA, SXGA+ |
| the RGB IN terminal, and “SXGA+” when SXGA+60 or |
|
| SXGA+60* signal is input through the RGB IN terminal. |
|
| (This item does not affect other signals.) |
|
I/P MODE | Select a proper mode corresponding to the input | MODE1, MODE2, MODE3 |
| picture. |
|
reset | Restore the default setting for all the items in “SIGNAL SETTING.” | |
AUDIO SETTING
Item | To do | Setting value |
SPEAKER | Select the speakers you want to use. | INT. (Internal speakers), |
SELECT |
| EXT. (External speakers) |
AUDIO ASSIGN | Select the audio input (AUDIO IN 1 or AUDIO IN 2 terminal) assigned to each video | |
H SIZE
HPOSITION V SIZE
V POSITION DOT CLOCK
CLOCK PHASE
ASPECT
Adjust the horizontal picture size. |
| |
Adjust the horizontal picture position. | Adjustable range changes | |
Adjust the vertical picture size. | automatically. | |
Adjust the vertical picture position. |
| |
Adjust to eliminate stripes or flickering when analog | Adjustable range changes | |
RGB signals are being input from a computer. Use with | ||
automatically. | ||
“CLOCK PHASE.” | ||
| ||
Adjust to eliminate stripes or flickering when analog | ||
RGB signals are being input from a computer. Use with |
| |
“DOT CLOCK.” |
| |
Select the aspect ratio (see “Changing the aspect ratio” | REGULAR, FULL, ZOOM, | |
on page 10). | PANORAMIC, REAL DOT |
|
| input. |
|
| VIDEO | Select the audio input while VIDEO is selected for the | AUDIO1, AUDIO2, OFF (no |
|
| input. | sound) |
| RGB | Select the audio input while RGB is selected for the |
|
|
| input. |
|
| DVI | Select the audio input while DVI is selected for the |
|
|
| input. |
|
MUTING | Turn the volume on or off. | ON, OFF | |
reset | Restore the default setting for all the items in “AUDIO SETTING.” | ||
reset | Restore the default setting for all the items in “SIZE SETTING.” |
•During the size and position adjustments, the picture may be distorted but this is not a malfunction.
•Size and position settings limit each other and if one is set to a higher setting value, the other’s adjustable range may be reduced.
•For the computer signals input to the
•“AUTO ADJUST” may not function properly for pictures with a dark area around it.
13