Recording from 3-CD Changer—CD Synchronized Recording
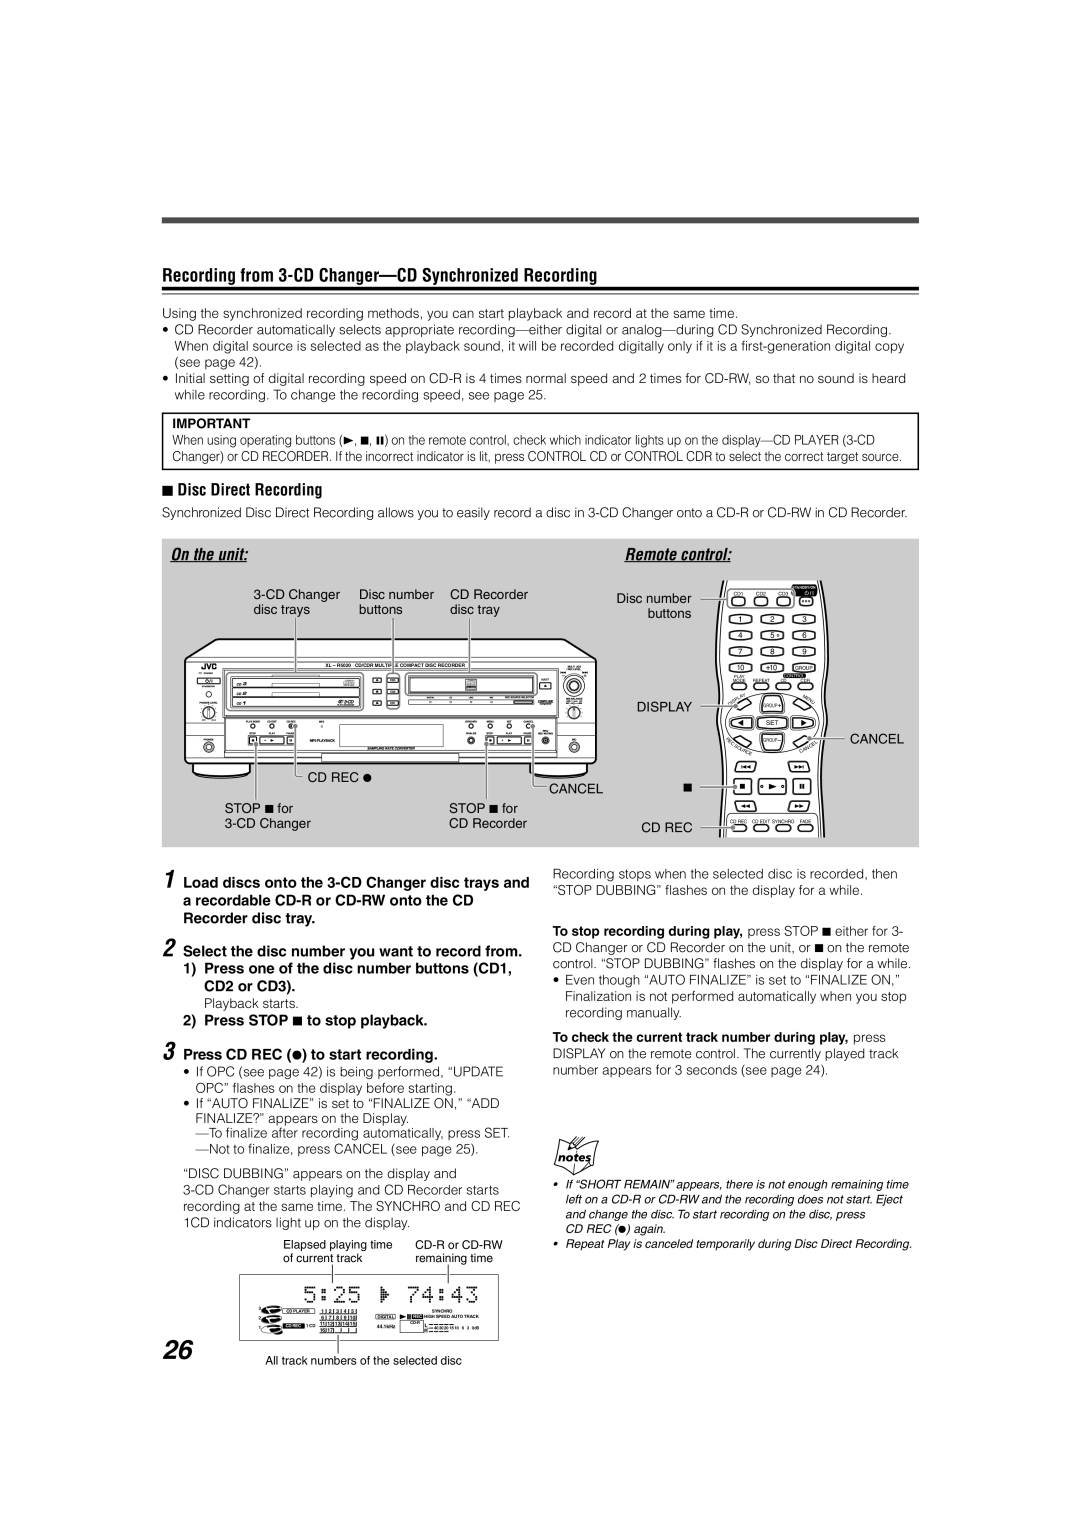
Using the synchronized recording methods, you can start playback and record at the same time.
•CD Recorder automatically selects appropriate
•Initial setting of digital recording speed on
IMPORTANT
When using operating buttons (3, 7, 8) on the remote control, check which indicator lights up on the
7Disc Direct Recording
Synchronized Disc Direct Recording allows you to easily record a disc in
On the unit: | Remote control: |
Disc number | CD Recorder | Disc number | |
disc trays | buttons | disc tray | buttons |
XL – R5020 CD/CDR MULTIPLE COMPACT DISC RECORDER |
Recordable |
ReWritable |
DISPLAY
MIN MAX
CD REC ¶ |
|
CANCEL | 7 |
STOP 7 for | STOP 7 for |
|
| CD Recorder | CD REC |
|
|
STANDBY/ON
CD1 CD2 CD3
1 2 3
4 5 6
7 8 9
10 ![]() 10 GROUP
10 GROUP
PLAY | CONTROL | |
MODE REPEAT | CD | CDR |
|
| Y |
| M |
|
|
| A |
|
| |
| L |
| E | ||
| P |
|
|
| N |
IS |
| GROUP |
| U | |
D |
|
|
|
| |
|
|
| SET |
|
|
E |
|
| GROUP |
|
|
R |
|
|
|
|
|
C |
|
|
|
| L |
| S |
|
|
| C |
| O |
| A | ||
|
| UR |
| N | |
|
|
| C |
| |
|
| CE |
|
|
|
CD REC CD EDIT SYNCHRO FADE
CANCEL
1 Load discs onto the
2 Select the disc number you want to record from.
1)Press one of the disc number buttons (CD1, CD2 or CD3).
Playback starts.
2)Press STOP 7 to stop playback.
3 Press CD REC (¶) to start recording.
•If OPC (see page 42) is being performed, “UPDATE OPC” flashes on the display before starting.
•If “AUTO FINALIZE” is set to “FINALIZE ON,” “ADD FINALIZE?” appears on the Display.
“DISC DUBBING” appears on the display and
|
| Elapsed playing time | ||||||||||||
|
| of current track |
|
| remaining time | |||||||||
|
|
|
|
|
|
|
|
|
|
|
|
|
|
|
| 3 | CD PLAYER | 1 | 2 |
| 3 | 4 | 5 |
|
|
|
|
|
|
|
|
|
|
| SYNCHRO |
| ||||||||
|
|
|
|
|
|
| ||||||||
| 2 |
| 6 | 7 |
| 8 | 9 | 10 | DIGITAL | REC HIGH SPEED AUTO TRACK |
| |||
| 1 | CD REC 1 CD | 11 12 | 13 14 15 | 44.1kHz |
| L 40 30 20 15 10 6 3 0dB |
| ||||||
26 |
|
| 16 17 |
|
|
|
|
|
| R |
| |||
|
|
|
|
|
|
|
|
|
|
|
|
|
| |
|
|
|
| |||||||||||
| All track numbers of the selected disc | |||||||||||||
Recording stops when the selected disc is recorded, then “STOP DUBBING” flashes on the display for a while.
To stop recording during play, press STOP 7 either for 3- CD Changer or CD Recorder on the unit, or 7 on the remote control. “STOP DUBBING” flashes on the display for a while.
•Even though “AUTO FINALIZE” is set to “FINALIZE ON,” Finalization is not performed automatically when you stop recording manually.
To check the current track number during play, press DISPLAY on the remote control. The currently played track number appears for 3 seconds (see page 24).
•If “SHORT REMAIN” appears, there is not enough remaining time left on a
CD REC (¶) again.
•Repeat Play is canceled temporarily during Disc Direct Recording.
