7Program Edit Recording
You can arrange the recording order of tracks of the discs in
• You can program up to 32 tracks.
IMPORTANT
When using operating buttons (3, 7, 8) on the remote control, check which indicator lights up on the
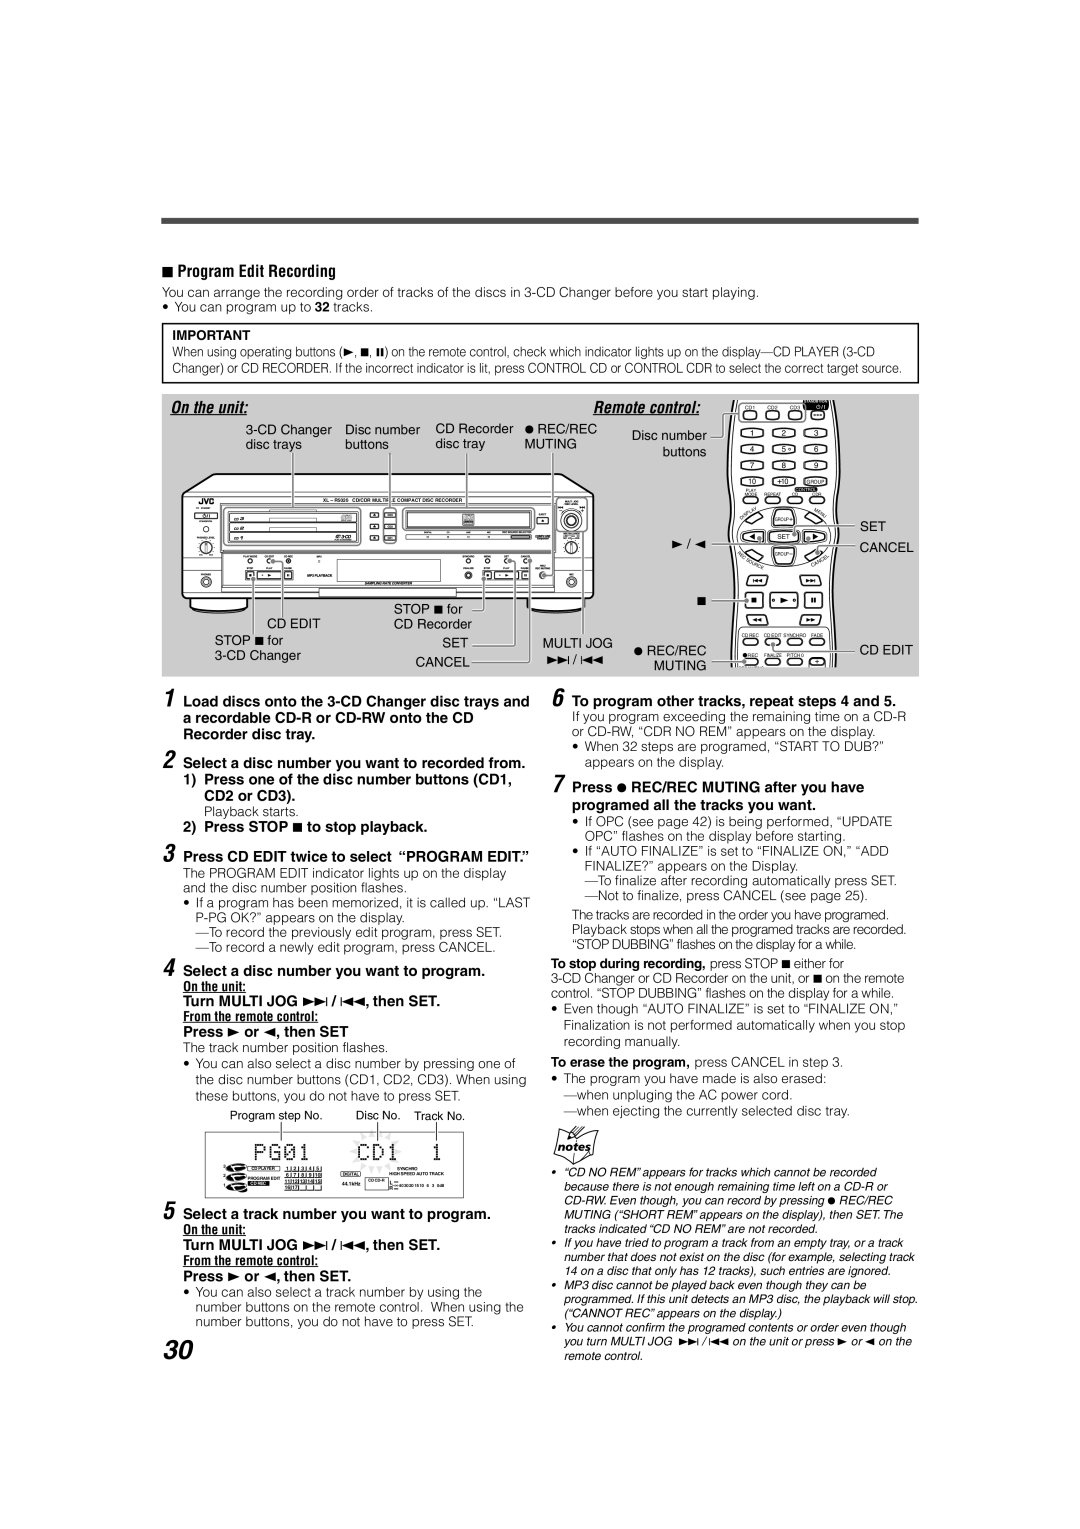
On the unit: |
|
| Remote control: |
|
|
|
|
| STANDBY/ON | ||
|
|
| CD1 | CD2 | CD3 |
|
| ||||
|
|
|
|
|
|
|
|
| |||
Disc number | CD Recorder | ¶ REC/REC | Disc number |
|
| 1 | 2 |
| 3 |
| |
disc trays | buttons | disc tray | MUTING |
|
|
|
|
|
|
| |
buttons |
|
| 4 | 5 |
| 6 |
| ||||
|
|
|
|
|
|
|
|
|
|
| |
|
|
|
|
|
|
| 7 | 8 |
| 9 |
|
|
|
|
|
|
|
| 10 | 10 |
| GROUP | |
|
|
|
|
|
| PLAY |
| CONTROL |
| ||
|
|
|
|
| MODE | REPEAT | CD | CDR | |||
XL – R5020 CD/CDR MULTIPLE COMPACT DISC RECORDER |
|
|
|
|
|
|
|
|
| ||
|
|
|
|
|
|
| Y |
|
| M |
|
|
|
|
|
|
|
| A |
|
|
| |
|
|
|
|
|
| L |
|
| E | ||
|
|
|
|
|
| P |
|
|
| N | |
|
|
|
|
| IS |
| GROUP |
|
| U | |
|
| Recordable |
|
| D |
|
|
|
| SET | |
|
| ReWritable |
|
|
|
|
|
|
|
| |
|
|
|
|
|
|
|
| SET |
|
| |
|
|
|
| 3 / 2 |
|
|
|
|
| CANCEL | |
MIN MAX |
|
|
| R |
|
| GROUP |
|
| ||
|
|
|
| E |
|
|
|
|
| ||
|
|
|
|
| C |
|
|
|
|
| L |
|
|
|
|
| S |
|
|
|
| E | |
|
|
|
|
|
|
|
|
|
| C | |
|
|
|
|
|
| O |
|
| N | ||
|
|
|
|
|
|
|
| A |
| ||
|
|
|
|
|
|
| UR | CE |
| C |
|
| STOP 7 for |
| 7 |
|
|
|
CD EDIT |
|
|
|
|
| |
CD Recorder |
|
|
|
|
| |
STOP 7 for | SET | MULTI JOG |
| CD REC CD EDIT SYNCHRO FADE |
| |
¶ REC/REC |
|
| CD EDIT | |||
REC | FINALIZE PITCH 0 | |||||
CANCEL | ¢ / 4 | MUTING |
|
|
| |
| REC MUTING |
|
| |||
1 Load discs onto the
2 Select a disc number you want to recorded from.
1)Press one of the disc number buttons (CD1, CD2 or CD3).
Playback starts.
2)Press STOP 7 to stop playback.
3 Press CD EDIT twice to select “PROGRAM EDIT.”
The PROGRAM EDIT indicator lights up on the display and the disc number position flashes.
•If a program has been memorized, it is called up. “LAST
4 Select a disc number you want to program.
On the unit:
Turn MULTI JOG ¢ / 4, then SET.
From the remote control:
Press 3 or 2, then SET
The track number position flashes.
•You can also select a disc number by pressing one of the disc number buttons (CD1, CD2, CD3). When using these buttons, you do not have to press SET.
| Program step No. | Disc No. Track No. | ||||||||||
|
|
|
|
|
|
|
|
|
|
|
|
|
3 |
|
|
|
|
|
|
|
|
|
|
|
|
CD PLAYER | 1 | 2 | 3 | 4 | 5 |
|
|
|
| SYNCHRO | ||
|
|
|
|
| ||||||||
2 | PROGRAM EDIT | 6 | 7 | 8 | 9 | 10 | DIGITAL | CD | HIGH SPEED AUTO TRACK | |||
| 11 12 13 14 15 |
| L |
|
| |||||||
1 | CD REC | 16 17 |
|
|
| 44.1kHz |
|
| 40 30 20 15 10 6 3 0dB | |||
|
|
|
|
|
|
|
| R |
|
| ||
|
|
|
|
|
|
|
|
|
|
|
|
|
5 Select a track number you want to program.
On the unit:
Turn MULTI JOG ¢ / 4, then SET.
From the remote control:
Press 3 or 2, then SET.
•You can also select a track number by using the number buttons on the remote control. When using the number buttons, you do not have to press SET.
30
6 To program other tracks, repeat steps 4 and 5.
If you program exceeding the remaining time on a
•When 32 steps are programed, “START TO DUB?” appears on the display.
7 Press ¶ REC/REC MUTING after you have programed all the tracks you want.
•If OPC (see page 42) is being performed, “UPDATE OPC” flashes on the display before starting.
•If “AUTO FINALIZE” is set to “FINALIZE ON,” “ADD FINALIZE?” appears on the Display.
The tracks are recorded in the order you have programed. Playback stops when all the programed tracks are recorded. “STOP DUBBING” flashes on the display for a while.
To stop during recording, press STOP 7 either for
•Even though “AUTO FINALIZE” is set to “FINALIZE ON,” Finalization is not performed automatically when you stop recording manually.
To erase the program, press CANCEL in step 3.
•The program you have made is also erased:
•“CD NO REM” appears for tracks which cannot be recorded because there is not enough remaining time left on a
•If you have tried to program a track from an empty tray, or a track number that does not exist on the disc (for example, selecting track 14 on a disc that only has 12 tracks), such entries are ignored.
•MP3 disc cannot be played back even though they can be programmed. If this unit detects an MP3 disc, the playback will stop. (“CANNOT REC” appears on the display.)
•You cannot confirm the programed contents or order even though you turn MULTI JOG ¢ / 4 on the unit or press 3 or 2 on the remote control.