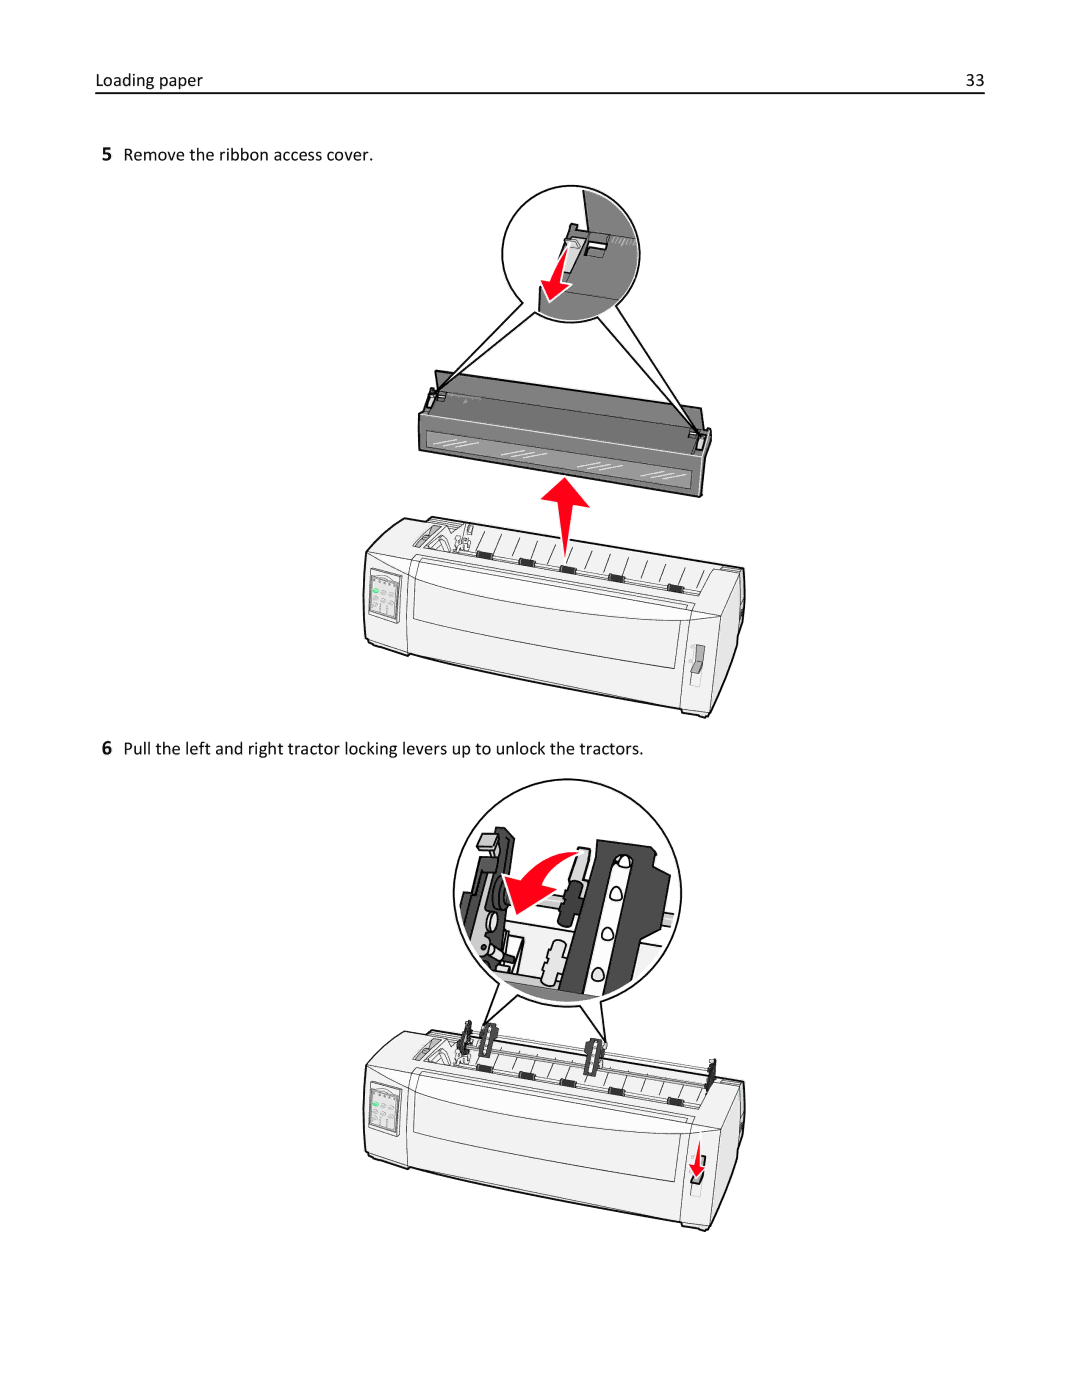
Manuals
/
Lexmark
/
Computer Equipment
/
All in One Printer
Lexmark
2500 manual Loading paper, 5Remove the ribbon access cover
Models:
2500
1
33
84
84
Download
84 pages
2.02 Kb
30
31
32
33
34
35
36
37
<
>
Troubleshooting
Warranty
2Click Configuration
Solving printing problems
Understanding Setup mode and menu options
Default Macro
Paper Out Alarm
Adjusting character bidirectional alignment
Setting the printer online or offline
Cleaning the printer
Page 33
Image 33
Loading paper
33
5
Remove the ribbon access cover.
6
Pull the left and right tractor locking levers up to unlock the tractors.
Page 32
Page 34
Page 33
Image 33
Page 32
Page 34
Contents
Users Guide
January
Forms Printer 2500 Series
Safety information
Contents
Using the control panel
Learning about the printer
Administrative support
Understanding Setup mode and menu options
Paper and specialty media guide
Changing tractor positions
Troubleshooting
Index
Notices
Contents
Power consumption
Safety information
Learning about theprinter
Printer overview
Printer front view
Printer back view
Applying control panel overlays
Understanding the printer features and functions
Feature/function
Learning about the printer
All models
Learning about the printer
Printing a demonstration page
1Set the forms thickness lever to position
2Turn the printer on
Printing a network setup page
Using IBM emulation mode
Printing from Windows or DOS
Windows
For Lexmark Forms Printer 2580/2581 users
Using Epson emulation mode
For Lexmark Forms Printer 2590/2591 users
For Forms Printer 2580/2581 users
For Forms Printer 2590/2591 users
Using Okidata MICROLINE emulation mode
Understanding the control panel buttons
Using thecontrolpanel
Using the control panel
Understanding the control panel lights
Advancing paper
Setting the printer online or offline
Using the Load/Unload function
Locking and unlocking the control panel
Selecting a Tractor mode
Disabling Font Lock
Selecting and locking a font
Disabling Pitch Lock
Selecting and locking a pitch
Loadingpaper
Setting the forms thickness lever
Paper paths
Paper paths for the push tractor
Notes
Using the Tear Off function
Setting the Tear Off position
Paper paths for the pull tractor
Loading continuous forms using the push tractor
Loading continuous paper
6Press Start/Stop
Loading paper
4Pull the front cover up
5Move the paper select lever down to the position
8Close the left and right tractor doors
Loading paper
Loading paper
Loading paper
7Open the left and right tractor doors
8Open the front cover
13Replace the ribbon access cover
11Place the paper holes over the tractor pins
Loading paper
10Close the front cover
Notes
Notes
1Turn the printer on
Loading paper
2Make sure the paper path is clear
3Set the forms thickness lever to
Loading paper
5Remove the ribbon access cover
9Place the paper holes over the tractor pins
Loading paper
7Open the left and right tractor doors
15Open the control panel cover to access layer
11Replace the ribbon access cover
Loading paper
10Close the left and right tractor doors
Loading a cut form or envelope manually
Loading cut forms
Notes
Loading paper
Notes
Aligning the left margin
4Press FormFeed
Setting Top-of-Form
Setting Top‑Of‑Form for a cut form or an envelope
Setting Top‑Of‑Form in a macro
Paper types and sizes supported by the printer
Paper andspecialtymedia guide
Cut Forms
Continuous Forms
Changing tractor positions
Push tractor position
Pull tractor position
Changing tractor positions
5Make sure the paper select lever is set to the
Changing tractor positions
position
7Release the latching levers
Using Setup mode
UnderstandingSetupmode and menu options
Changing menu settings an example
Main menu options
Setup Mode - Main menu
Forms Macro Options
Data Options
Forms Macro options
Default Macro
Control Options
Emulation Options
Data options
Paper Handling Options
Buffer
Auto LF
Control options
Auto CR
Zero Slash
Uni‑Dir Printing
Paper Out Alarm
Auto Ready Cut Sheet
Demo Print
Interface options
Emulation options
IBM mode
Epson mode
Honor Init
Interface Selection
Preparing the printer for cleaning
Cleaning the printer
Cleaning the inside of the printer
Maintaining theprinter
Recycling Lexmark products
Cleaning the outside of the printer
Restoring the factory default settings
Administrativesupport
Restoring the US factory default settings
Restoring the EU factory default settings
Supporting SNMPv3
Supporting IPSec
2Click Configuration
Using 802.1x authentication
2Click Configuration
4Click 802.1x Authentication
Testing the printer
Troubleshooting
Checking an unresponsive printer
Running a printer test page
Checking the printer status
Using Hex Trace mode
Troubleshooting
Notes
Adjusting character bidirectional alignment
Solving printing problems
Printer is noisy
Printer alarm sounds
1Press Start/Stop
6Press Start/Stop
Printer speed slows
Left margin moves to the right during printing
Paper is jammed in the printer
Solving paper feed problems
Paper jam in the Tractor 2 Feeder
Paper is jammed in the Auto Sheet Feeder
Printer does not feed paper
To clear a cut form paper jam
Printer does not feed from the Auto Sheet Feeder
The Auto Sheet Feeder feeds multiple sheets
Paper fed from the Auto Sheet Feeder is skewed
Print is too light
Solving print quality problems
Dots are missing or print quality is poor
CHECK THE RIBBON DENSITY CONTROL KNOB
Forms are smudged or print is too dark
Characters are wrong or missing
Incorrect number of lines on a page
Graphics do not print
Incorrect line spacing or overprinting occurs
Contacting Customer Support
Edition notice
Notices
2014 Lexmark International, Inc
All rights reserved
UNITED STATES GOVERNMENT RIGHTS
Trademarks
Conventions
Industry Canada compliance statement
European Community EC directives conformity
Noise emission levels
Product power consumption
ENERGY STAR Power consumption
Power Saver
Statement of Limited Warranty
Limited warranty
Off mode
Extent of limited warranty
Limited warranty service
Additional rights
Limitation of liability
Numerics
Index