Manuals
/
Meridian Audio
/
Home Audio
/
Home Theater System
Meridian Audio
FDP-DILA2
warranty
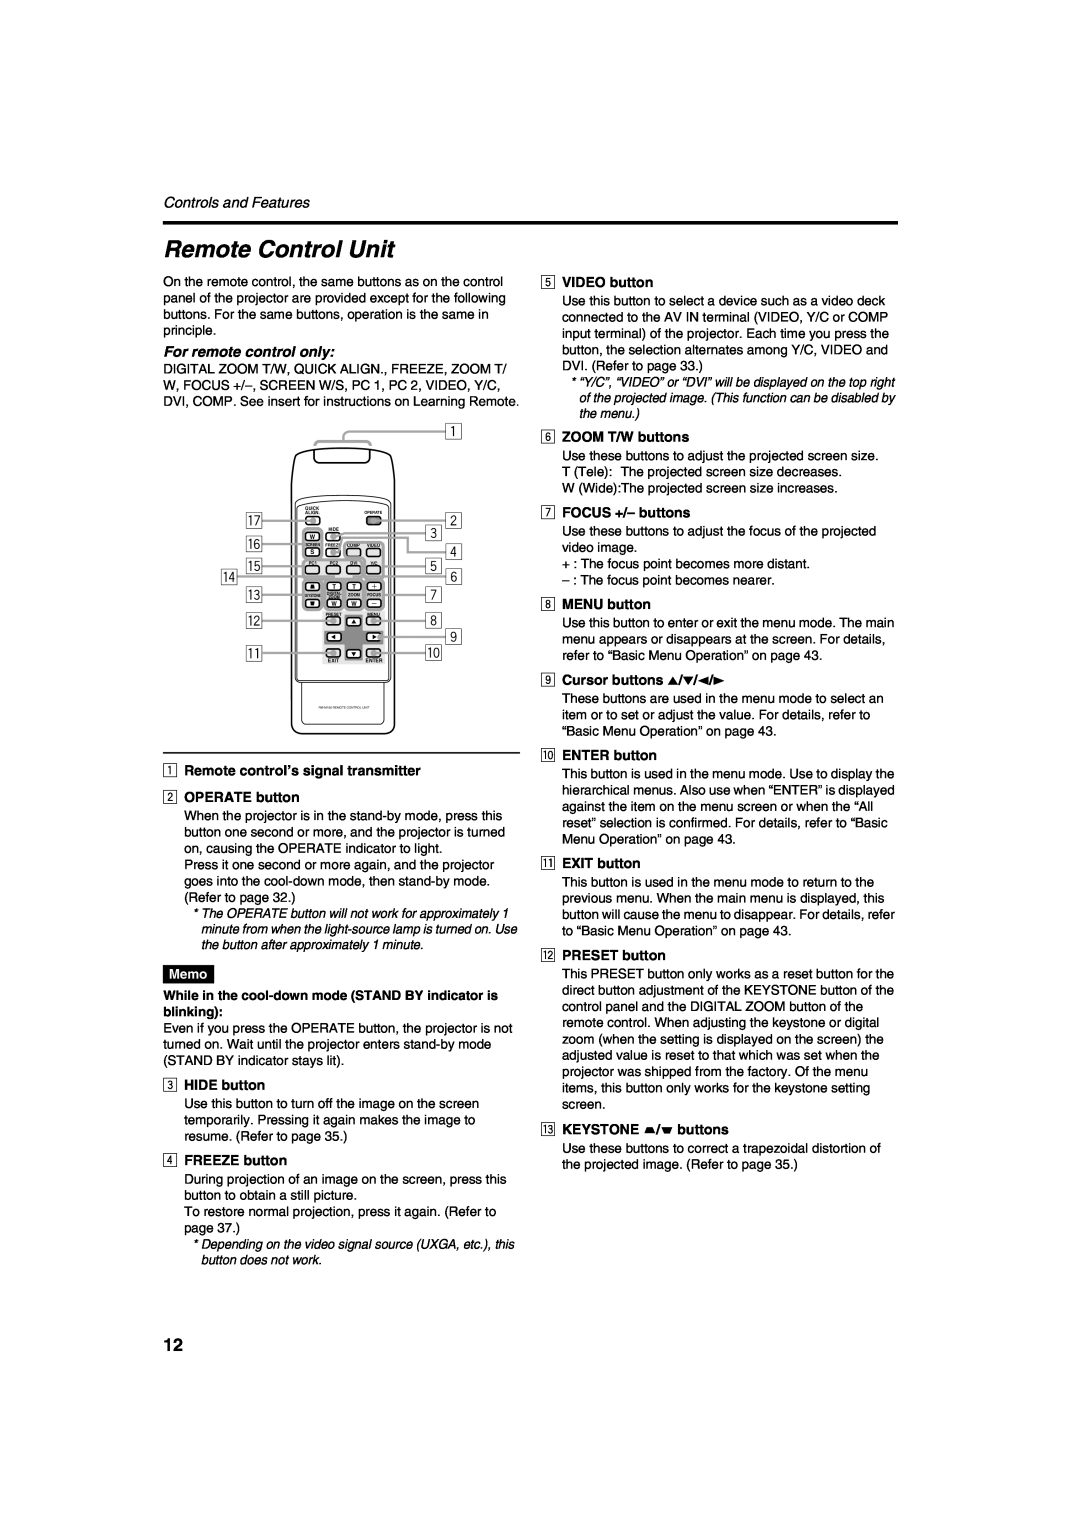
Remote Control Unit
Models:
FDP-DILA2
1
12
80
80
Download
80 pages
50.37 Kb
9
10
11
12
13
14
15
16
Troubleshooting
Specification
Install
Video signals
eLAMP indicator
Connecting to Various Devices
Warranty
Maintenance
To perform All Reset
Accessories
Page 12
Image 12
Page 11
Page 13
Page 12
Image 12
Page 11
Page 13
Contents
Installation and Operations Manual
Home Theater Optimized
FDP-DILA2
SAFETY PRECAUTIONS
IMPORTANT INFORMATION IMPORTANT SAFEGUARDS
About the installation place
About burning-inof the D-ILAdevice
Power cord
Contents
Accessories
for checking operation
for Macintosh
Controls and Features
3AC IN power input terminal
5MAIN POWER switch
1Exhaust vents
Controls and Features
pConnector panel
wAir inlet
eControl panel
Controls and Features
t y u
tAir inlet filter
yOpening for replacing the light-sourcelamp
Control Panel on the Projector
Controls and Features
pPRESET button
eLAMP indicator
rTEMP indicator
Controls and Features
1PC computer 1 input terminal D-sub 3-row15 pin
3DVI terminal DVI-D24 pin
4 PC computer 2 input terminals BNC ⋅
Remote Control Unit
Controls and Features
rDIGITAL ZOOM T/W buttons
tPC buttons
ySCREEN W/S buttons
Install the batteries
Precautions for using batteries
Controls and Features
Open the back cover
Installing the Projector
Precautions for Installation
CAUTIONS
Adjusting the Inclination of the Projector
Adjusting the vertical angle of the projector
Installing the Projector
Leveling the projector
Installing the Projector against the Screen
Installing the Projector
Side view
Top view
Installing the Projector
Projection Distance and Screen Size
Optional Lenses
Installing the Projector
2Loosen the SHIFT LOCK fixing bolt
screen
4Tighten the SHIFT LOCK fixing bolt firmly
Using as a wireless remote control unit
Installing the Projector
When installing adjusting/setting the unit
Installing the Projector
CAUTIONS
Connecting to Various Devices
Video signals
Computer signals
Note: Instructions for installing the Video
Allowable input signals
Connecting to Various Devices
Connecting to Video Devices
Connecting to Various Devices
Memo
Connecting to HDTV Devices/DVD Players
Connecting to Various Devices
Memo
Connecting to Devices which Control the Projector
Connecting to Various Devices
Connecting to Computer Devices
Connecting to Various Devices
Connection to an IBM PC or IBM-compatiblecomputer
Connecting to Various Devices
1Release the stopper at each end and
open the ferrite core
2 Wind the cord around the ferrite core
Connecting the Power Cord
Basic Operations
Lamp control settings
1. Turning on the Power
1 Turn on the MAIN POWER switch
Remote control unit
Turning off the Power
Remote control unit
Remote control unit
Remote control unit
Projector’s buttons
3. Adjust the Screen Size Zooming
Remote control unit
4. Adjust Focus
5. Setting the Screen Aspect Ratio
Remote control unit
Projector’s buttons
Turning off Image HIDE
Removing the Trapezoidal Distortion of the Image
Remote control unit
Quick Alignment Function QUICK ALIGN
Basic Operations
Remote control unit
Displaying a Still Picture FREEZE
Zooming a Part of the Image DIGITAL ZOOM T/W
Basic Operations
Menu Operations
Menu Transition Diagram in No signal Menu Mode
Quick Reference Guide for No signal Menu Mode
Menu Transition Diagram in Video Menu Mode
Menu Operations
Quick Reference Guide for Video Menu Mode
Menu Operations
Factory set value
Menu Transition Diagram in PC Menu Mode
Menu Operations
Quick Reference Guide for PC Menu Mode
Menu Operations
or adjust the value
4Press the cursor button 5 or ∞ to
select an item in the submenu
1Press the MENU button
Remote control unit
Projector
Video menu mode
PC menu mode
Changing the Color System Video Menu Mode Only
1Press the MENU button
Changing the Language Display
1Press the MENU button
3Set the language with the cursor button 5 or ∞
1Press the MENU button
Adjusting Tracking/Phase
Adjust the tracking or phase with the cursor 2 or
1Press the MENU button
Menu Operations
1Press the MENU button
Make adjustment with the cursor 2 or
To perform All Reset
However, some fine-tuningfor specific
installations may be required
Adjusting Color temperature
To perform All Reset
1Press the MENU button
button
Adjusting the Video Screen/Menu Position
1Press the MENU button
menu
1Press the MENU button
1Press the MENU button
Setting and Adjusting Other Functions OPTIONS
Make adjustment with the cursor 2 or
1Press the MENU button
Menu Operations
Menu Operations
Getting Information
1Press the MENU button
3Press the MENU button to exit the menu mode
Menu Operations
Replacing the Fuse
5Reinstall the fuse holder into the projector
the projector and the wall outlet
2Loosen the fuse holder to remove it
Replacing the Light-SourceLamp
Light-sourcelamp and lamp use time
Replacing the Light-SourceLamp
CAUTIONS
Loosen the two screws with a flat-endscrewdriver
4Replace the lamp-replacementopening
5Reset the lamp use time
3 Insert the new light-sourcelamp fully
inside and fasten the screws
Resetting the Lamp Use Time
1Turn on the MAIN POWER switch to go
Projector’s button
into stand-bymode
Cleaning and Replacing the Filter Cover
1Turn off the MAIN POWER switch
3Clean the filter
4Reinstall the filter
Troubleshooting
Maintenance
Troubleshooting
Warning Indication
Action to be taken for warning indication
Warning Messages
Message
Cause
Corrective action
Warning Messages
Displayed when the lamp control
Warning Messages
Memo
Specifications
Optical mechanism system
Electrical system
Input terminals
Specifications
General
Specifications
Front
Side
22.430
Specifications
Y/C terminal
RS-232Cterminal
PC1 terminal/PC OUT terminal
RS-232Cexternal control
1. Communication Specifications
2. Command Format
3. Control command table
2-3Parameters used for the data format
RS-232Cexternal control
1 Numeric value
Appendix
For lens unit GL-M2910G1
For lens unit GL-M2915SG1.5
Appendix
For lens unit GL-M2920ZG2 to
For lens unit GL-M2930SZG2.9 to
Page
Page
Page
WARRANTY
LIMITED WARRANTY
Faroudja Laboratories
A Division of Genesis Microchip Corp
Top
Page
Image
Contents