OPERATING PROCEDURE | PHOTOS&ILLUSTRATION | |||||||
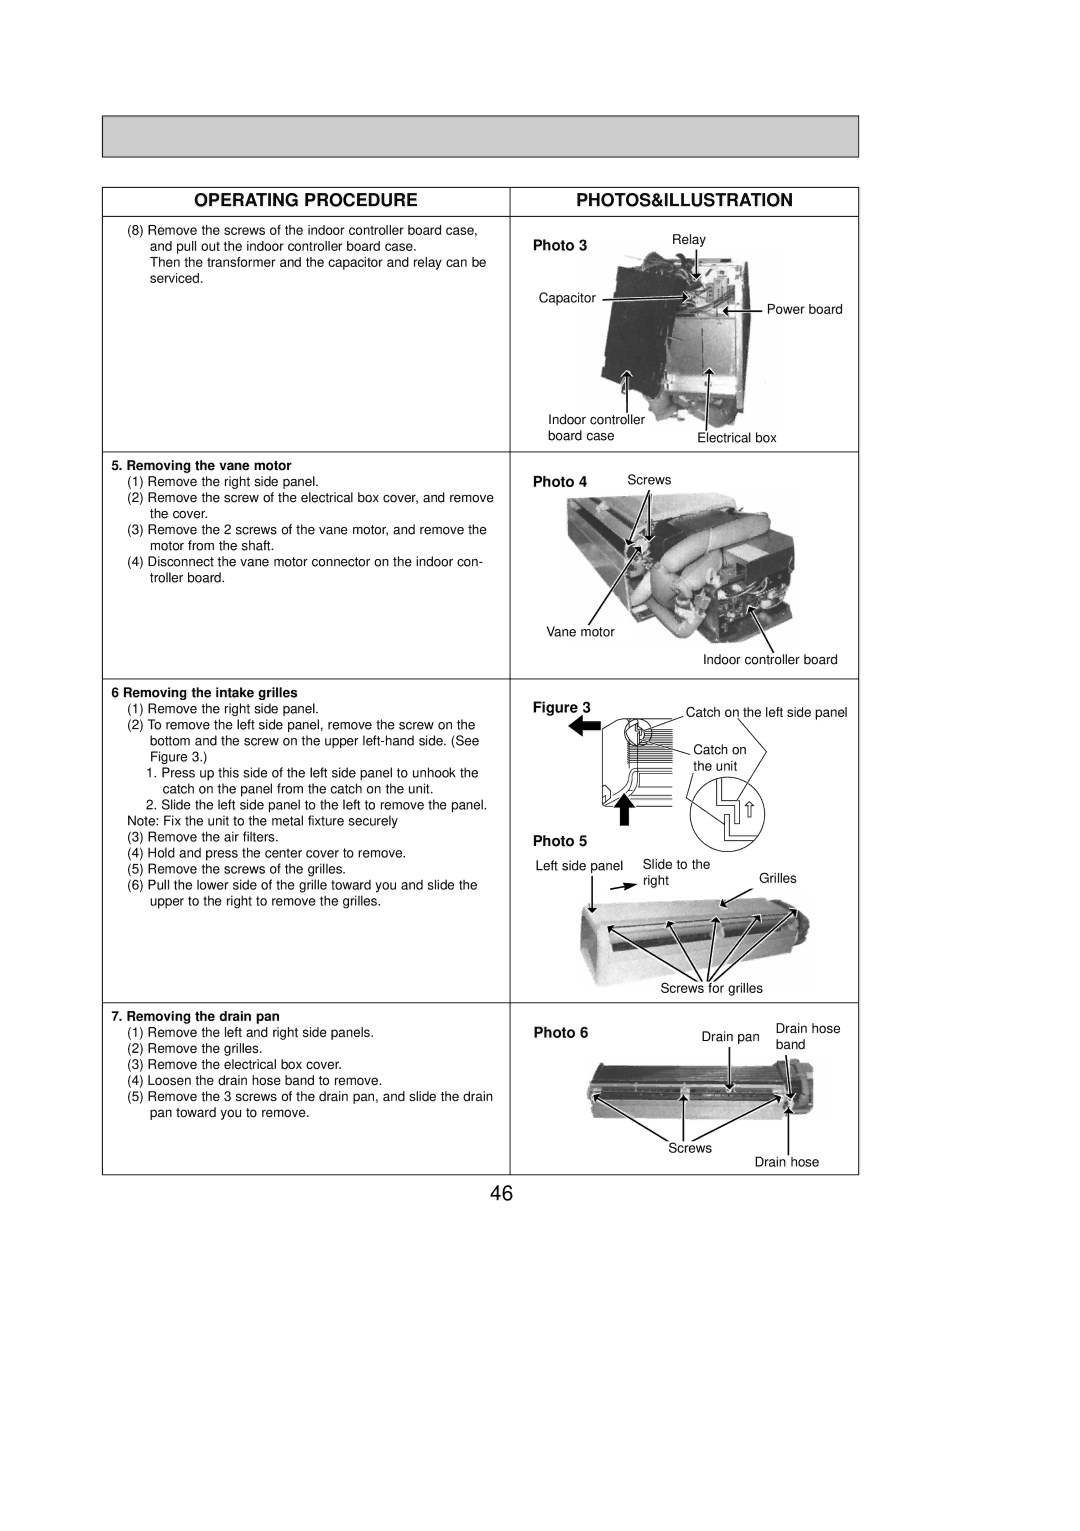
(8) Remove the screws of the indoor controller board case, |
|
|
|
|
|
|
|
|
Photo 3 | Relay |
|
| |||||
and pull out the indoor controller board case. |
|
| ||||||
|
|
|
|
|
| |||
Then the transformer and the capacitor and relay can be |
|
|
|
|
|
|
|
|
serviced. |
|
|
|
|
|
|
|
|
|
|
|
|
|
|
|
| |
|
|
|
|
|
|
|
|
|
| Capacitor |
|
|
|
|
|
| |
|
|
|
|
|
| Power board |
| |
|
|
|
|
|
|
| ||
|
|
|
|
|
| |||
|
|
|
|
|
|
|
|
|
|
| Indoor controller |
| ||||
|
| board case |
|
|
|
|
|
|
|
|
| Electrical box | |||
|
|
|
|
|
|
|
|
|
|
|
|
|
|
|
|
5. Removing the vane motor | Photo 4 |
|
|
|
|
| |
(1) Remove the right side panel. | Screws |
|
|
| |||
(2)Remove the screw of the electrical box cover, and remove the cover.
(3)Remove the 2 screws of the vane motor, and remove the
motor from the shaft.
(4)Disconnect the vane motor connector on the indoor con- troller board.
|
|
| Vane motor |
|
|
|
|
|
|
|
|
|
|
|
|
|
|
| ||
|
|
|
|
|
|
|
|
|
|
|
|
|
|
|
|
|
|
| ||
|
|
|
|
|
|
|
|
| Indoor controller board | |||||||||||
|
|
|
|
|
|
|
|
|
|
|
|
|
|
|
|
|
|
|
| |
|
|
|
|
|
|
|
|
|
|
|
|
|
|
|
|
|
|
|
|
|
6 Removing the intake grilles | Figure 3 |
|
|
|
|
|
|
|
|
|
|
|
|
|
| |||||
(1) | Remove the right side panel. |
| Catch on the left side panel | |||||||||||||||||
(2) To remove the left side panel, remove the screw on the |
|
|
|
|
|
|
|
|
|
|
|
|
|
|
|
|
|
| ||
| bottom and the screw on the upper |
|
|
|
|
|
| Catch on | ||||||||||||
|
|
|
|
|
|
| ||||||||||||||
| Figure 3.) |
|
|
|
|
|
| |||||||||||||
|
|
|
|
|
|
| the unit | |||||||||||||
| 1. Press up this side of the left side panel to unhook the |
|
|
|
|
|
| |||||||||||||
|
|
|
|
|
|
|
|
|
|
|
|
|
|
|
|
|
|
| ||
| catch on the panel from the catch on the unit. |
|
|
|
|
|
|
|
|
|
|
|
|
|
|
|
|
|
| |
| 2. Slide the left side panel to the left to remove the panel. |
|
|
|
|
|
|
|
|
|
|
|
|
|
|
|
|
|
| |
|
|
|
|
|
|
|
|
|
|
|
|
|
|
|
|
|
|
| ||
Note: Fix the unit to the metal fixture securely |
|
|
|
|
|
|
|
|
|
|
|
|
|
|
|
|
|
| ||
|
|
|
|
|
|
|
|
|
|
|
|
|
|
|
|
|
| |||
(3) | Remove the air filters. | Photo 5 |
|
|
|
|
|
|
|
|
|
|
|
|
|
| ||||
|
|
|
|
|
|
|
|
|
|
|
|
|
| |||||||
|
|
|
|
|
|
|
|
|
|
|
|
|
| |||||||
(4) | Hold and press the center cover to remove. |
|
|
|
|
|
|
|
|
|
|
|
|
|
|
|
|
|
| |
(5) | Remove the screws of the grilles. | Left side panel |
|
| Slide to the |
|
|
|
|
|
|
|
| |||||||
|
|
|
|
| Grilles |
|
| |||||||||||||
(6) | Pull the lower side of the grille toward you and slide the |
|
|
|
| right |
|
|
|
|
|
|
|
|
|
|
|
| ||
|
|
|
|
|
|
|
|
|
|
|
|
|
| |||||||
|
|
|
|
|
|
|
|
|
|
|
|
|
|
|
|
|
| |||
| upper to the right to remove the grilles. |
|
|
|
|
|
|
|
|
|
|
|
|
|
|
|
|
|
| |
|
|
|
|
|
|
|
|
|
|
|
|
|
|
|
|
|
|
| ||
|
|
| Screws for grilles |
|
|
|
| |
|
|
|
|
|
|
|
|
|
7. Removing the drain pan |
|
|
|
|
|
|
| |
(1) | Remove the left and right side panels. | Photo 6 |
|
|
|
| Drain hose |
|
| Drain pan | |||||||
|
|
| band |
| ||||
(2) | Remove the grilles. |
|
|
|
|
|
| |
|
|
| ||||||
|
|
|
|
|
|
| ||
(3)Remove the electrical box cover.
(4)Loosen the drain hose band to remove.
(5) Remove the 3 screws of the drain pan, and slide the drain pan toward you to remove.
Screws
Drain hose
46