Chapter 2. TV Connections | 21 |
Digital Video and Home Recording
The table below will help you decide which type of connection to use for digital video. Digital video comes to your home in a compressed state, whether received on recorded media (e.g., disc) or broadcast over the air, over cable, or via satellite. Some compressed digital video is available for recording as noted in the table.
Connection Type into the TV | Effect on Home Recording |
|
|
HDMI or DVI | You cannot record the resultant uncompressed video sent to the TV |
Compressed video is converted to | via HDMI or DVI. |
uncompressed form by an external device |
|
such as a cable box, satellite receiver, or |
|
DVD player before it is sent to the TV on an |
|
HDMI or DVI cable. |
|
IEEE 1394 (FireWire®) Connections | You can record compressed digital video either |
Your TV can receive and decode digital | • on compatible digital recorders as digital signals using IEEE 1394 |
channels, MPEG2 compressed digital video, | connections |
and Dolby Digital audio. | • converted to analog signals and recorded as |
| composite video from the MONITOR OUT jack |
| You may be unable to record some programming because of copy restric- |
| tions added by the content owners. |
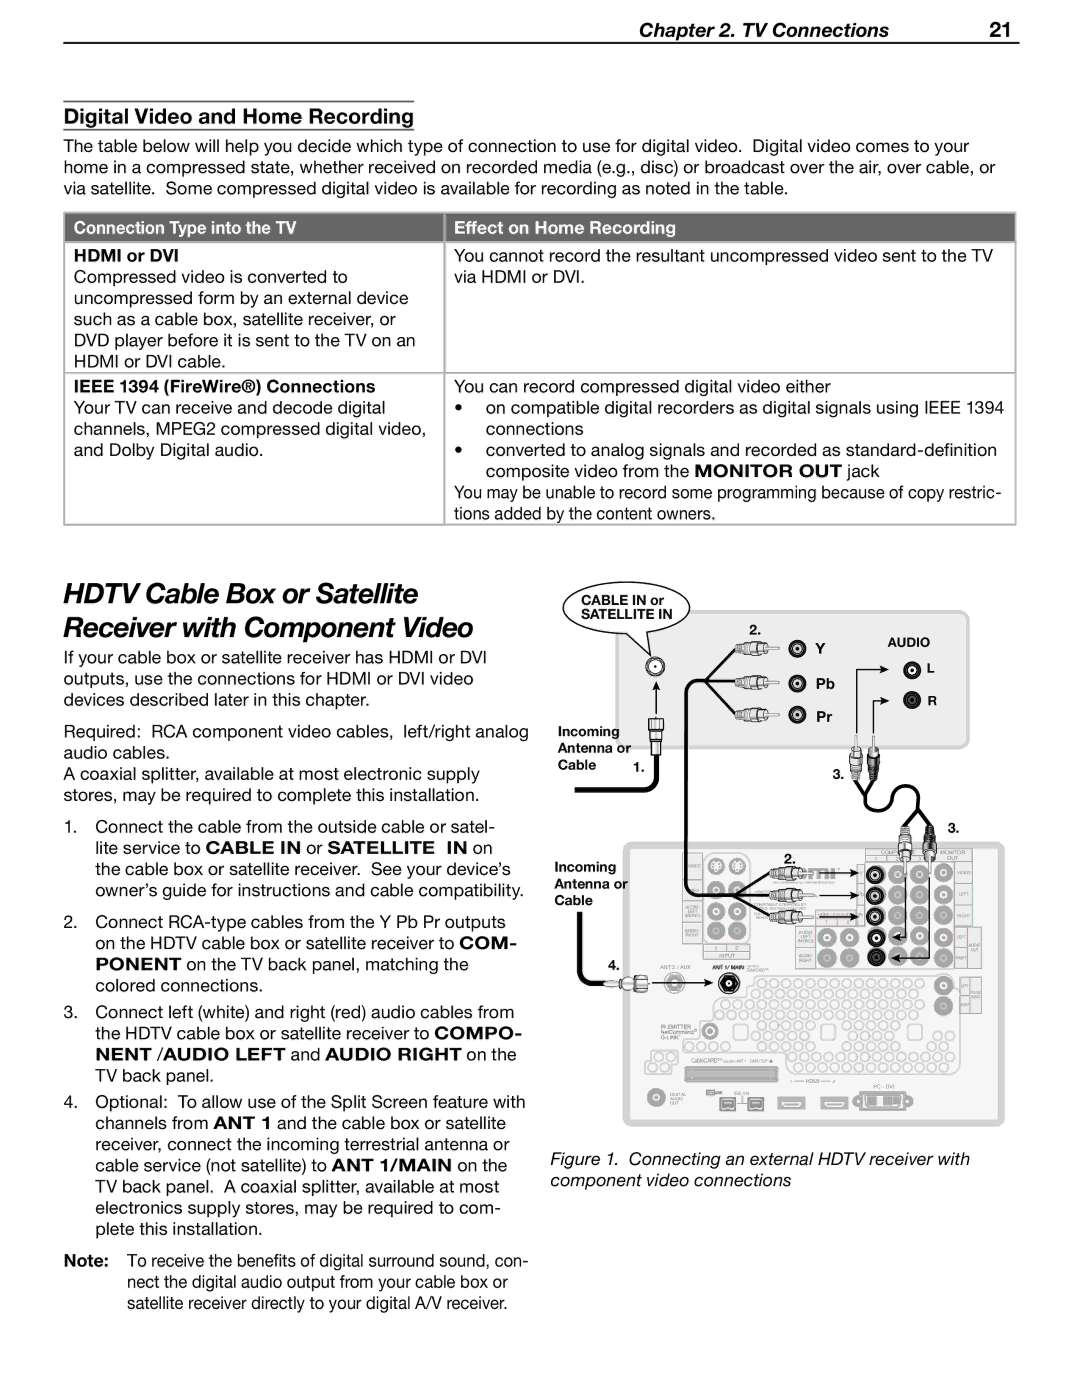
HDTV Cable Box or Satellite
������������
������������
Receiver with Component Video
If your cable box or satellite receiver has HDMI or DVI outputs, use the connections for HDMI or DVI video devices described later in this chapter.
Required: RCA component video cables, left/right analog audio cables.
A coaxial splitter, available at most electronic supply stores, may be required to complete this installation.
���������
�����������
�������
�� | ����� | |
� | ||
| ||
�� | � | |
| ||
�� | � | |
| ||
�� |
|
1. Connect the cable from the outside cable or satel- |
��
| lite service to CABLE IN or SATELLITE IN on |
| the cable box or satellite receiver. See your device’s |
| owner’s guide for instructions and cable compatibility. |
2. | Connect |
| on the HDTV cable box or satellite receiver to COM- |
| PONENT on the TV back panel, matching the |
| colored connections. |
3. | Connect left (white) and right (red) audio cables from |
| the HDTV cable box or satellite receiver to COMPO- |
| NENT /AUDIO LEFT and AUDIO RIGHT on the |
| TV back panel. |
4. | Optional: To allow use of the Split Screen feature with |
| channels from ANT 1 and the cable box or satellite |
| receiver, connect the incoming terrestrial antenna or |
��������� | ������� | �� |
|
|
|
|
|
|
| � | |
����������� |
|
|
|
| |
����� | ������������������ |
|
| �� | |
����� |
| ���������������������������������������� |
|
| |
|
|
|
| ||
| ����������������������� |
|
|
| |
| ���������� | ����������������������������� |
|
|
|
|
| ���������������� | �� | ||
|
| ���������������������������������������������� | |||
| ������ | � | � | ||
|
|
|
| ||
| ������ |
| ����� |
| ����� |
| ���� |
|
|
| ������ |
|
| � | � |
�� |
| ����� | ����� |
����������� |
| ����� | |
�������������� ���������� | |||
|
|
| �������� |
�������������������������������������![]()
� ���� �
������� | ��������� |
����� |
|
��� |
|
| ��������� |
| ������� |
� | � | � | ��� |
|
|
| ����� |
|
|
| ���� |
|
|
| ����� |
|
|
| ���� |
�����
���
�����
����
������
�����
�����
��������
cable service (not satellite) to ANT 1/MAIN on the |
TV back panel. A coaxial splitter, available at most |
electronics supply stores, may be required to com- |
plete this installation. |
Note: To receive the benefits of digital surround sound, con- nect the digital audio output from your cable box or satellite receiver directly to your digital A/V receiver.
