NTI RACKMUX RACKMOUNT ANSI TERMINAL DRAWER
1. INSTALLATION
1.1 Rack Mounting Instructions
1.1.1 Standard Rack
The RACKMUX was designed to be mounted to a rack and includes mounting flanges to make attachment easy.
1.Determine the mounting height in the rack for the drawer. It should be a height comfortable to use the keyboard and see the LCD display. Mark holes in each of the 4 corner cabinet rails at points all level with each other.
2.Secure the rear brackets to the rear rack cabinet rails at the holes marked in step 1 using
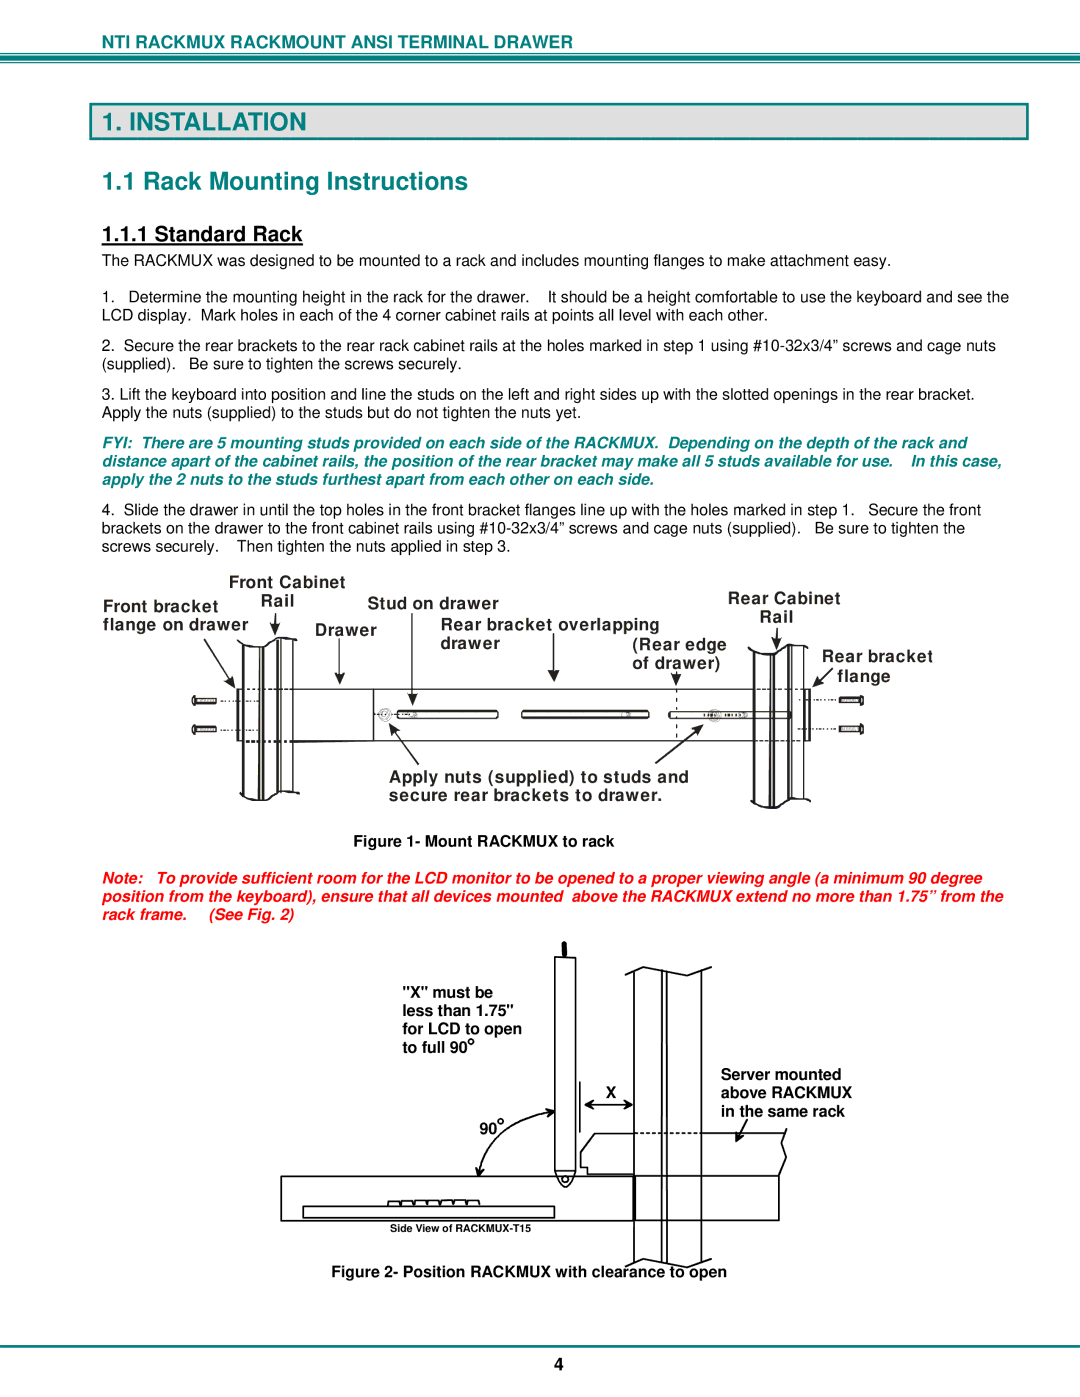
3.Lift the keyboard into position and line the studs on the left and right sides up with the slotted openings in the rear bracket. Apply the nuts (supplied) to the studs but do not tighten the nuts yet.
FYI: There are 5 mounting studs provided on each side of the RACKMUX. Depending on the depth of the rack and distance apart of the cabinet rails, the position of the rear bracket may make all 5 studs available for use. In this case, apply the 2 nuts to the studs furthest apart from each other on each side.
4.Slide the drawer in until the top holes in the front bracket flanges line up with the holes marked in step 1. Secure the front brackets on the drawer to the front cabinet rails using
|
| Front Cabinet |
|
|
|
| Rear Cabinet | |||||||
Front bracket | Rail |
| Stud on drawer |
|
| |||||||||
flange on drawer | Drawer |
| Rear bracket | overlapping | Rail | |||||||||
| ||||||||||||||
|
|
|
|
|
|
|
| drawer | (Rear edge |
|
| Rear bracket | ||
|
|
|
|
|
|
|
|
| ||||||
|
|
|
|
|
|
|
|
| ||||||
|
|
|
|
|
|
|
|
| of drawer) |
|
| |||
|
|
|
|
|
|
|
|
|
|
| flange | |||
|
|
|
|
|
|
|
|
|
|
|
|
| ||
|
|
|
|
|
|
|
|
|
|
|
|
| ||
|
|
|
|
|
|
|
|
|
|
|
|
|
|
|
|
|
|
|
|
|
|
|
|
|
|
|
|
|
|
|
|
|
|
|
|
|
|
|
|
|
|
|
|
|
|
|
|
|
|
|
|
|
|
|
|
|
|
|
|
|
|
|
|
|
|
|
|
|
|
|
|
|
|
|
Apply nuts (supplied) to studs and secure rear brackets to drawer.
Figure 1- Mount RACKMUX to rack
Note: To provide sufficient room for the LCD monitor to be opened to a proper viewing angle (a minimum 90 degree position from the keyboard), ensure that all devices mounted above the RACKMUX extend no more than 1.75” from the rack frame. (See Fig. 2)
"X" must be less than 1.75" for LCD to open to full 90
X | Server mounted |
above RACKMUX | |
| in the same rack |
90![]()
Side View of
Figure 2- Position RACKMUX with clearance to open
4
