![]()
![]()
![]()
![]()
![]()
![]() The display shows:
The display shows:
FORMAT:A4
/} Until the desired paper format is displayed. ![]()
![]()
![]()
![]()
![]()
![]() To confirm the setting.
To confirm the setting.
The display shows:
AUTOMATIC
CHECK PRINT HEAD
TO INSTALL THE PRINT HEAD
The print head provided with the machine allows you to print up to 80 pages*, whereas the print heads that you will buy subse- quently have a greater capacity and will thus allow you to print up to 450 pages*.
* Based on Test Chart
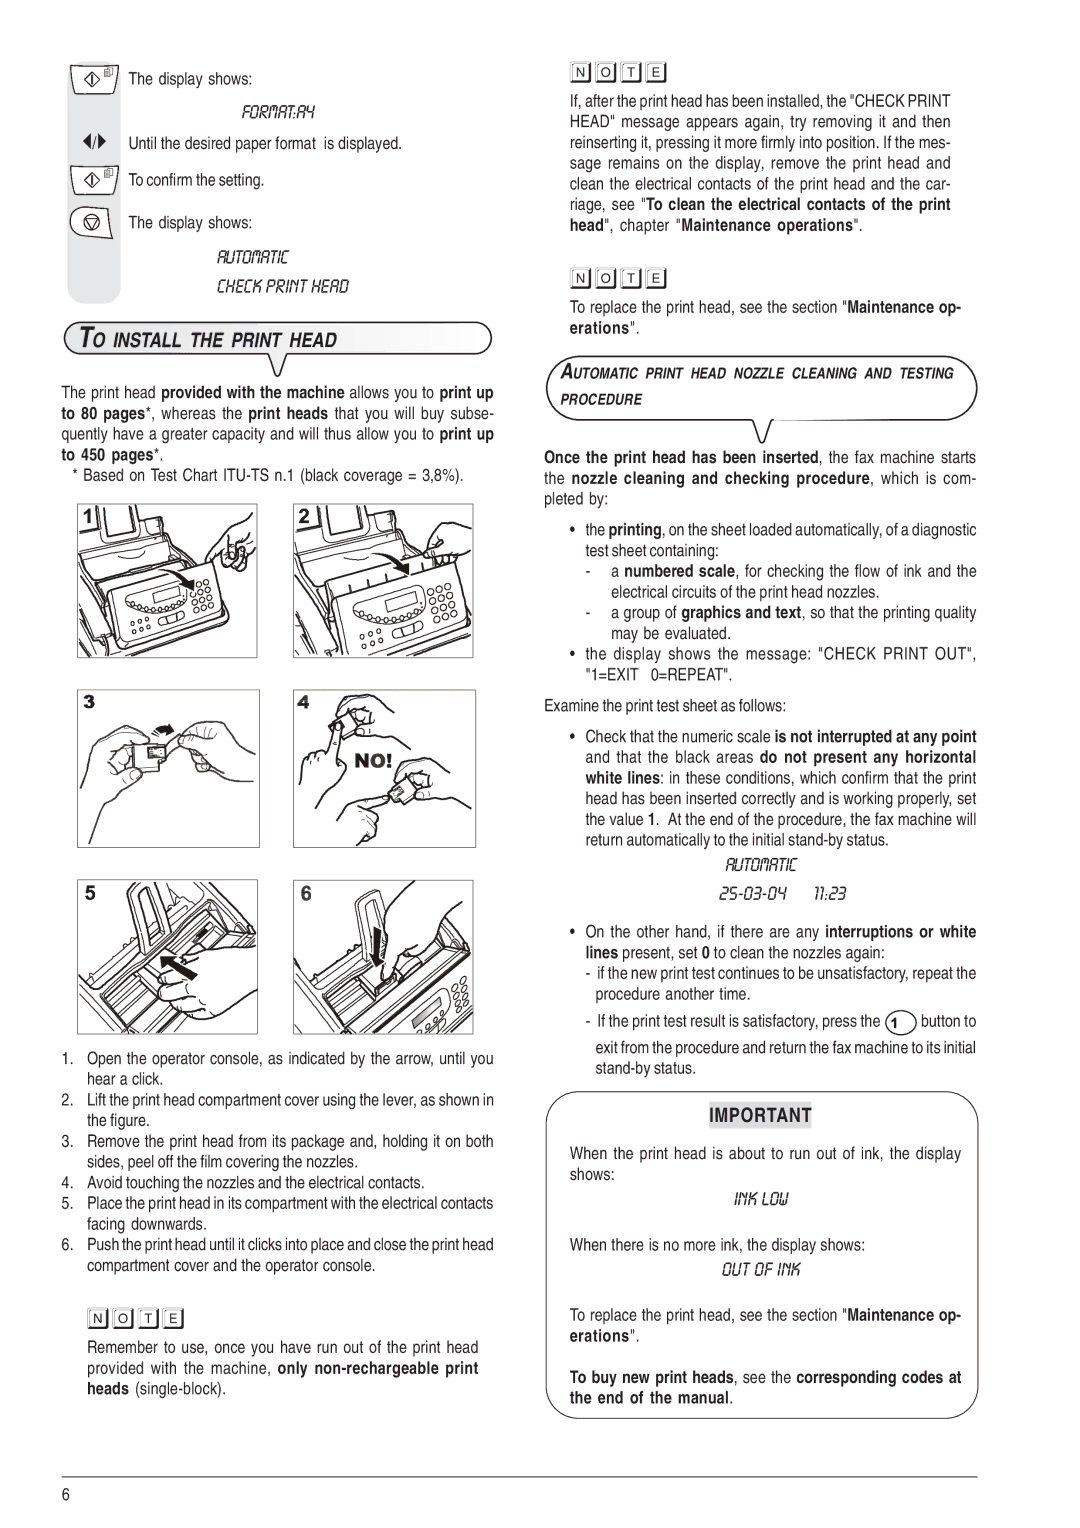
1.Open the operator console, as indicated by the arrow, until you hear a click.
2.Lift the print head compartment cover using the lever, as shown in the figure.
3.Remove the print head from its package and, holding it on both sides, peel off the film covering the nozzles.
4.Avoid touching the nozzles and the electrical contacts.
5.Place the print head in its compartment with the electrical contacts facing downwards.
6.Push the print head until it clicks into place and close the print head compartment cover and the operator console.
notE
Remember to use, once you have run out of the print head provided with the machine, only
notE
If, after the print head has been installed, the "CHECK PRINT HEAD" message appears again, try removing it and then reinserting it, pressing it more firmly into position. If the mes- sage remains on the display, remove the print head and clean the electrical contacts of the print head and the car- riage, see "To clean the electrical contacts of the print head", chapter "Maintenance operations".
notE
To replace the print head, see the section "Maintenance op- erations".
AUTOMATIC PRINT HEAD NOZZLE CLEANING AND TESTING
PROCEDURE
Once the print head has been inserted, the fax machine starts the nozzle cleaning and checking procedure, which is com- pleted by:
•the printing, on the sheet loaded automatically, of a diagnostic test sheet containing:
-a numbered scale, for checking the flow of ink and the electrical circuits of the print head nozzles.
-a group of graphics and text, so that the printing quality may be evaluated.
•the display shows the message: "CHECK PRINT OUT", "1=EXIT 0=REPEAT".
Examine the print test sheet as follows:
•Check that the numeric scale is not interrupted at any point and that the black areas do not present any horizontal white lines: in these conditions, which confirm that the print head has been inserted correctly and is working properly, set the value 1. At the end of the procedure, the fax machine will return automatically to the initial
AUTOMATIC
25-03-04 11:23
•On the other hand, if there are any interruptions or white lines present, set 0 to clean the nozzles again:
-if the new print test continues to be unsatisfactory, repeat the procedure another time.
-If the print test result is satisfactory, press the ![]() button to exit from the procedure and return the fax machine to its initial
button to exit from the procedure and return the fax machine to its initial
IMPORTANT
When the print head is about to run out of ink, the display shows:
INK LOW
When there is no more ink, the display shows:
OUT OF INK
To replace the print head, see the section "Maintenance op-
erations".
To buy new print heads, see the corresponding codes at the end of the manual.
6
