System Configuration
do not wish to start the test process at this time, press the ⁄/¤ Navigation Button Eto return to either the EzSet/EQ menu or the Master Menu, and press the Set Button F. To begin the EzSet/EQ Near Field measurements, press the
‹/ › Navigation Button Eso that ON is highlighted in reverse video, and press the Set Button F.
NOTE: Once the EzSet/EQ process starts, the vol- ume control and Standby/Off switches are tem- porarily disabled while the tests are in progress. Do not adjust the volume or turn the unit off until you see the on-screen message change to indi- cate that EzSet/EQ is finished.
W A R N I N G ! !
D u r i n g m e a s u r e m e n t
P l e a s e m a i n t a i n s i l e n c e W h i l e s e v e r a l l o u d s o u n d b u r s t s a r e h e a r d .
→ S T A R T : | O F F | O N | |
B A C K | T O | E Z S E T / E Q M E N U |
B A C K | T O | M A S T E R | M E N U |
Figure 7b
IMPORTANT NOTE: Anyone with hearing that is sensitive to loud noises should leave the room at this point, or use ear protection sufficient to reduce the noise level at their ears. Inexpensive foam-style ear plugs, available at most drug stores, may be used to reduce the sound level to a tolerable level for anyone who has a problem with loud noise. If you are uncomfortable with, or cannot tolerate loud sounds and do not use some sort of ear protection we strongly recommend that you leave the room and ask someone else to be present while the EzSet/EQ process takes place, or that you do not use EzSet/EQ and enter the configuration settings manually, as described on pages 26 through 31.
Step 5. At this point you will begin to hear a series of test tones circulate among all the speak- ers in your system. While this is happening, the AVR 635 is reading the signal to determine which speaker positions are active, what type of speaker is present at each active position, what the dis- tance is from the listening position to each speak- er, and to begin to build a profile of the impact of the room’s acoustics on the quality of audio reproduction. When the test is completed you will hear the tones stop, and the system will pause fors long as a minute while the processor makes its calculations. Do not be alarmed if the “WARN- ING” message remains on the screen after tones stop until a results message is displayed as shown in Step 6 or 7, below.
NOTE: While these tests detect whether a speak- er is connected to a particular output, they cannot determine whether the speaker is in the correct position. (For example, it can tell whether a speaker is connected to the Surround Right out- put, but it cannot tell whether the speaker is on
the right or left side of your listening room.) For that reason, we strongly recommend that you try to listen as the tone circulates, matching the name shown for each channel to the location of the speaker. If a tone is heard from a speaker position that does not match the on-screen mes- sage, make a note of the incorrect speaker con- nections. When the test process stops you will see a message indicating the they Far Field measure- ments are complete, but since there is a connec- tion error press the ¤ Navigation Button E so that the on-screen cursor in Fig. 7 is pointing to RETURN TO MASTER MENU and press the Set Button F. At this point, exit all menus and turn the receiver off. Check all speaker wire connections and then rerun EzSet/EQ.
Step 6. When the Far Field tests are complete a message screen will appear to confirm if the pro- cedure was successful or not. In most cases there will not be any problems and you will see the message shown in Figure 7c on your screen. If the speaker positions shown match the actual speak- er layout in your system, press the Set Button
Fto complete EzSet/EQ by performing the Near Field Measurements. Continue the EzSet/EQ process by pressing the Set Button Fto take the Near Field measurements from the front left, center and right speakers. By taking this separate set of measurements, the AVR 635 is able to com- plete its view of the room’s sonic signature and apply equalization as needed to correct spikes and dips in the system’s response. Continue these instructions with Step 8.
* F A R F I E L D C O M P L E T E *
D e t e c t e d s p e a k e r c o n f i g
F L : Y E S | S B R : Y E S |
C E N : Y E S | S B L : Y E S |
F R | : | Y E S | S L : | Y E S |
S R | : | Y E S | S U B : | Y E S |
→ D O N E A R F I E L D
B A C K T O M A S T E R M E N U
Figure 7c
Step 7a. If the measurements are not successful due to a missing or malfunctioning speaker, the FAR FIELD EQ ERROR message will appear as shown in Figure 7d. EzSet/EQ is pro- grammed to look for speaker pairs at the front left/front right, surround left/surround right and surround back left/surround back right positions. If the test results indicate that one, but not both of the speakers in any of these pairs is present, the menu will show NO next to the speaker posi- tion where the tests did not report back that a speaker is present. Should this message appear, make note of the suspect speaker location, exit all menus and turn the receiver off. Check all speaker wire connections and then rerun EzSet/EQ.
* | F A R F I E L D E Q | E R R O R * |
D e t e c t e d s p e a k e r | c o n f i g |
F L : Y E S | S B R : Y E S |
C E N | : Y E S | S B L : Y E S |
F R : Y E S | S L | : Y E S |
S R : N O | S U B : Y E S |
V e r i f y s p k r c o n n e c t i o n s
V e r i f y | m i c p o s i t i o n |
R e d u c e | b a c k g r o u n d n o i s e |
→ B A C K T O M A S T E R M E N U
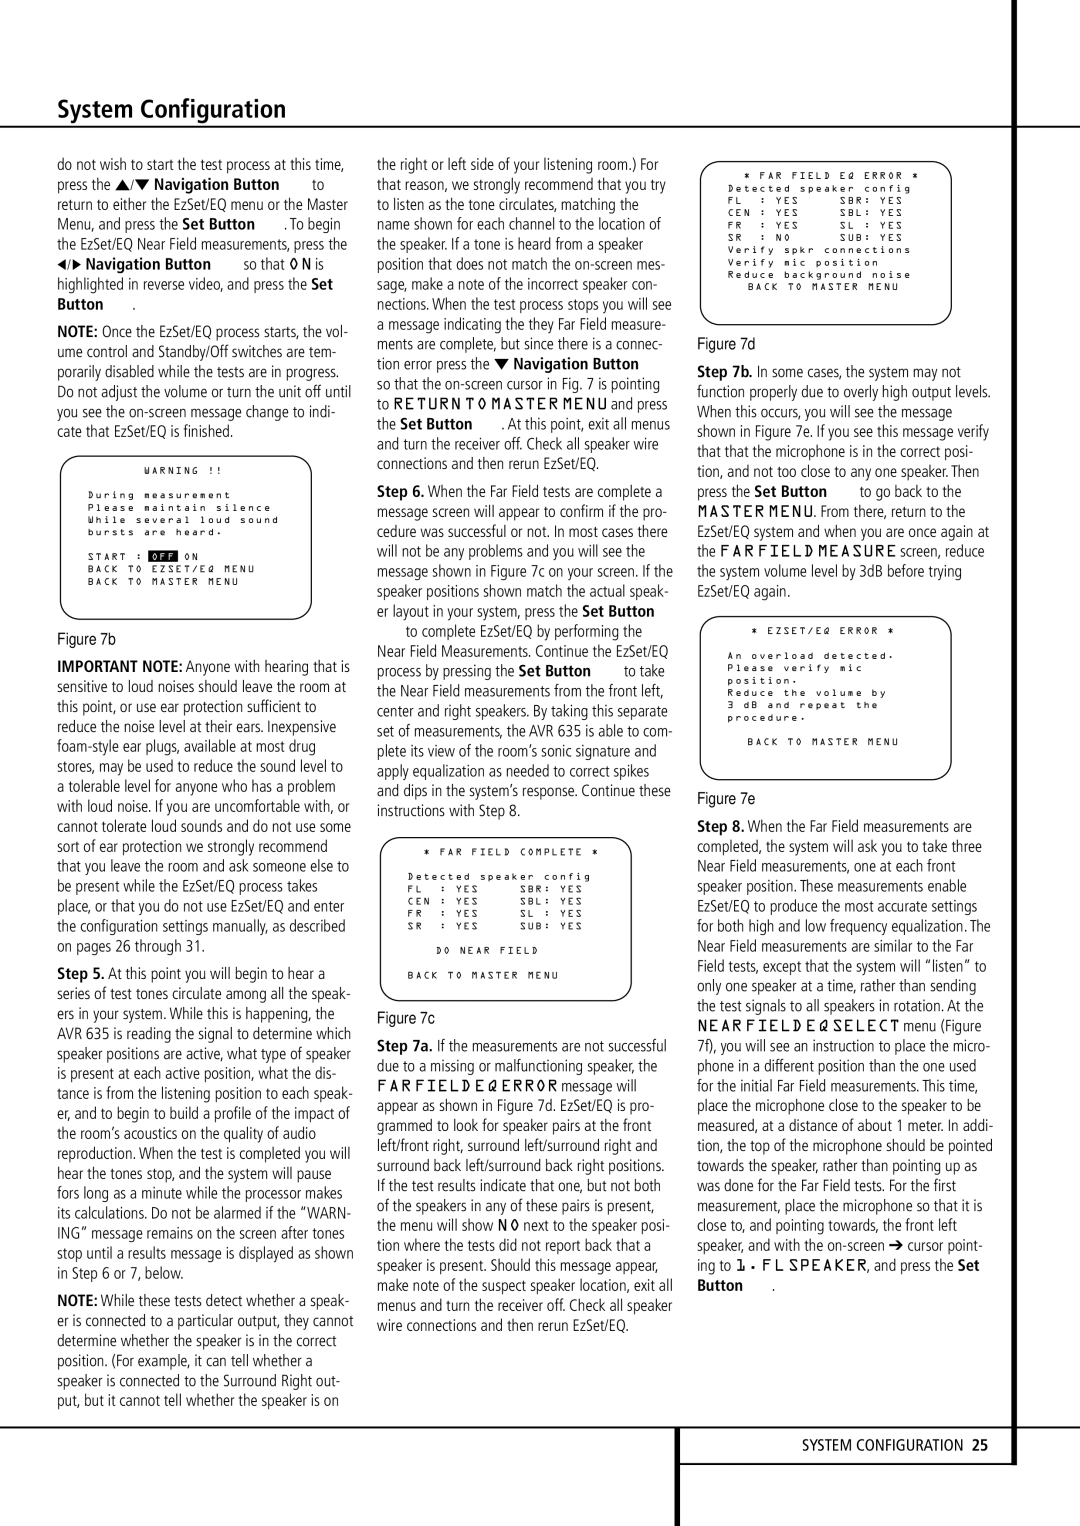
Figure 7d
Step 7b. In some cases, the system may not function properly due to overly high output levels. When this occurs, you will see the message shown in Figure 7e. If you see this message verify that that the microphone is in the correct posi- tion, and not too close to any one speaker. Then press the Set Button Fto go back to the MASTER MENU. From there, return to the EzSet/EQ system and when you are once again at the FAR FIELD MEASURE screen, reduce the system volume level by 3dB before trying EzSet/EQ again.
* E Z S E T / E Q E R R O R *
A n o v e r l o a d d e t e c t e d . P l e a s e v e r i f y m i c
p o s i t i o n .
R e d u c e t h e v o l u m e b y 3 d B a n d r e p e a t t h e p r o c e d u r e .
→ B A C K T O M A S T E R M E N U
Figure 7e
Step 8. When the Far Field measurements are completed, the system will ask you to take three Near Field measurements, one at each front speaker position. These measurements enable EzSet/EQ to produce the most accurate settings for both high and low frequency equalization. The Near Field measurements are similar to the Far Field tests, except that the system will “listen” to only one speaker at a time, rather than sending the test signals to all speakers in rotation. At the NEAR FIELD EQ SELECT menu (Figure 7f), you will see an instruction to place the micro- phone in a different position than the one used for the initial Far Field measurements. This time, place the microphone close to the speaker to be measured, at a distance of about 1 meter. In addi- tion, the top of the microphone should be pointed towards the speaker, rather than pointing up as was done for the Far Field tests. For the first measurement, place the microphone so that it is close to, and pointing towards, the front left speaker, and with the on-screen➔ cursor point- ing to 1. FL SPEAKER, and press the Set Button F.