Menu operations
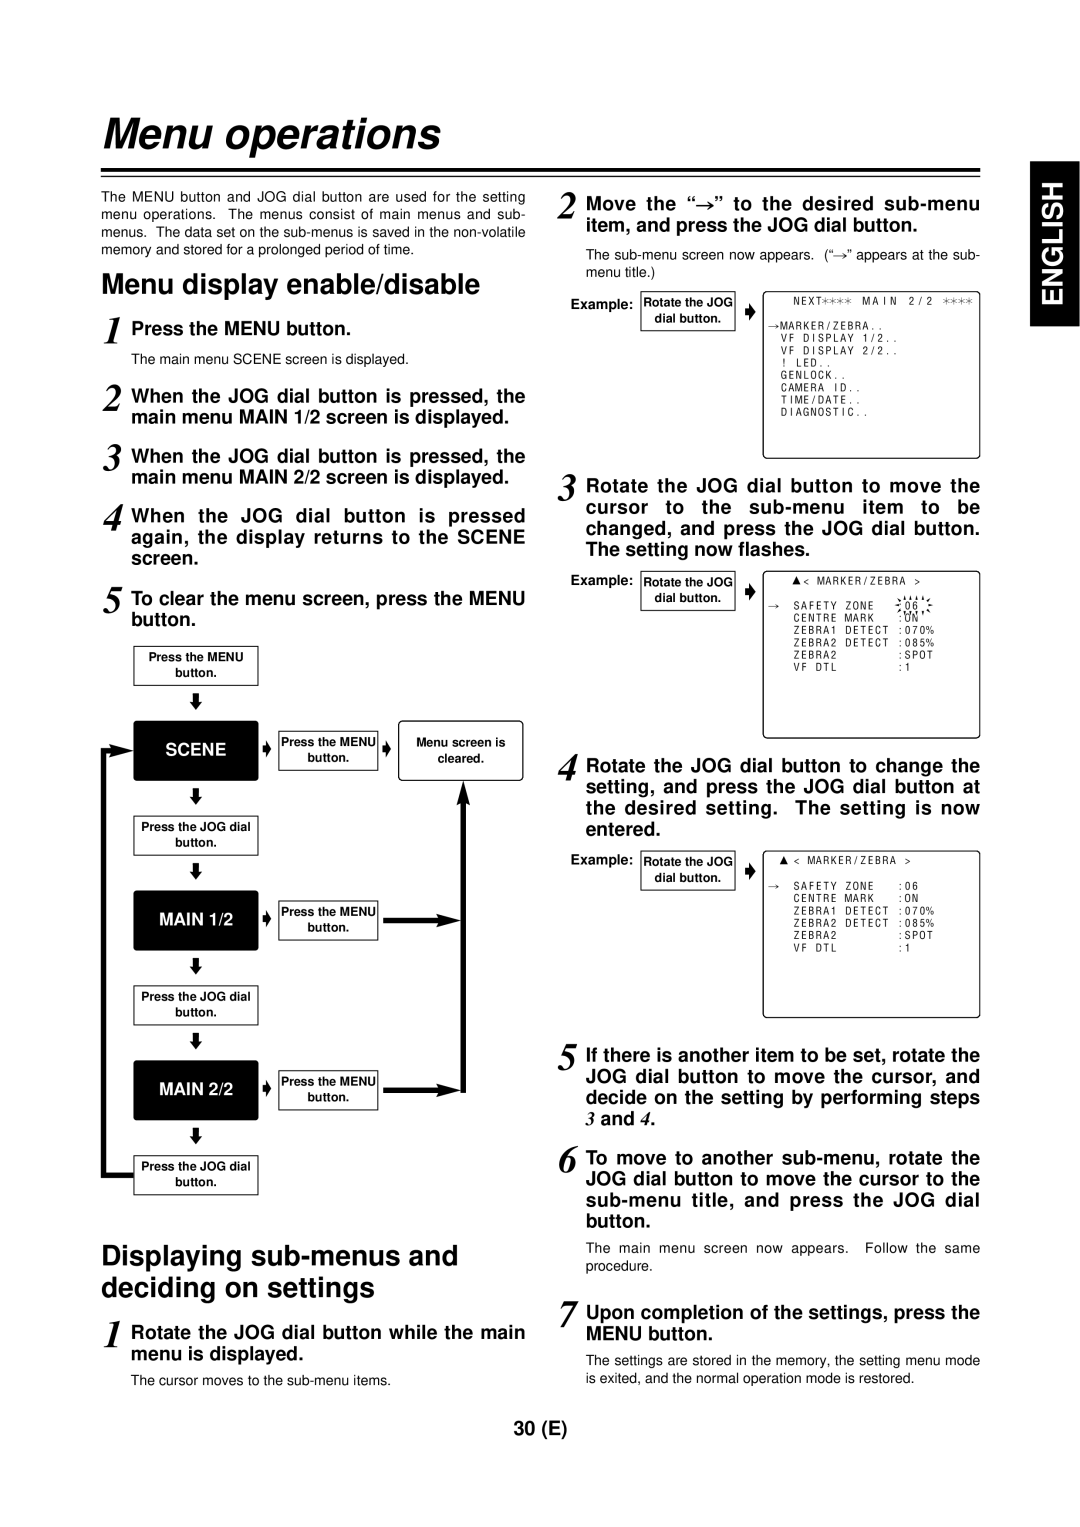
The MENU button and JOG dial button are used for the setting menu operations. The menus consist of main menus and sub- menus. The data set on the
2 Move the “#” to the desired
The
ENGLISH
Menu display enable/disable
menu title.)
Example: Rotate the JOG dial button.
I
NEXT¢¢¢¢ MAIN 2/2 ¢¢¢¢
1
2 When the JOG dial button is pressed, the main menu MAIN 1/2 screen is displayed.
3 When the JOG dial button is pressed, the main menu MAIN 2/2 screen is displayed.
4 When the JOG dial button is pressed again, the display returns to the SCENE screen.
5 Tobutton.clear the menu screen, press the MENU
Press the MENU
button.
#MARKER/ZEBRA.. VF DISPLAY 1/2.. VF DISPLAY 2/2..
!LED..
GENLOCK.. CAMERA ID.. TIME/DATE..
DIAGNOSTIC..
3 Rotate the JOG dial button to move the cursor to the
Example: | Rotate the JOG | I | 3< MARKER/ZEBRA > | |
| dial button. | # | SAFETY ZONE | :06 |
|
| |||
|
|
| CENTRE MARK | :ON |
|
|
| ZEBRA1 DETECT :070% | |
|
|
| ZEBRA2 DETECT :085% | |
|
|
| ZEBRA2 | :SPOT |
|
|
| VF DTL | :1 |
}
SCENE | 5 | Press the MENU | 5 | Menu screen is |
|
| button. |
| cleared. |
}
Press the JOG dial
button.
}
MAIN 1/2 | 5 | Press the MENU |
|
| button. |
}
Press the JOG dial
button.
}
MAIN 2/2 | 5 | Press the MENU |
|
| button. |
}
Press the JOG dial
button.
Displaying sub-menus and deciding on settings
1 Rotate the JOG dial button while the main menu is displayed.
The cursor moves to the
4 Rotate the JOG dial button to change the setting, and press the JOG dial button at the desired setting. The setting is now entered.
Example: | Rotate the JOG | I | 3 | < MARKER/ZEBRA > | |
| dial button. |
| # | SAFETY ZONE | :06 |
|
|
|
| CENTRE MARK | :ON |
|
|
|
| ZEBRA1 DETECT :070% | |
|
|
|
| ZEBRA2 DETECT :085% | |
|
|
|
| ZEBRA2 | :SPOT |
|
|
|
| VF DTL | :1 |
5 If there is another item to be set, rotate the JOG dial button to move the cursor, and decide on the setting by performing steps 3 and 4.
6 To move to another
The main menu screen now appears. Follow the same procedure.
7 Upon completion of the settings, press the MENU button.
The settings are stored in the memory, the setting menu mode is exited, and the normal operation mode is restored.
30 (E)
