Parts and their functions (continued)
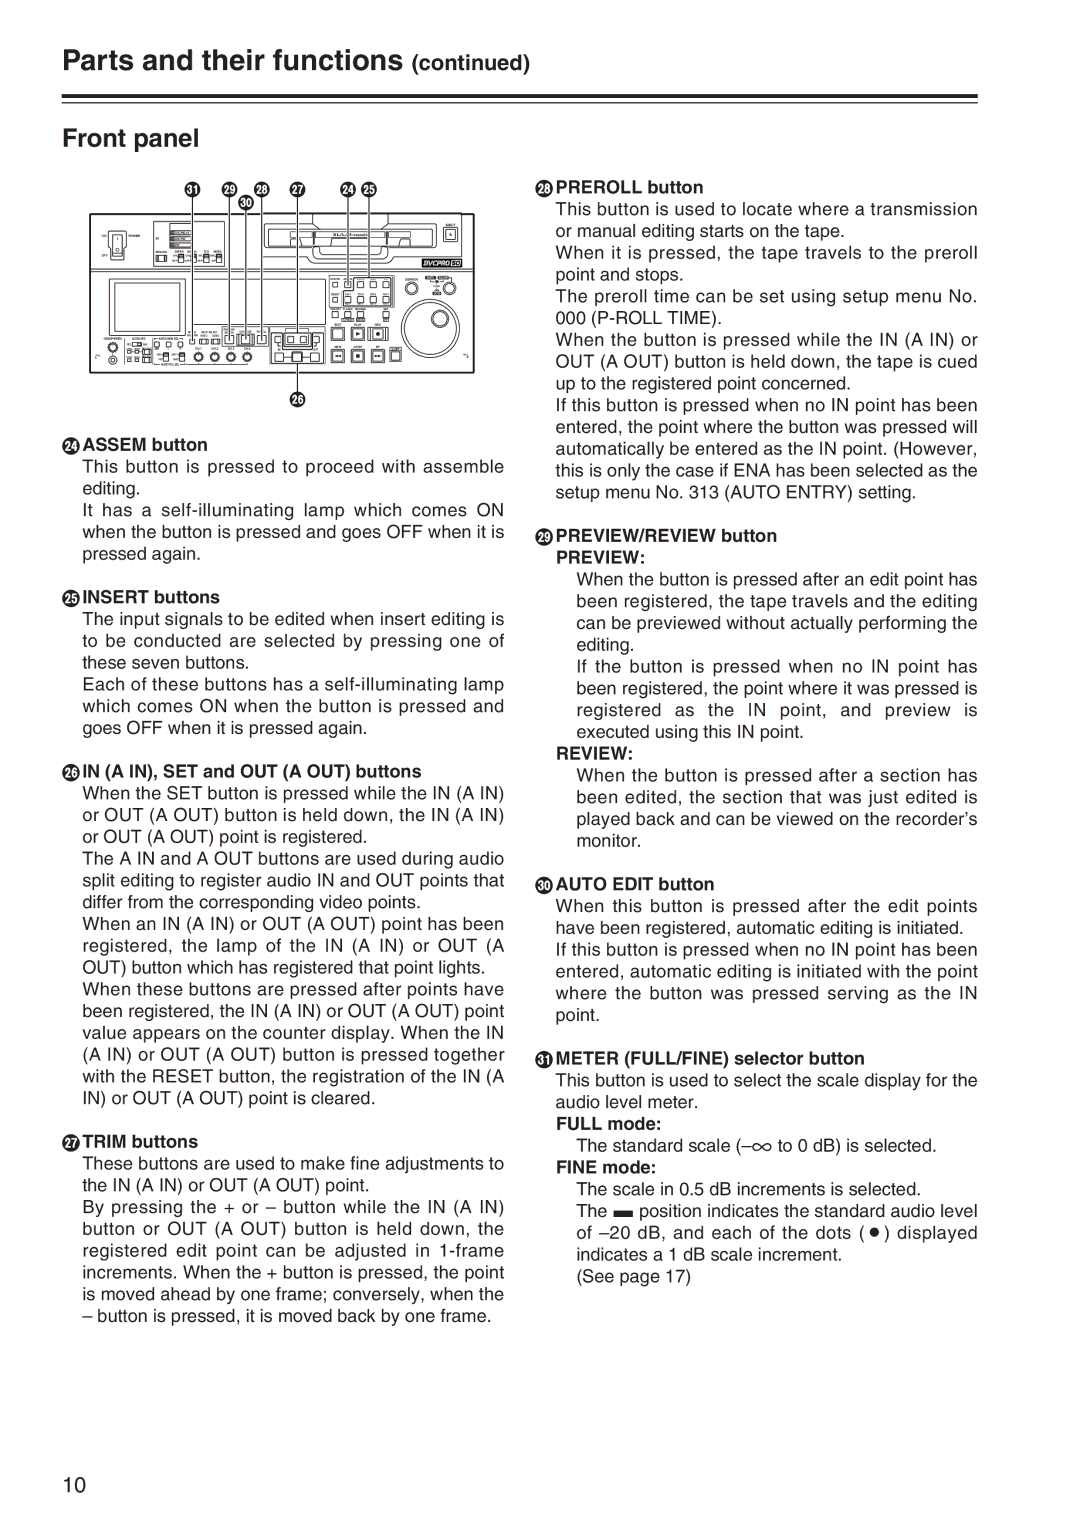
Front panel
ONPOWER
OFF
HEADPHONES | AUDIO MIX | |
1&2 |
| 3&4 |
CH1/3 | CH2/4 | REC CH1/3 |
PULL | CH2/4 | REC CH2/4 |
CH1/3 | ||
|
| O |
| M L | K | H I |
|
|
|
| |||
|
|
|
|
| N |
|
|
|
|
|
|
|
|
|
|
|
|
|
|
|
|
|
|
|
|
| EJECT |
| DVCPRO 50 |
|
|
|
|
|
|
|
|
|
| ||
2X | DVCPRO |
|
|
|
|
|
|
|
|
|
|
| |
| DV |
|
|
|
|
|
|
|
|
|
|
|
|
REMOTE | SUPER | REC INH |
| TCG | MODE |
|
|
|
|
|
|
|
|
| ON | ON | INT |
| TAPE |
|
|
|
|
|
|
|
|
| OFF | OFF | EXT |
| EE |
|
|
|
|
|
|
|
|
|
|
|
|
|
|
| COUNTER ASSEM | VIDEO | CUE | TC | SEARCH | SHTL | SLOW |
|
|
|
|
|
|
|
|
|
|
|
| PUSH | |
|
|
|
|
|
|
|
|
|
|
| INSERT |
|
|
| JOG |
|
|
|
|
|
|
|
|
|
| RESET | CH 1 | CH 2 | CH 3 | CH 4 | |
|
|
|
|
|
|
|
|
|
|
| PF 1 | PF 2 | PF 3 | PF 4 |
|
|
|
|
|
|
|
|
|
|
| STAND BY | PLAYER | RECORDER |
| SET |
|
|
|
|
|
|
|
|
|
|
|
| TC PRESET | MENU |
| PF |
|
|
|
|
|
|
|
|
|
|
| EDIT |
| PLAY | REC |
|
|
|
|
| METER | INPUT SELECT | PREVIEW/ | AUTO EDIT PREROLL |
|
|
|
|
|
|
|
| |
|
|
| REVIEW | A IN |
| A OUT |
|
|
|
|
| ||||
AUDIO MON SEL |
| FULL/FINE | VIDEO | AUDIO |
|
|
|
|
|
|
|
|
|
| |
|
|
|
|
|
|
|
|
|
|
|
|
|
| ||
MIX | L | R | CH 1 | CH 2 | CH 3 | CH 4 | IN | SET | REW |
| STOP | FF |
| SHIFT | |
OUT |
|
|
|
| |||||||||||
REC | UNITY |
|
|
|
|
|
|
|
|
|
|
|
|
| PULL |
PB VAR
AUDIO VOL SEL
LPREROLL button |
This button is used to locate where a transmission |
or manual editing starts on the tape. |
When it is pressed, the tape travels to the preroll |
point and stops. |
The preroll time can be set using setup menu No. |
000 |
When the button is pressed while the IN (A IN) or |
OUT (A OUT) button is held down, the tape is cued |
up to the registered point concerned. |
J
HASSEM button
This button is pressed to proceed with assemble editing.
It has a
IINSERT buttons
The input signals to be edited when insert editing is to be conducted are selected by pressing one of these seven buttons.
Each of these buttons has a
JIN (A IN), SET and OUT (A OUT) buttons
When the SET button is pressed while the IN (A IN) or OUT (A OUT) button is held down, the IN (A IN) or OUT (A OUT) point is registered.
The A IN and A OUT buttons are used during audio split editing to register audio IN and OUT points that differ from the corresponding video points.
When an IN (A IN) or OUT (A OUT) point has been registered, the lamp of the IN (A IN) or OUT (A OUT) button which has registered that point lights.
When these buttons are pressed after points have been registered, the IN (A IN) or OUT (A OUT) point value appears on the counter display. When the IN (A IN) or OUT (A OUT) button is pressed together with the RESET button, the registration of the IN (A IN) or OUT (A OUT) point is cleared.
KTRIM buttons
These buttons are used to make fine adjustments to the IN (A IN) or OUT (A OUT) point.
By pressing the + or – button while the IN (A IN) button or OUT (A OUT) button is held down, the registered edit point can be adjusted in
– button is pressed, it is moved back by one frame.
If this button is pressed when no IN point has been |
entered, the point where the button was pressed will |
automatically be entered as the IN point. (However, |
this is only the case if ENA has been selected as the |
setup menu No. 313 (AUTO ENTRY) setting. |
MPREVIEW/REVIEW button
PREVIEW:
When the button is pressed after an edit point has been registered, the tape travels and the editing can be previewed without actually performing the editing.
If the button is pressed when no IN point has been registered, the point where it was pressed is registered as the IN point, and preview is executed using this IN point.
REVIEW:
When the button is pressed after a section has been edited, the section that was just edited is played back and can be viewed on the recorder’s monitor.
NAUTO EDIT button
When this button is pressed after the edit points have been registered, automatic editing is initiated. If this button is pressed when no IN point has been entered, automatic editing is initiated with the point where the button was pressed serving as the IN point.
OMETER (FULL/FINE) selector button
This button is used to select the scale display for the audio level meter.
FULL mode:
The standard scale
FINE mode:
The scale in 0.5 dB increments is selected.
The 5 position indicates the standard audio level of
(See page 17)
10