Network setting of the projector (cont.)
Changing the network number
1
2
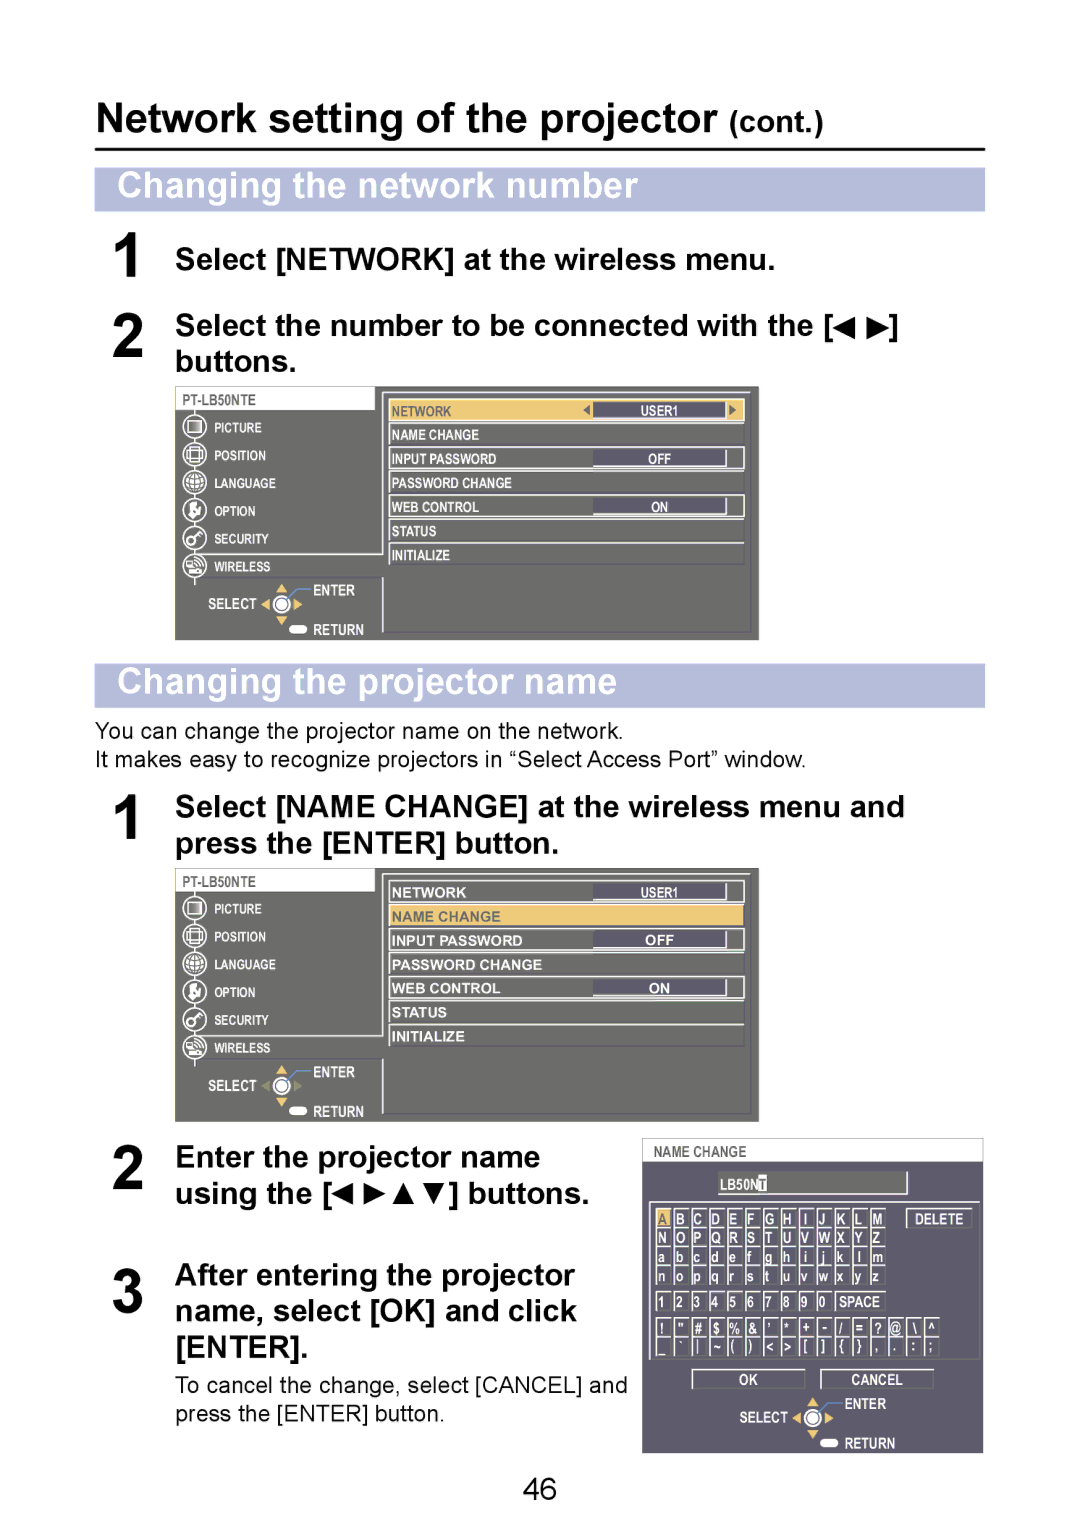
Select [NETWORK] at the wireless menu.
Select the number to be connected with the [![]()
![]() ] buttons.
] buttons.
NETWORK | USER1 | ||
PICTURE | |||
NAME CHANGE |
| ||
|
| ||
POSITION | INPUT PASSWORD | OFF | |
LANGUAGE | PASSWORD CHANGE |
| |
OPTION | WEB CONTROL | ON | |
SECURITY | STATUS |
| |
INITIALIZE |
| ||
WIRELESS |
| ||
|
| ||
SELECT | ENTER |
| |
|
| ||
| RETURN |
|
Changing the projector name
You can change the projector name on the network.
It makes easy to recognize projectors in “Select Access Port” window.
1Select [NAME CHANGE] at the wireless menu and press the [ENTER] button.
NETWORK | USER1 | ||
PICTURE | |||
NAME CHANGE |
| ||
|
| ||
POSITION | INPUT PASSWORD | OFF | |
LANGUAGE | PASSWORD CHANGE |
| |
OPTION | WEB CONTROL | ON | |
SECURITY | STATUS |
| |
INITIALIZE |
| ||
WIRELESS |
| ||
|
| ||
SELECT | ENTER |
| |
|
| ||
| RETURN |
|
2Enter the projector name using the [![]()
![]() ▲▼] buttons.
▲▼] buttons.
3After entering the projector name, select [OK] and click
[ENTER].
To cancel the change, select [CANCEL] and press the [ENTER] button.
NAME CHANGE |
|
|
|
|
|
| |||||
|
|
| LB50NT |
|
|
|
|
| |||
A B | C | D | E | F | G | H | I | J | K L M | DELETE | |
N O P | Q R S | T | U V W X Y Z |
| |||||||
a b c | d | e | f | g | h i j k l m |
| |||||
n o p | q | r | s | t | u v w x y z |
| |||||
1 | 2 | 3 | 4 | 5 | 6 | 7 | 8 | 9 | 0 | SPACE | / ^ |
! " # $ | % & ’ * + | ||||||||||
_ ` | ~ ( ) < > [ ] { } , . : ; | ||||||||||
|
|
|
|
| OK |
|
|
|
| CANCEL |
|
|
|
|
|
| SELECT |
|
| ENTER |
| ||
|
|
|
|
|
|
|
|
| |||
|
|
|
|
|
|
|
|
|
| RETURN |
|
46
