Card slot Computer Software
Before using Setup Recording Playback Editing
Not available
Guía para rápida consulta en español está incluida
IEC
AC Adaptor
≥ The rating plate is on the underside of the AC Adaptor
Model No
Declaration of Conformity U.S.A. only Trade Name
Responsible party
Support Contact
Important Safety Instructions
Care
Indemnity concerning recording content
USE & Location
LSQT0969
Contents
Recording dubbing images onto Other video devices
Playback on TV
Before using Editing scenes! l 66
Features
Easy recording! l
Easy playback! l
Before using Using with a computer! VDR-D200 only l
Using with DVD player/recorder! l
Quick Guide
Open the card slot cover
≥ Rotate the mode dial to select
Recording motion pictures
Still picture playback VDR-D200 only
Motion picture playback
Accessories
Parts identification and handling
Adjust the belt length and the pad position
Before using Using grip belt
Shoulder strap fixture
By at least 2 cm 1z
Tripod receptacle
Fitting the lens cap
Using the viewfinder
Using the LCD monitor
39, Adjusting viewfinder
Pull out the viewfinder
DVD-RAM DVD-RW
Discs and cards
Discs that can be used on this unit
≥ DVD-RAM 2.6 GB Ver
Examples of discs that cannot be used on this unit
≥ MO
≥ Floppy disk
Video DVD-Video format VR DVD Video Recording format
When using brand-new DVD-RW
Card type SD Memory Card MiniSD Card Capacity
Cards that you can use with this unit VDR-D200 only
Handling precautions
How to hold a disc or card
Disc and card handling
Do not touch the recorded surface or the terminal surface
Charging the battery
Power supply
≥ Hold the battery with your hand so it does not fall
Charging lamp Lights up Charging
Recordable time
Charging time and recordable time
Charging time
Turning the unit on/off
Connecting to the AC outlet
Status indicator B goes off
Slide the Disc Eject lever once and release it
Inserting/removing a disc
Inserting disc
Removing disc
After inserting a disc/After recording finishes
Recording/playback side is opposite to the labelled side
Double sided disc
Inserting/removing an SD card VDR-D200 only
Card access lamp
Securely close the card slot cover
Concerning the SD card
Selecting a mode
Basic operations
How to use the joystick
Joystick and screen display
Select by moving up
Operation icon is off
Adjustments
Disc playback mode
AUTO/MANUAL/FOCUS switch is set To Manual
Soft skin mode Self timer Backlight compensation
Card recording mode
Card playback mode VDR-D200 only When Slide Show is selected
Card playback mode VDR-D200 only When Picture is selected
Switching the language
While stopped, press the Menu button
Using the menu screen
Current settings on menus
Press the Menu button
To exit the menu screen
Move the joystick left
Date OFF
Setting date and time
Setup Press the joystick to enter the selection
EVF EVF SET
Adjusting LCD monitor/viewfinder
LCD SET
Basic camera positioning Recording
Before recording
RAM -RW‹VR› -RW‹V› -R Record motion pictures onto a disc
Recording motion pictures
Remove the lens cap, then turn the unit on
Flashes red Recording mode Recording time elapsed
Changing the recording mode of the motion picture
Screen indications in the disc recording mode
Record the still picture on an SD card
Rotate the mode dial to select Press the Photo Shot button
Recording still pictures VDR-D200 only
Recording with a shutter operation effect
Screen indications in card recording mode
Progressive function Recording
Zoom in/out function
Various recording functions
Move the zoom lever
Recording Digital zoom function
Rotate the LCD monitor towards the lens side
Recording yourself
To use the zoom microphone function
Select again
Soft skin mode
Start recording. fade
Fade in/fade out function
To select the color for fade in/out
To cancel fading
Pause recording. fade out
Color which appears in fading pictures can be selected
To return to normal recording
Backlight compensation function
Image on the screen will become brighter
Select ª again
To stop the timer midway through
Self-timer recording VDR-D200 only
You can record still pictures on an SD card using the timer
Press the Menu button. The self-timer setting is canceled
RAM -RW‹VR› -RW‹V› -R
Cinema mode
Wind noise reduction function
Image stabilizer function
To cancel the MagicPix function
MagicPix function
Recording with the video light VDR-D200 only
Video light and gain up mode on
Press the Light button
Video light on
Manual recording functions
Scene mode
To make people stand out against the background
To make the scene brighter in dark conditions
To cancel the scene mode function
Manual focus indication 1MF is displayed
Manual focus adjustment
To restore to the automatic adjustment
White balance
Set the AUTO/MANUAL/FOCUS switch to Manual
About the white balance sensor a
Recording Move the joystick down several times and select
Manual shutter speed/aperture adjustment
To restore to automatic adjustment
Motion picture playback
Rotate the mode dial to select
Select the scene to be played back
Press the joystick
Frame-by-frame playback
To adjust the volume
Playback Move the volume lever to change the volume level
Scenes recorded on the same day are displayed as thumbnails
Playing back motion pictures by date
Select the date for playback, then press the joystick
Playback Press the joystick
Still picture playback VDR-D200 only
Select the file to be played back
About still picture compatibility
Playing back still pictures as a slide show
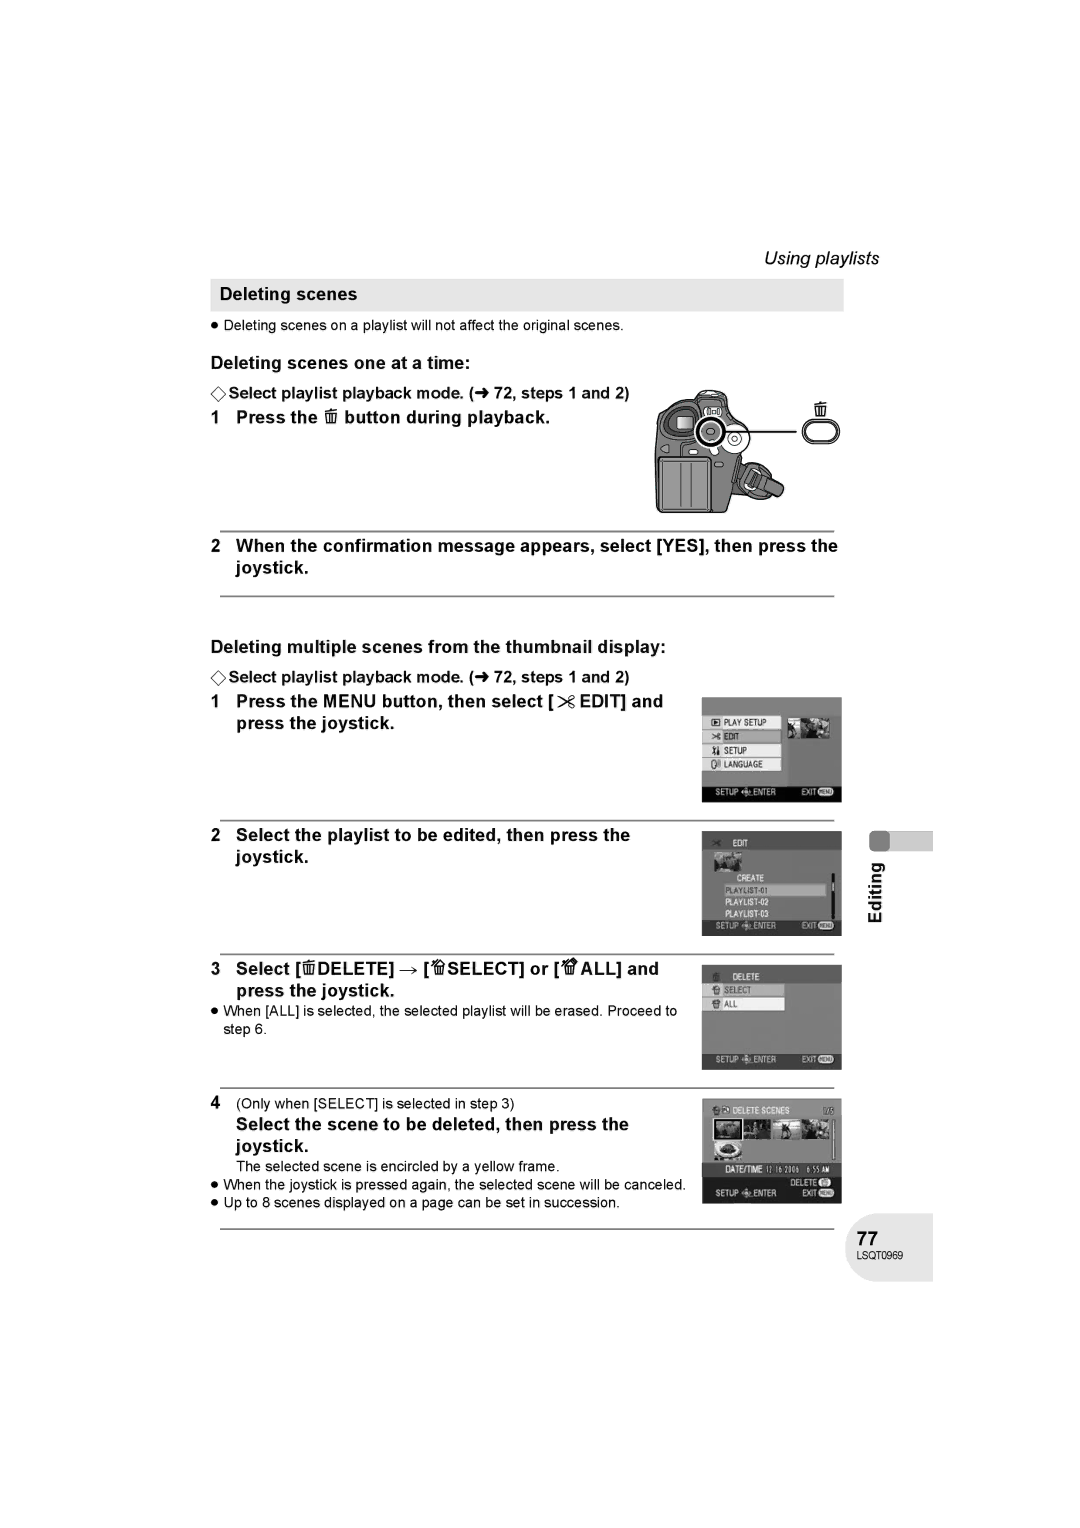
Deleting scenes
Editing scenes
Editing Deleting scenes one at a time
Select the scene to be deleted, then press the joystick
To complete editing
Selected scene is played back
Dividing a scene
RAM -RW‹VR›
Combining scenes
Recorded scenes Playlist
Using playlists
What is a playlist?
To playback a playlist
Creating a new playlist
To add another scene to the same playlist
Scenes in the selected playlist are displayed as thumbnails
Playing back a playlist
To return to showing the original scenes
To continue adding scenes to the playlist
Editing a playlist
Adding scenes to playlist
Scenes in a playlist can be moved
Moving scenes
Dividing a scene
≥ The selected scene and the next scene are combined
Combining scenes
Deleting scenes
To continue deleting other scenes
Deleting still pictures
Editing still pictures VDR-D200 only
Deleting files one at a time
Select the file to be deleted, then press the joystick
To complete editing
Locking still pictures
To complete the settings
Editing To complete the settings
Dpof setting
To cancel all Dpof settings
What is DPOF?
Formatting discs
Formatting discs and cards
This is for initializing cards
Formatting an SD card VDR-D200 only
Finalizing a disc
Finalizing a disc
Finalizing video format discs
Finalizing VR format discs
Un-finalizing a DVD-RW
Protecting a disc
Displaying disc information
Playback on TV
With a TV
Connect this unit and a TV
Start playback on this unit
Playback on DVD recorder/player
With a DVD recorder/player
Playing back a DVD-RAM or a DVD-RW VR format
Playing back a DVD-RW Video format or a DVD-R
Copying recordings onto a DVD recorder’s hard disk
Recording dubbing images onto other video devices
With a VCR
Connect this unit and a video device
To stop recording dubbing
Connect this unit and a printer
With a printer PictBridge VDR-D200 only
Select a file to be printed, then press the joystick
≥ Press the Menu button to exit the menu screen
Select the layout setting on page Layout
Select the paper size setting on Paper Size
When you stop printing halfway
Select Print # YES and press the joystick
When using an SD card recorded on this unit
Before using with a computer Windows
What you can do with a computer
Can do Software used
Contents on provided CD-ROM
DVD-Video disc is created
DVDfunSTUDIO
Acrobat Reader
File Export
DVD-MovieAlbumSE
Operating environment
CPU
RAM
Free hard disk space
Using Built-in SD Drive
Necessary software
Interface
Article 7 Export Control
End User License Agreement
100
101
Installation Windows
≥ You cannot install the application if you click No
Check the contents, then click k at the top right of window
If any trouble has occurred while installing DVD-RAM Driver
102
103
Installing DVD-MovieAlbumSE
Click DVD-MovieAlbum
Click Next Select Ntsc for the TV system, click Next
Click DVDfunSTUDIO
Installing DVDfunSTUDIO
104
105
Software application uninstallation
DVD-RAM Driver
DVD-MovieAlbumSE DVDfunSTUDIO
Connection and recognition Windows
Connection and recognition procedures
106
Connect this unit and a computer
107
Disc playback mode When accessing the disc
About the computer display
To disconnect USB cable safely
Card playback mode When accessing the card
108
Double click the icon in task tray
If the driver has not been recognized properly
Verifying the unit is correctly recognized by the computer
109
110
Creating a DVD-Video disc on a computer Windows
On the computer
111
Insert a brand-new DVD-RW or DVD-R disc into the unit
112
When the CollectTool screen appears, click OK
Edit the DVD menu as required
Click Burning
113
Before using with a computer Macintosh
When using a disc recorded on this unit
Pixe VRF Browser EX
114
ImageMixer VCD/DVD2
115
DVD-Video or Video CD disc is created
Save button
116
Pixe VRF Browser EX specifications
117
118
Installation Macintosh
Double-click Panasonic # Imx for Panasonic # ImageMixer.pkg
Click Continue
ImageMixer VCD/DVD2
119
Pixe VRF Browser EX
Creating a DVD-Video on a computer from a recorded disc
Using discs on a computer Macintosh
120
Pixe VRF Browser EX starts
Prepare a DVD-RW/DVD-R/rRW/rR drive that can be written to
121
Insert the disc in this unit
When the drive icon is displayed on the desktop
Proceed with the write setting and then click OK
When the drive icon is not displayed on the desktop
122
123
Using an SD card on a computer Macintosh
Connection
124
Copying still picture files to a computer
Double-click the Noname icon
Folders on the SD card are displayed
Menu list
Menus
125
Motion picture recording menus
Edit Scene
Play Setup
126
127
Setup menu
Indications
Indications
128
Recording indications
Confirmatory indications
129
Playback indications
130
Messages
131
About recovery
132
Functions that cannot be used simultaneously
133
Frequently asked questions
134
This unit is turned off
Troubleshooting
Unit operations
136
137
138
139
Performance and Maintenance # System
Not appear when
Select Eject the disc being used
VCD/DVD2
140
DVD2
About this unit
141
142
About the battery
About the AC adaptor
143
About the disc
DVD-R
144
145
Explanation of terms
Automatic white balance
White balance
Auto focus
146
147
Specifications
148
149
When using the remote control not supplied
Number of recordable pictures on an SD card VDR-D200 only
150
Optional accessories
DVD video camera accessories
151
Accessory Order Form For USA Customers
152
Request for Service Notice USA Only
153
Limited Warranty For USA Customers
154
Customer Services Directory
155
Warranty For Canadian Customers
Index
Iris Image stabilizer function Initial setting
Menu list
Number of recordable pictures Operation icons
157
Spanish Quick Use Guide/Guía española para el uso rápido
SD sólo VDR-D200
158
Grabación de imágenes dinámicas
≥ Gire el selector de modo para seleccionar
159
F1005Nt4016 30000 F
Panasonic Puerto Rico, Inc
Panasonic Canada Inc