PELCO EXSITE IPSXM
LANGUAGE | ENGLISH | |||
UNIT INVERSION | OFF | |||
<SYSTEM INFORMATION> |
| |||
<DISPLAY SETUP> |
| |||
<UNIT SETTINGS> |
| |||
<POSITION CALIBRATION> |
| |||
RESET CAMERA |
| |||
CYCLE CAMERA POWER |
| |||
REBOOT SYSTEM |
| |||
EXIT |
| |||
|
|
|
| |
|
|
|
|
|
UNIT SETTINGS |
| |||
|
| |||
<CAMERA> |
| |||
<MOTION> |
| |||
<POWER UP> |
| |||
<LINE SYNC> |
| |||
<PRESETS> |
| |||
<PATTERNS> |
| |||
<ZONES> |
| |||
<WINDOW BLANKING> |
| |||
<ALARMS> |
| |||
<WIPER> |
| |||
<AUX> |
| |||
<CLEAR> |
| |||
<PASSWORD> |
| |||
BACK |
| |||
EXIT |
| |||
|
| |||
|
|
|
|
|
PRESETS |
| |||
|
| |||
|
|
|
|
|
PRESET NUMBER | 1 | |||
***PRESET NOT DEFINED*** | ||||
<EDIT PRESET LABEL> |
| |||
<EDIT PRESET SCENE> |
| |||
<EDIT CAMERA SETTINGS> |
| |||
<MOTION DETECTION>* |
| |||
<CLEAR PRESET> |
| |||
<CLEAR CAMERA SETTINGS> |
| |||
BACK |
| |||
EXIT |
| |||
REFERENCE INFORMATION |
| |||
AZIMUTH | ||||
ELEVATION | ||||
ZOOM | ||||
CUSTOM CAMERA SETTINGS | ||||
* Available only with the 23X day/night camera.
PRESETS
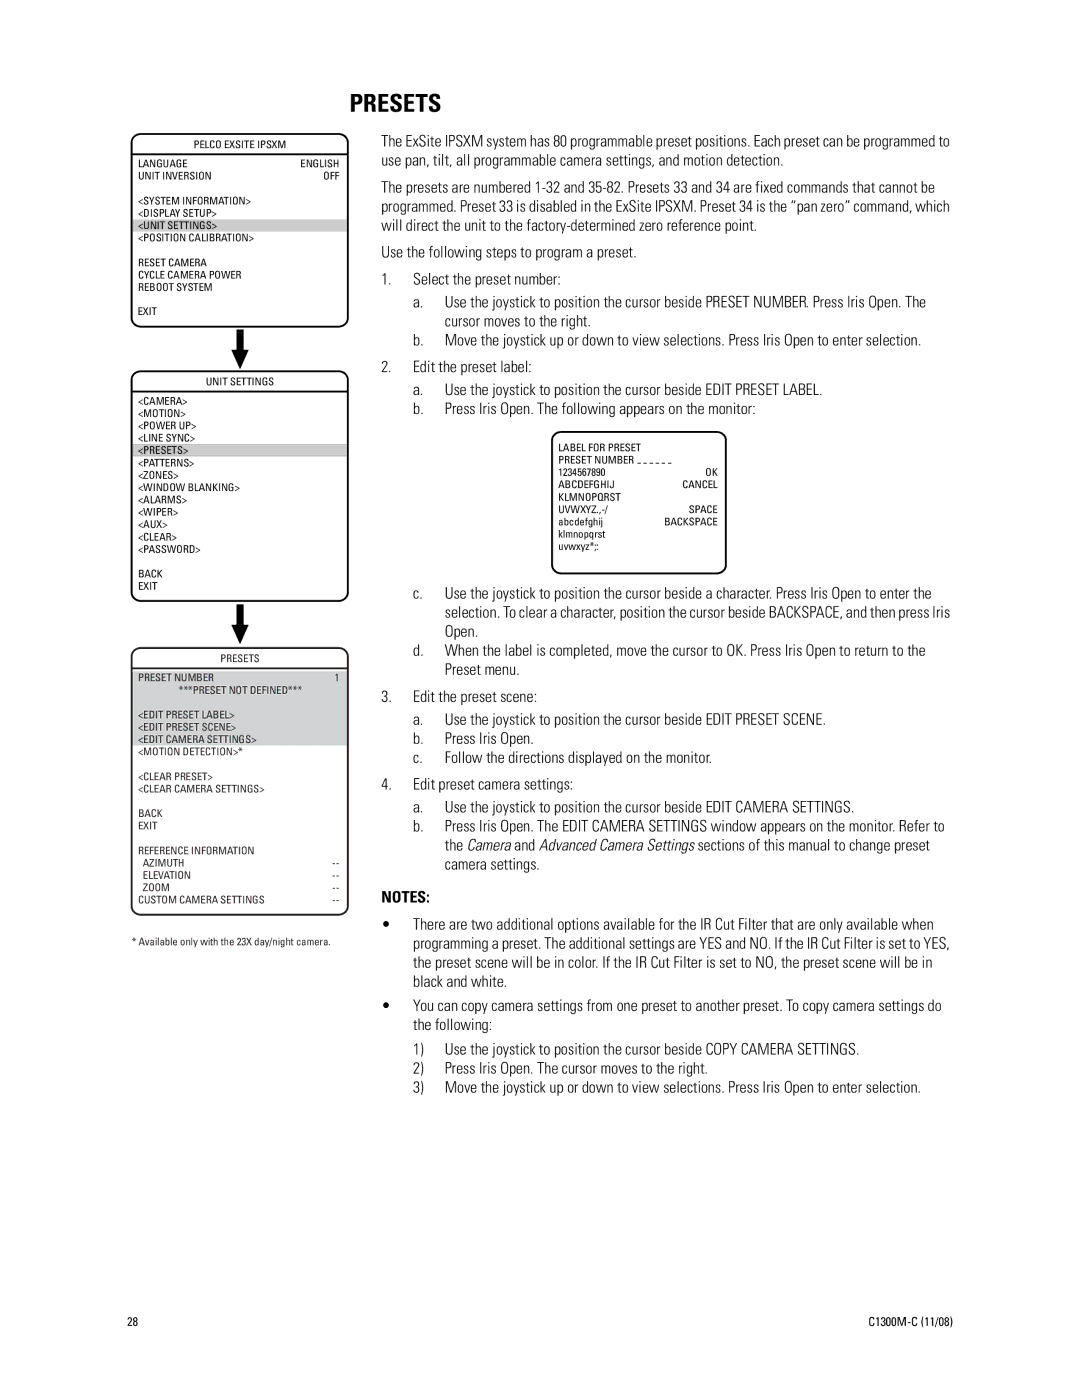
The ExSite IPSXM system has 80 programmable preset positions. Each preset can be programmed to use pan, tilt, all programmable camera settings, and motion detection.
The presets are numbered
Use the following steps to program a preset.
1.Select the preset number:
a.Use the joystick to position the cursor beside PRESET NUMBER. Press Iris Open. The cursor moves to the right.
b.Move the joystick up or down to view selections. Press Iris Open to enter selection.
2.Edit the preset label:
a.Use the joystick to position the cursor beside EDIT PRESET LABEL.
b.Press Iris Open. The following appears on the monitor:
LABEL FOR PRESET
PRESET NUMBER
1234567890 | OK |
ABCDEFGHIJ | CANCEL |
KLMNOPQRST |
|
SPACE | |
abcdefghij | BACKSPACE |
klmnopqrst |
|
uvwxyz*;: |
|
c.Use the joystick to position the cursor beside a character. Press Iris Open to enter the selection. To clear a character, position the cursor beside BACKSPACE, and then press Iris Open.
d.When the label is completed, move the cursor to OK. Press Iris Open to return to the Preset menu.
3.Edit the preset scene:
a.Use the joystick to position the cursor beside EDIT PRESET SCENE.
b.Press Iris Open.
c.Follow the directions displayed on the monitor.
4.Edit preset camera settings:
a.Use the joystick to position the cursor beside EDIT CAMERA SETTINGS.
b.Press Iris Open. The EDIT CAMERA SETTINGS window appears on the monitor. Refer to the Camera and Advanced Camera Settings sections of this manual to change preset camera settings.
NOTES:
•There are two additional options available for the IR Cut Filter that are only available when programming a preset. The additional settings are YES and NO. If the IR Cut Filter is set to YES, the preset scene will be in color. If the IR Cut Filter is set to NO, the preset scene will be in black and white.
•You can copy camera settings from one preset to another preset. To copy camera settings do the following:
1)Use the joystick to position the cursor beside COPY CAMERA SETTINGS.
2)Press Iris Open. The cursor moves to the right.
3)Move the joystick up or down to view selections. Press Iris Open to enter selection.
28 |
|
