Front Panel |
|
|
|
| 01 |
1 | 2 | 3 | 4 | 5 | 6 |
11 10
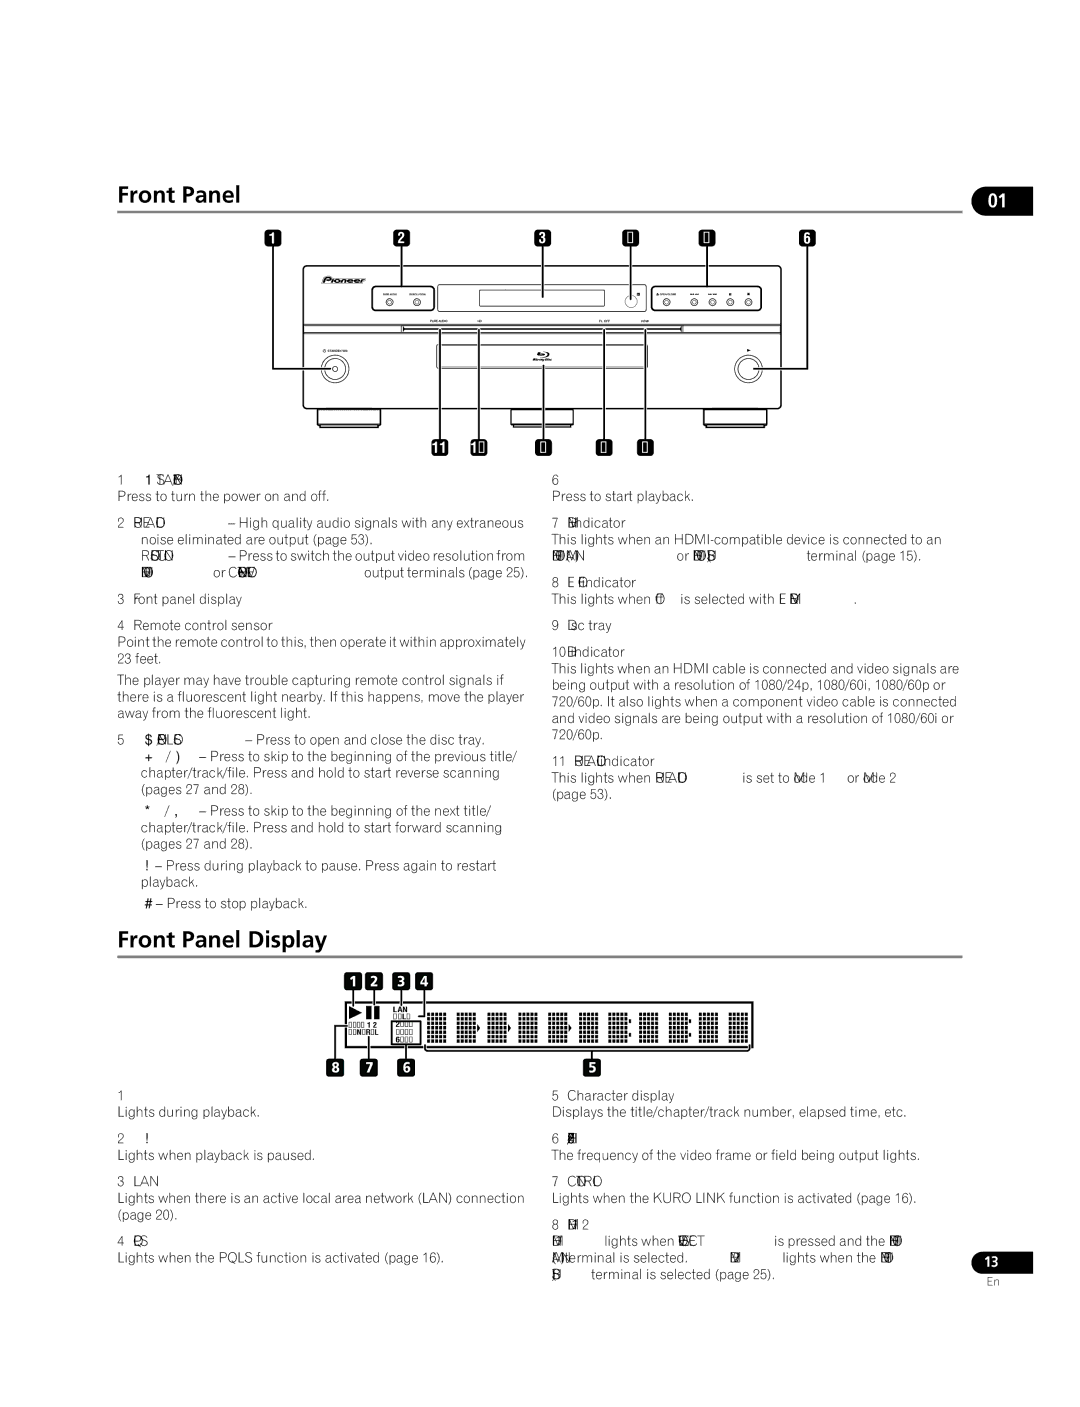
1 STANDBY/ON
Press to turn the power on and off.
2PURE AUDIO – High quality audio signals with any extraneous noise eliminated are output (page 53).
RESOLUTION – Press to switch the output video resolution from HDMI OUT or COMPONENT VIDEO output terminals (page 25).
3Front panel display
4Remote control sensor
Point the remote control to this, then operate it within approximately 23 feet.
The player may have trouble capturing remote control signals if there is a fluorescent light nearby. If this happens, move the player away from the fluorescent light.
5 OPEN/CLOSE – Press to open and close the disc tray. / – Press to skip to the beginning of the previous title/ chapter/track/file. Press and hold to start reverse scanning (pages 27 and 28).
/ – Press to skip to the beginning of the next title/ chapter/track/file. Press and hold to start forward scanning (pages 27 and 28).
– Press during playback to pause. Press again to restart playback.
– Press to stop playback.
9 8 7
6
Press to start playback.
7 HDMI indicator
This lights when an
8 FL OFF indicator
This lights when Off is selected with FL DIMMER.
9Disc tray
10HD indicator
This lights when an HDMI cable is connected and video signals are being output with a resolution of 1080/24p, 1080/60i, 1080/60p or 720/60p. It also lights when a component video cable is connected and video signals are being output with a resolution of 1080/60i or 720/60p.
11 PURE AUDIO indicator
This lights when PURE AUDIO is set to Mode 1 or Mode 2 (page 53).
Front Panel Display
| 1 | 2 |
| 3 |
| 4 |
| ||
|
|
|
|
|
|
|
|
|
|
|
|
|
|
| LAN |
|
|
| |
|
|
|
|
| PQLS |
|
|
| |
| HDMI 1 2 | 24HZ |
|
|
| ||||
| CONTROL | 50HZ |
|
|
| ||||
|
|
|
|
| 60HZ |
|
|
| |
|
|
|
|
|
|
|
|
|
|
8 7 6
1
Lights during playback.
2
Lights when playback is paused.
3 LAN
Lights when there is an active local area network (LAN) connection (page 20).
4 PQLS
Lights when the PQLS function is activated (page 16).
5
5 Character display
Displays the title/chapter/track number, elapsed time, etc.
6 24HZ/50HZ/60HZ
The frequency of the video frame or field being output lights.
7 CONTROL
Lights when the KURO LINK function is activated (page 16).
8 HDMI 1 2
HDMI 1 lights when VIDEO SELECT is pressed and the HDMI OUT (MAIN) terminal is selected. HDMI 2 lights when the HDMI OUT (SUB) terminal is selected (page 25).
13
En
