PDP-4270XA
For USE in the United Kingdom
STANDBY/ON Button
Ventilation Caution
Contents
Using Teletext
Using with other equipment
Troubleshooting Scart pin assignments Specifications
Additional information
Important user information
Installation guidelines
Important user information Chapter
Usage guidelines
Important user information
After-image lagging due to remaining electrical load
Panel sticking and after-image lag
After-image lag image due to burning
Preventing Damage from screen burning
Safety precautions Chapter
Safety precautions
When using other items
Safety precautions Installation precautions
Rear view
Side view
English Power cable
Supplied accessories
Supplied accessories Chapter
Part names
Power button
Part names Chapter
Plasma television front
Rear
Part names Plasma television rear
Part names Remote control unit
Preparation Chapter
Preparation
Over 50 cm 10 cm
Location
Attaching/detaching the Pioneer stand
Using a wall for stabilization
Stabilizing on a table or floor
Detaching the stand
Remove the plasma television from the stand
Preparation
Reattaching the stand
Preparation Basic connections
Connecting the antenna
Routing cables
Attaching the ferrite core
Operating range of the remote control unit
Preparing the remote control unit
Connecting the power cord
Inserting batteries
Preparation
Plasma television status indicators
Turning the power on
Watching TV
Watching TV Chapter
Watching TV
Tuning to your favourite channels
Changing the volume and sound
Freezing images
Switching the broadcast audio channel
Using eon the remote control unit
Home Menu
Using the Home Menu
Home Menu Chapter
Home Menu overview
Setting up Chapter
Setting up
Setting up TV channels
Setting up analogue TV channels manually
Setting Child Lock
Setting up
Reducing video noise
Description
Labeling TV channels
Setting up Selecting a decoder input terminal
Sorting preset TV channels
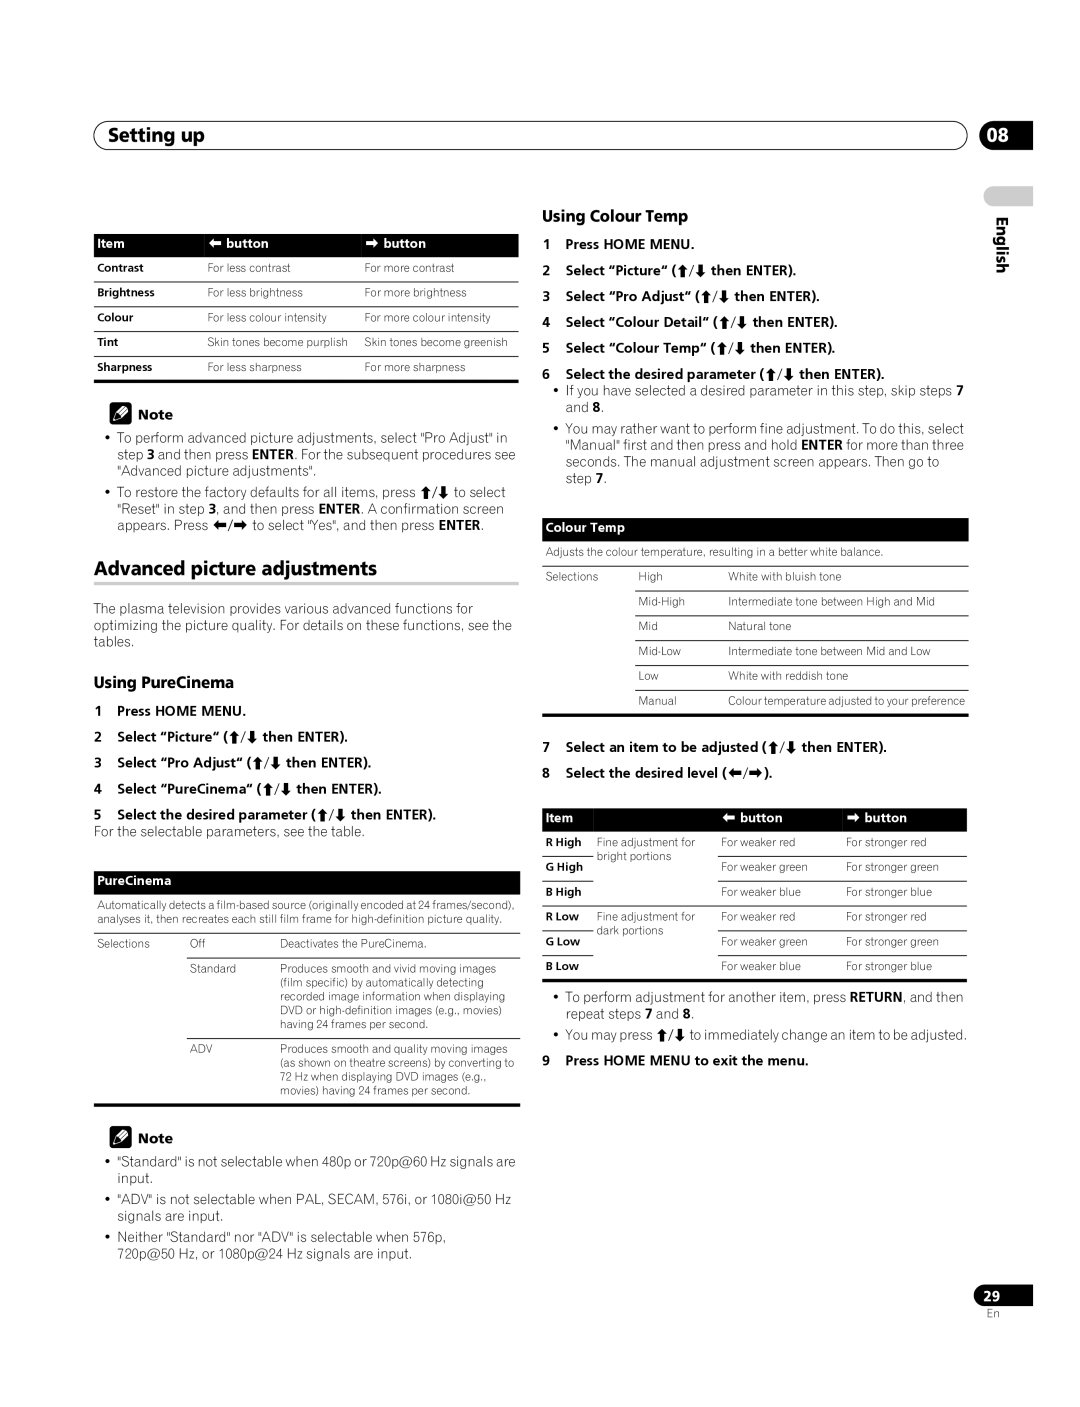
Basic picture adjustments
Setting up Language setting
AV Selection
Select the desired level /
Using Colour Temp
Advanced picture adjustments
Using PureCinema
Using Colour Management
Using CTI
Using Colour Space
Using Intelligent Colour
Using the 3DYC and I-P Mode
Using the Dynamic Range Expander DRE functions
Front Surround
Sound adjustments
Front Surround
No Signal off
Power Control
Energy Save
No Operation off
Useful adjustment settings Chapter
Useful adjustment settings
Adjusting image positions
Colour system setting
Selecting a screen size manually
Useful adjustment settings
Selecting a screen size automatically
Item Description
Using a password
Sleep Timer
Selecting a screen size for 43 aspect ratio signals
Entering a password
Resetting the password function
Changing the password
Disabling the password function
If you forget the password
Using with other equipment Chapter
Using with other equipment
Connecting a DVD player
Connecting a decoder
Connecting a game console or camcorder
Using with other equipment
Connecting an amplifier/AV receiver
Displaying an image from the game console or camcorder
Connecting Hdmi equipment
Using the Hdmi Input
To specify the type of digital video signals
Input signal table
Selecting the Scart terminal for use with i/o link.A
Using i/o link.A
Using Teletext Chapter
Using Teletext
Using the Teletext Functions
Operating the Teletext basics
Displaying subpages
Using Teletext
Displaying TOP Over View
Displaying subtitle pages
Problem Possible solution
Troubleshooting
Additional information
Additional information Chapter
Scart pin assignments
Additional information
Code Message Check
5 7 9 11 13 15 17 19
Plasma Television, model PDP-4270XA
Additional information Specifications
Trademarks
English Français
Touche STANDBY/ON
Table des matières
Table des matières
Utilisation des télétextes
Utilisation avec un autre appareil
Informations supplémentaires
Connexion d’un magnétoscope Lecture d’un magnétoscope
Informations importantes pour l’utilisateur
Instructions d’installation
Informations importantes pour l’utilisateur Chapitre
Instructions d’usage
Informations importantes pour l’utilisateur
Image rémanente due à une charge électrique
Rémanence d’image sur le panneau
Image rémanente due au brûlage
Pour éviter l’endommagement de l’écran par brûlage
Précautions de sécurité Chapitre
Précautions de sécurité
Si vous utilisez d’autres accessoires
02 Précautions de sécurité Précautions d’installation
Vue de dos
Vue de côté
Pour le Royaume-Uni et la République d’Ireland
Accessoires fournis
Accessoires fournis Chapitre
Nomenclature Chapitre
Nomenclature
Téléviseur plasma avant
Côté Avant
Arrière
Nomenclature Téléviseur plasma arrière
Touches de couleur ROUGE, VERT, JAUNE, Bleu
Nomenclature Boîtier de télécommande
Préparation
Emplacement
Préparation Chapitre
Plus de 50 cm
Fixation sur une table ou au sol
Pose et dépose du support Pioneer
Fixation à un mur
Dépose du support
Retirez le téléviseur plasma du support
Préparation
Réattachement du support
Connexion de l’antenne
05 Préparation Connexions de base
Fixation du noyau de ferrite
Cheminement des câbles
Portée du boîtier de télécommande
Préparation du boîtier de télécommande
Connexion du cordon d’alimentation
Mise en place des piles
05 Préparation
Pour regarder la télévision Chapitre
Pour regarder la télévision
Mise sous tension
Sélection des chaînes
Accord sur vos chaînes favorites
Modification du volume et du son
Pour regarder la télévision
Gel d’une image
Utilisation de la touche edu boîtier de télécommande
Commutation du canal audio de l’émission
Le menu Home Chapitre
Le menu Home
Présentation du menu Home
Utilisation du menu Home
Réglage
Utilisation d’Autoinstallation
Réglage Chapitre
Réglage des chaînes de télévision
Réduction de bruit vidéo
08 Réglage
Définition de Verrouillage enfants
Élément Description
Classement des chaînes de télévision préréglées
Réglage Sélection d’une entrée décodeur
Désignation des chaînes de télévision
Sélection AV
08 Réglage Choix de la langue
Réglages de base de l’image
Sélectionnez le niveau souhaité /
Réglages avancés de l’image
Réglage
Utilisation de PureCinema
Utilisation de Temp. Couleur
Utilisation de Gestion coul
Utilisation de CTI
Utilisation d’Espace Couleur
Utilisation de Couleur Intelligente
Mode I-P
Utilisation de 3DYC et de Mode I-P
Contraste Dynamique
Niveau de Noir
Surround avant
Réglages du son
Surround avant
Aigus
Gestion de l’alimentation
Arrêt si absence signal
Économie d’énergie
Pas d’opération arrêt si absence opération
09 Réglages utiles Chapitre
Réglages utiles
Réglage des positions de l’image
Choix du système couleur
Sélection manuelle d’un format d’écran
Réglages utiles
Sélection automatique d’un format d’écran
Plein
Minut. Extinction
09 Réglages utiles
Utilisation d’un mot de passe
Saisie du mot de passe
Effacement du mot de passe
Changement de mot de passe
Désactivation du mot de passe
Français Nous vous proposons d’écrire ici le mot de passe
Utilisation avec un autre appareil Chapitre
Utilisation avec un autre appareil
Connexion d’un décodeur
Connexion d’un lecteur de DVD
Connexion d’une console de jeu ou d’un caméscope
Utilisation avec un autre appareil
Affichage des images d’une console de jeu ou d’un caméscope
Lecture d’un magnétoscope
Connexion d’un appareil Hdmi
Utilisation de l’entrée Hdmi
Activation de la prise Hdmi
Pour spécifier le type des signaux vidéo numériques
Utilisation de li/o link.A
Lecture commandée par touche unique
Pour spécifier le type des signaux audio
Chargement des préréglages
Utilisation des télétextes
Mise en service, ou hors service, du télétexte
Utilisation des télétextes Chapitre
Qu’est-ce que le télétexte ?
Affichage d’une page secondaire
Utilisation des télétextes
Affichage des éléments TOP
Affichage de pages de sous-titres
Informations supplémentaires Chapitre
Informations supplémentaires
Guide de dépannage
Anomalie Action corrective possible
Brochage de la prise péritel
Informations supplémentaires
Code Message Vérification
Prise péritel Input
Élément 42Téléviseur plasma, Modèle PDP-4270XA
Informations supplémentaires Caractéristiques techniques
Marques de commerce
Français Deutsch
Taste STANDBY/ON
Inhalt
Inhalt
Verwendung von Videotext
Verwendung mit anderen Geräten
12 Zusätzliche Informationen
Anschließen von HDMI-Ausrüstung Gebrauch von i/o link.A
Wichtige Informationen für den Anwender Kapitel
Wichtige Informationen für den Anwender
Grundregeln zur Benutzung
Grundregeln zur Aufstellung
Wichtige Informationen für den Anwender
Nachbild durch Einbrennen
Einbrenner und Nachbilder
Nachbild wegen elektrischer Restladung
Wichtige Sicherheitshinweise Kapitel
Wichtige Sicherheitshinweise
Bei Gebrauch anderer Vorrichtungen
Wichtige Sicherheitshinweise Beim Installieren zu beachten
Rückansicht
Seitenansicht
Netzkabel
Mitgeliefertes Zubehör
Mitgeliefertes Zubehör Kapitel
Teilebezeichnungen Kapitel
Teilebezeichnungen
Plasma-Fernseher Vorne
Seite Vorne
Hinten
Teilebezeichnungen Plasma-Fernseher Hinten
Teilebezeichnungen Fernbedienung
Vorbereitungen Kapitel
Vorbereitungen
Über 50 cm 10 cm
Positionierung
Stabilisieren auf einem Tisch oder auf dem Boden
Anbringen/Abnehmen des Pioneer-Fußes
Gebrauch einer Wand zur Stabilisierung
Abnehmen des Fußes
Wiederanbringen des Fußes
Vorbereitungen
Nehmen Sie den Plasma-Fernseher vom Fuß ab
Mit dem mitgelieferten Sechskantschlüssel fest
Antennenanschluss
Vorbereitungen Grundlegende Anschlüsse
Verlegen von Kabeln
Anbringen des Ferritkerns
Wirkungsbereich der Fernbedienung
Vorbereiten der Fernbedienung
Anschließen des Netzkabels
Einlegen der Batterien
Vorbereitungen
Fernsehempfang Kapitel
Fernsehempfang
Einschalten
Kanäle ändern
Lautstärke- und Toneinstellungen
Fernsehempfang
Abrufen von Favoritenkanälen
Mit e an der Fernbedienung
Umschalten des Programm-Audiokanals
Standbild
07 Menü Home Kapitel
Menü Home
Überblick über Menü Home
Verwendung des Menüs Home
Vorbereitung
Verwendung der Funktion Automatische Installation
Vorbereitung Kapitel
Programmieren von Fernsehkanälen
Reduzieren von Bildrauschen
Vorbereitung
Einstellen der Kindersicherung
Gegenstand Beschreibung
Sortieren von voreingestellten Fernsehkanälen
Vorbereitung Wählen des Decodereingangs
Eingeben von Fernsehkanalnamen
AV-Wahl
Vorbereitung Einstellen der Sprache
Bildeinstellungen
Stellen Sie die gewünschte Stufe ein /
Verwendung von PureCinema
Erweiterte Bildeinstellungen
Verwendung von Farbtemperatur
Gegenstand Taste Taste
Verwendung von Farbraum
Verwendung von CTI
Verwendung von Farbmanagement
Verwendung von Intelligente Farbe
Verwendung des 3DYC- und des I-P-Modus
Verwendung der Funktionen des Dynamikdehners DRE
Höhen
Toneinstellungen
Leistungssteuerung
Kein Signal -aus
Energiesparmodus
Keine Bedienung -aus
Praktische Einstellmöglichkeiten
Manuelles Wählen einer Bildschirmgröße
Praktische Einstellmöglichkeiten
Automatisches Wählen einer Bildschirmgröße
Kino
Wählen einer Bildschirmgröße für 43-Bildseitensignale
Timer
Verwendung eines Passworts
Eingeben eines Passworts
Rückstellen des Passworts
Ändern des Passworts
Deaktivieren des Passworts
Wenn das Passwort nicht mehr verfügbar ist
Verwendung mit anderen Geräten Kapitel
Verwendung mit anderen Geräten
Anschließen eines DVD-Spielers
Anschließen eines Decoders
Anschließen einer Spielekonsole oder eines Camcorders
Verwendung mit anderen Geräten
Wiedergeben des Spielekonsolen- oder Camcorderbilds
VCR-Wiedergabe
Eingangssignaltabelle
Angeben des Typs der digitalen Videosignale
Verwendung des HDMI-Eingangs
Anschließen von HDMI-Ausrüstung
Wählen Sie den Digital-Video-Signaltyp /, dann Enter
Angeben des Typs der Audiosignale
Gebrauch von i/o link.A
Direkter Wiedergabestart
Videotext-Funktionen Grundlegender Videotext-Betrieb
Verwendung von Videotext
Verwendung von Videotext Kapitel
Anzeigen von Unterseiten
Verwendung von Videotext
Anzeigen der TOP-Übersicht
Anzeigen von Untertitelseiten
Zusätzliche Informationen
Problem Lösungsansätze
12 Zusätzliche Informationen Kapitel
Fehlerdiagnose
SCART-Anschlussbelegung
Zusätzliche Informationen
Code Meldung Prüfen
SD04 und SD11
Gegenstand 42Plasma-Fernseher, Modell PDP-4270XA
12 Zusätzliche Informationen Technische Daten
Warenzeichen
Deutsch Italiano
Tasto STANDBY/ON
Indice
Indice
Informazioni aggiuntive
Utilizzo con altri apparecchi
Utilizzo del Televideo
Informazioni importanti per l’utilizzatore
Consigli sull’installazione
Informazioni importanti per l’utilizzatore Capitolo
Consigli sull’utilizzo
Informazioni importanti per l’utilizzatore
Maniglie sul lato posteriore del televisore al plasma
Pulizia del mobile
Rumore del motore della ventola
Blocco e latenza post-immagine del pannello
Precauzioni per la sicurezza Capitolo
Precauzioni per la sicurezza
Caso di utilizzo di altri accessori
Precauzioni per l’installazione
Precauzioni per la sicurezza
Vista posteriore
Accessori forniti in dotazione Capitolo
Accessori forniti in dotazione
Cavo di alimentazione
Per il Regno Unito e l’Irlanda
Denominazione delle parti Capitolo
Denominazione delle parti
Televisore al plasma lato anteriore
Lato Lato anteriore
Lato posteriore
Denominazione delle parti Telecomando
Preparazione Capitolo
Preparazione
Oltre 50 cm 10 cm
Posizionamento
Stabilizzazione su un tavolo o a pavimento
Montaggio/smontaggio del supporto Pioneer
Stabilizzazione mediante fissaggio a parete
Smontaggio del supporto
Rimuovete il televisore al plasma dal supporto
Preparazione
Rimontaggio del supporto
Collegamento dell’antenna
Preparazione Collegamenti di base
Convogliamento dei cavi
Cavo d’antenna reperibile in commercio
Preparazione del telecomando
Installazione del nucleo di ferrite
Inserimento delle batterie
Collegamento del cavo di alimentazione
30 º Attenzione
Preparazione Raggio di azione del telecomando
Visione dei programmi TV
Indicatori di stato del televisore al plasma
Visione dei programmi TV Capitolo
Accensione dell’apparecchio
Sintonizzazione dei canali preferiti
Variazione del volume e audio
Visione dei programmi TV
Utilizzo del tasto e del telecomando
Cambiare il canale audio delle trasmissioni
Blocco delle immagini
Menu Principale Voce Pagina
Il Menu Principale Home Menu
Il Menu Principale Home Menu Capitolo
Impostazione
Utilizzo dell’autoinstallazione
Impostazione Capitolo
Impostazione dei canali TV
Riduzione del rumore video
Impostazione
Impostazione della Protezione bambini
Voce Descrizione
Selezionate Decoder / Selezionate INGRESSO1 /
Etichettatura dei canali TV
Ordinamento dei canali TV preimpostati
Selezione AV
Impostazione Impostazione della lingua
Regolazioni di base dell’immagine
Selezionate il livello desiderato /
Utilizzo di PureCinema
Regolazione avanzata dell’immagine
Utilizzo della funzione Temp. Colore
Voce Tasto Tasto
Utilizzo della funzione Spazio colore
Utilizzo della funzione CTI
Utilizzo della funzione Gestione colore
Utilizzo della funzione Colore intelligente
Utilizzo della funzione 3DYC e della Modalità I-P
Utilizzo delle funzioni DRE Espansione Gamma Dinamica
Surround anteriore
Regolazioni del suono
Surround anteriore
Risparmio energia
Comando di accensione
Nessun segnale Off
Nessuna operazione Off
Utili impostazioni di regolazione
Selezione automatica delle dimensioni dello
Selezione manuale delle dimensioni dello schermo
Utili impostazioni di regolazione
Schermo
Utilizzo della password
Spegnimento con Timer
Inserimento della password
Immagine grande senza maschere laterali
Ripristino della password
Modifica della password
Disabilitazione della password
Se avete dimenticato la password
Utilizzo con altri apparecchi Capitolo
Utilizzo con altri apparecchi
Collegamento di un lettore DVD
Collegamento di un decoder
Sistema AV link avanzato
Collegamento di una console per giochi o di una videocamera
Collegamento di un’unità Hdmi
Utilizzo dell’ingresso Hdmi
Attivazione del terminale Hdmi
Per specificare il tipo di segnale video digitale
Selezione del terminale Scart per l’uso con i/o link.A
Utilizzo con altri apparecchi
Utilizzo della funzione di ingresso/uscita Link.A
Utilizzo del Televideo Capitolo
Utilizzo del Televideo
Cos’è il Televideo?
Attivazione e disattivazione di Televideo
Visualizzazione delle sottopagine
Utilizzo del Televideo
Visualizzazione della Panoramica TOP
Visualizzazione delle pagine dei sottotitoli
Problema Possibile soluzione
Risoluzione dei problemi
Informazioni aggiuntive
Informazioni aggiuntive Capitolo
Assegnazione dei pin della presa Scart
Informazioni aggiuntive
Codice Messaggio Controllo
SD04 e SD11
Voce 42Televisore al plasma, modello PDP-4270XA
Informazioni aggiuntive Caratteristiche tecniche
Marchi di fabbrica
Van de stekker
STANDBY/ON toets
Italiano Nederlands
Inhoud
Inhoud
Gebruik van Teletekst
Gebruik met andere apparatuur
Aanvullende informatie
Aansluiten van een videorecorder Videorecorder weergave
Belangrijke informatie voor de gebruiker
Richtlijnen voor de installatie
Belangrijke informatie voor de gebruiker Hoofdstuk
Richtlijnen voor het gebruik
Belangrijke informatie voor de gebruiker
Naijlen als gevolg van resterende elektrische lading
Naijlende beelden op het plasmascherm
Nabeelden als gevolg van inbranding
Voorkomen van het inbranden van uw scherm
Veiligheidsvoorzorgen Hoofdstuk
Veiligheidsvoorzorgen
Bij gebruik van andere producten
Veiligheidsvoorzorgen Voorzorgen bij de installatie
Achteraanzicht
Zijaanzicht
Meegeleverde accessoires Hoofdstuk
Meegeleverde accessoires
Netsnoer
Afstandsbediening AA formaat batterijen x Ferrietkern
Benaming van de onderdelen Hoofdstuk
Benaming van de onderdelen
Plasmatelevisie voorkant
Zijkant Voor
Achter
Benaming van de onderdelen Plasmatelevisie achterkant
Benaming van de onderdelen Afstandsbediening
Voorbereiding Hoofdstuk
Voorbereiding
Meer dan 50 cm
Plaats
Bevestigen/verwijderen van de Pioneer standaard
Voorbereiding Voorkomen dat de plasmatelevisie omvalt
Vastzetten op tafel of vloer
Vastzetten aan een wand
Haal de plasmatelevisie van de standaard
Voorbereiding
Opnieuw bevestigen van de standaard
Aansluiten van de antenne
Voorbereiding Basisaansluitingen
Leggen van de bedrading
Bevestigen van de ferrietkern
Bereik van de afstandsbediening
Voorbereiden van de afstandsbediening
Aansluiten van het netsnoer
Plaatsen van de batterijen
Voorbereiding
TV kijken
Plasmatelevisie statusindicators
TV kijken Hoofdstuk
Aan/uit zetten
Afstemmen op uw favoriete kanalen
Veranderen van het volume en de geluidsweergave
TV kijken
Gebruik van e op de afstandsbediening
Schakelen tussen audiokanalen
Stilzetten van beelden
Het Home Menu Hoofdstuk
Het Home Menu
Overzicht Home Menu
Gebruik van het Home Menu
Te verrichten instellingen
Gebruik van de Automatische installatie
Te verrichten instellingen Hoofdstuk
Instellen van TV kanalen
Verminderen van ruis in video
Te verrichten instellingen
Instellen van het kinderslot
Onderdeel Beschrijving
Sorteren van voorgeprogrammeerde TV kanalen
Namen geven aan TV kanalen
Selecteer Sorteren / en dan Enter
Het Sorteerscherm zal nu verschijnen
AV Selectie
Te verrichten instellingen Instellen van de taal
Basis-beeldinstellingen
Stel het gewenste niveau in /
Gebruik van Kleurtemp
Geavanceerde beeldinstellingen
Gebruik van PureCinema
Gebruik van het Kleurbeheer
Gebruik van CTI
Gebruik van Kleuromgeving
Gebruik van Intelligente kleuren
Gebruik van 3DYC en de I-P-modus
Gebruik van de DRE Verbreding Dynamisch Bereik functies
Dynamisch Contrast
Zwartniveau
Surround voor
Geluidsinstellingen
Surround voor
Stroombesparing
Stroomvoorziening
Uit, geen signaal
Uit, geen bedrijf
Nuttige instellingen
Automatisch instellen van schermafmetingen
Nuttige instellingen
Handmatig instellen van schermafmetingen
Gebruik van een wachtwoord
Sluimertimer
Invoeren van een wachtwoord
Vast
Terugstellen van het wachtwoord
Veranderen van het wachtwoord
Uitschakelen van het wachtwoord
Als u uw wachtwoord vergeten bent
Gebruik met andere apparatuur Hoofdstuk
Gebruik met andere apparatuur
Aansluiten van een decoder
Aansluiten van een DVD-speler
Aansluiten van een spelcomputer of camcorder
Gebruik met andere apparatuur
Weergeven van beelden van een spelcomputer of camcorder
Videorecorder weergave
Gebruik van de Hdmi ingangsaansluitingen
Instellen van het type digitale videosignalen
Aansluiten van Hdmi apparatuur
Werking stellen van de Hdmi aansluiting
Gebruik van de i/o link.A
Instellen van het type audiosignalen
Selecteren van de Scart aansluiting voor i/o link.A
Eén-toets-weergave
Gebruik van Teletekst Hoofdstuk
Gebruik van Teletekst
Gebruik van de Teletekstfuncties
Basisbediening voor Teletekst
Weergeven van subpagina’s
Gebruik van Teletekst
Weergeven van het TOP overzicht
Weergeven van ondertitelpagina’s
Aanvullende informatie
Oplossen van problemen
Aanvullende informatie Hoofdstuk
Probleem Mogelijke oplossing
Scart pen-toewijzingen
Aanvullende informatie
Code Melding Controleren
SD04 en SD11
Onderdeel Plasmatelevisie, model PDP-4270XA
Aanvullende informatie Technische gegevens
Handelsmerken
Nederlands Español
Botón STANDBY/ON
Contenido
Contenido
Utilización del teletexto
Utilización con otros equipos
Información adicional
Español
Información importante para el usuario Capítulo
Información importante para el usuario
Consejos para la utilización
Consejos para la instalación
Información importante para el usuario
Ruido del motor del ventilador
Asideros en la parte trasera del televisor de plasma
Prevención de daños desde el quemado de la pantalla
Imagen remanente del panel
Precauciones de seguridad Capítulo
Precauciones de seguridad
Vista lateral
Cuando utilice otros componentes
Vista trasera
Accesorios suministrados Capítulo
Accesorios suministrados
Cable de alimentación
Manuales de instrucciones x
Nombres de los componentes Capítulo
Nombres de los componentes
Televisor de plasma vista frontal
Lado Parte frontal
Parte trasera
Nombres de los componentes Televisor de plasma vista trasera
Nombres de los componentes Mando a distancia
Preparación Capítulo
Preparación
Más de 50 cm
Ubicación
Instalación/extracción del soporte Pioneer
Preparación Prevención de caída del televisor de plasma
Estabilización en una mesa o piso
Utilización de una pared para la estabilización
Extraiga el televisor de plasma del soporte
Preparación
Reinstalación del soporte
Conexión de la antena
Preparación Conexiones básicas
Encaminamiento de los cables
Fijación del núcleo de ferrita
Rango de operación del mando a distancia
Preparación del mando a distancia
Conexión de cable de alimentación
Instalación de las pilas
Preparación
Contemplación de TV Capítulo
Contemplación de TV
Encendido
Cambio de canales
Sintonización de sus canales favoritos
Cambio del volumen y sonido
Contemplación de TV
Utilización de e del mando a distancia
Cambio del canal de audio de emisión
Congelamiento de imágenes
El menú principal Capítulo
El menú principal
Resumen del menú principal
Utilización del menú principal
Configuración Capítulo
Configuración
Configuración de los canales de TV
Configuración manual de los canales de TV analógicos
Configuración del bloqueo infantil
Configuración
Reducción de ruido de vídeo
Selección de un terminal de entrada para el descodificador
Configuración del idioma
Configuración Etiquetado de canales de TV
Organización de los canales de TV predeterminados
Repita el paso 8 para introducir hasta cinco caracteres
Ajustes de imagen básicos
Selección AV
Ajustes de imagen avanzados
Seleccione el nivel deseado /
Utilización de la temperatura de color
Utilización de PureCinema
Utilización de CTI
Temperatura del color
Utilización del color inteligente
Utilización de la gestión del color
Utilización del espacio de color
Eliminación de ruido de las imágenes
DRE inteligente
Utilización de 3DYC y del I-P Modo
Contraste dinámico
Nivel negro
Surround frontal
Ajustes del sonido
Surround frontal
Agudos
Ahorro de energía
Control de la alimentación
Apagado sin señal
Apagado sin operación
Ajustes útiles
Configuración del sistema de color
Ajustes útiles Capítulo
Ajuste de las posiciones de la imagen
Selección manual de un tamaño de pantalla
Ajustes útiles
Selección automática de un tamaño de pantalla
ÍtemDescripción
Utilización de una contraseña
Temporizador de apagado
Cambio de la contraseña
Introducción de una contraseña
Reposición de la contraseña
Inhabilitación de la contraseña
Utilización con otros equipos Capítulo
Utilización con otros equipos
Conexión de un descodificador
Conexión de un reproductor DVD
Conexión de una consola de videojuegos o una videocámara
Utilización con otros equipos
Reproducción de una videograbadora
Sistema avanzado AV Link
Conexión de un equipo Hdmi
Utilización de la entrada Hdmi
Activación del terminal Hdmi
Para especificar el tipo de señales de vídeo digitales
Selección del terminal Scart para uso con i/o link.A
Utilización de la función i/o link.A
Utilización del teletexto Capítulo
Utilización del teletexto
¿Qué es teletexto?
Encendido y apagado del teletexto
Visualización de páginas secundarias
Utilización del teletexto
Visualización panorámica TOP
Visualización de páginas de subtítulos
Problema Solución posible
Solución de problemas
Información adicional
Información adicional Capítulo
Asignaciones de los contactos Scart
Información adicional
Código Mensaje Comprobación
SD04 y SD11
Ítem Televisor de plasma, modelo PDP-4270XA
Información adicional Especificaciones
Marcas registradas
Pioneer Corporation