Connections & Setup
+
+
O
Y
A
L
P
MENU dial
M
A
F
F
O
Y
A
LP
Power switch
Setting the Date and Time
You need to set the date and time before they can be displayed.
Date and time information is recorded onto the tape at all times, but its display can be turned on or off during playback (see page 89).
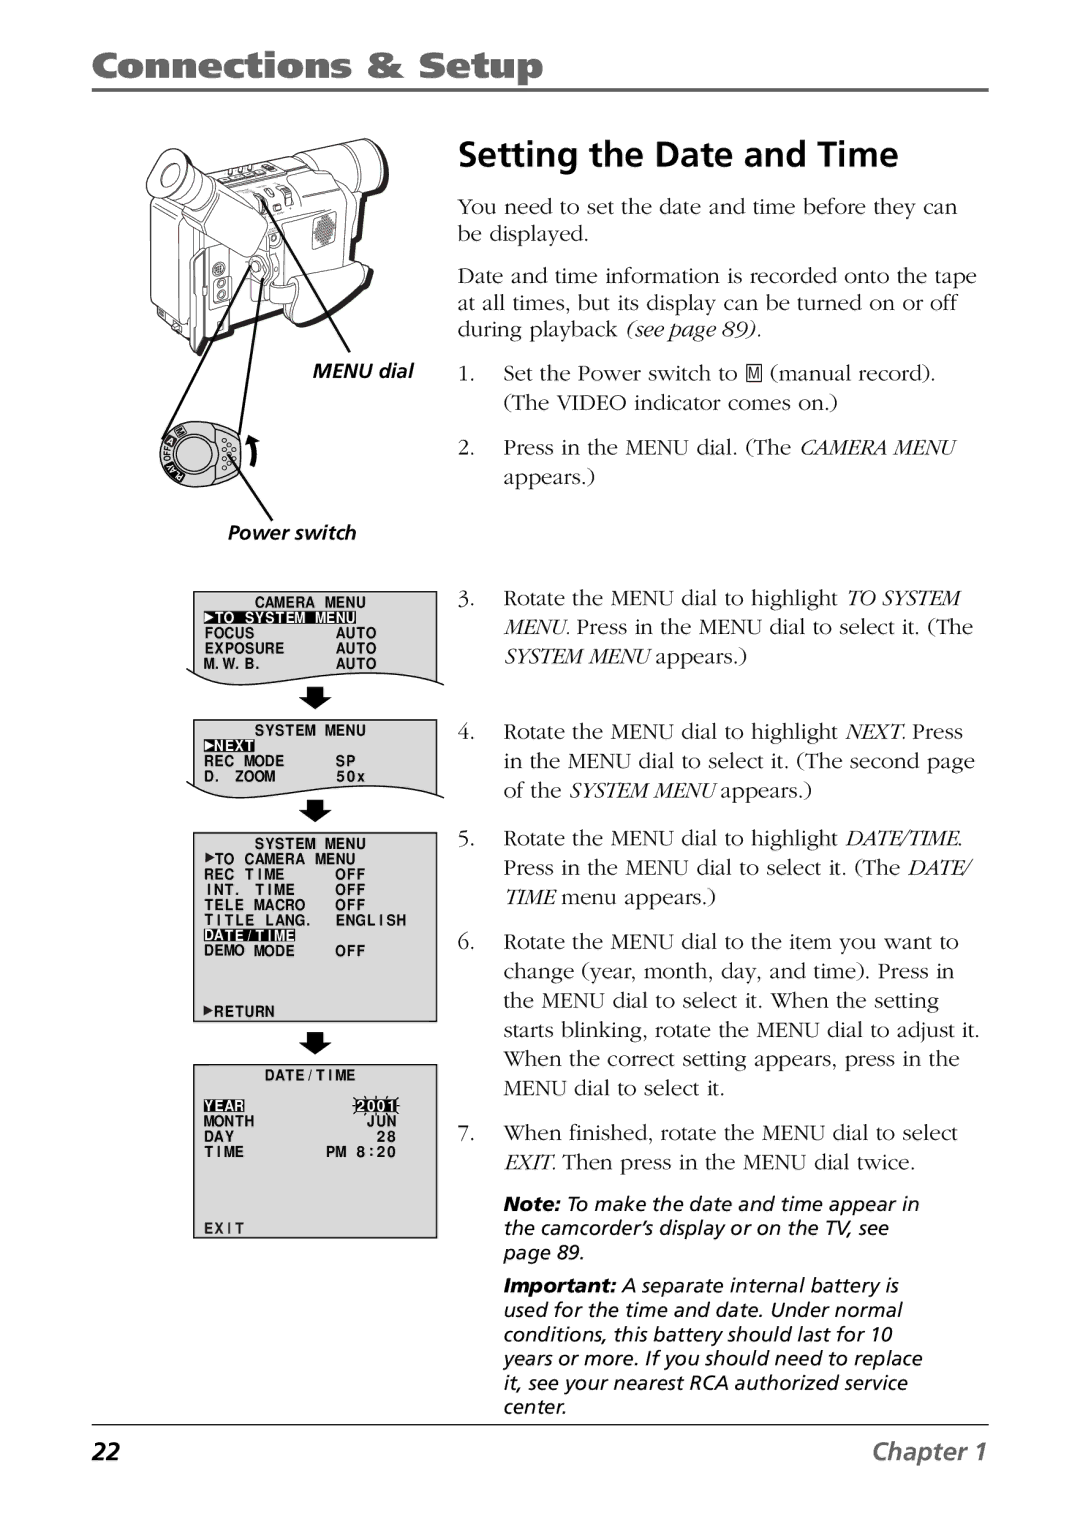
1.Set the Power switch to M (manual record). (The VIDEO indicator comes on.)
2.Press in the MENU dial. (The CAMERA MENU appears.)
CAMERA MENU ![]() TO SYST EM MENU
TO SYST EM MENU
FOCUS | AUTO | |
EXPOSURE | AUTO | |
M. W. B . | AUTO | |
| SYS T EM MENU | |
NEX T |
|
|
REC MODE | SP | |
D . ZOOM | 5 0 x | |
|
|
| SYS T EM MENU |
|
|
| |||
| TO | CAMERA MENU |
|
|
| ||||
REC T I ME | OF F |
|
|
| |||||
I NT . | T I ME | OF F |
|
|
| ||||
T E LE MACRO | OF F |
|
|
| |||||
T I T L E | LANG. | ENGL I SH | |||||||
DATE / T I ME |
|
|
|
|
|
| |||
DEMO MODE | OF F |
|
|
| |||||
| RETURN |
|
|
|
|
| |||
|
|
| DAT E / T I ME |
|
|
| |||
|
|
|
|
|
| ||||
|
|
|
|
|
| ||||
|
|
|
|
|
|
|
|
|
|
YEAR |
|
| 2 | 0 0 1 | |||||
MONTH |
|
|
|
| J UN | ||||
DAY |
|
|
|
| 2 8 |
| |||
T I ME |
|
| PM 8 : 2 0 | ||||||
EX I T
3.Rotate the MENU dial to highlight TO SYSTEM MENU. Press in the MENU dial to select it. (The SYSTEM MENU appears.)
4.Rotate the MENU dial to highlight NEXT. Press in the MENU dial to select it. (The second page of the SYSTEM MENU appears.)
5.Rotate the MENU dial to highlight DATE/TIME. Press in the MENU dial to select it. (The DATE/ TIME menu appears.)
6.Rotate the MENU dial to the item you want to change (year, month, day, and time). Press in the MENU dial to select it. When the setting starts blinking, rotate the MENU dial to adjust it. When the correct setting appears, press in the MENU dial to select it.
7.When finished, rotate the MENU dial to select EXIT. Then press in the MENU dial twice.
Note: To make the date and time appear in the camcorder’s display or on the TV, see page 89.
Important: A separate internal battery is used for the time and date. Under normal conditions, this battery should last for 10 years or more. If you should need to replace it, see your nearest RCA authorized service center.
22 | Chapter 1 |
