OPERATING INSTRUCTIONS

OPTIONAL

OPTIONAL

OPERATING

REMOTE CONTROL

WALL THERMOSTAT

INSTRUCTIONS

Use the Regency® Remote Control Kit approved for this unit. Use of other systems may void your warranty.

The remote control kit comes with a hand held transmitter, a receiver and a wall mounting plate.

1)Choose a convenient location on the wall to install the receiver and the receptacle box (protection from extreme heat is very important). Run wires from the fi replace to that location. Use Thermostat Wire Table.

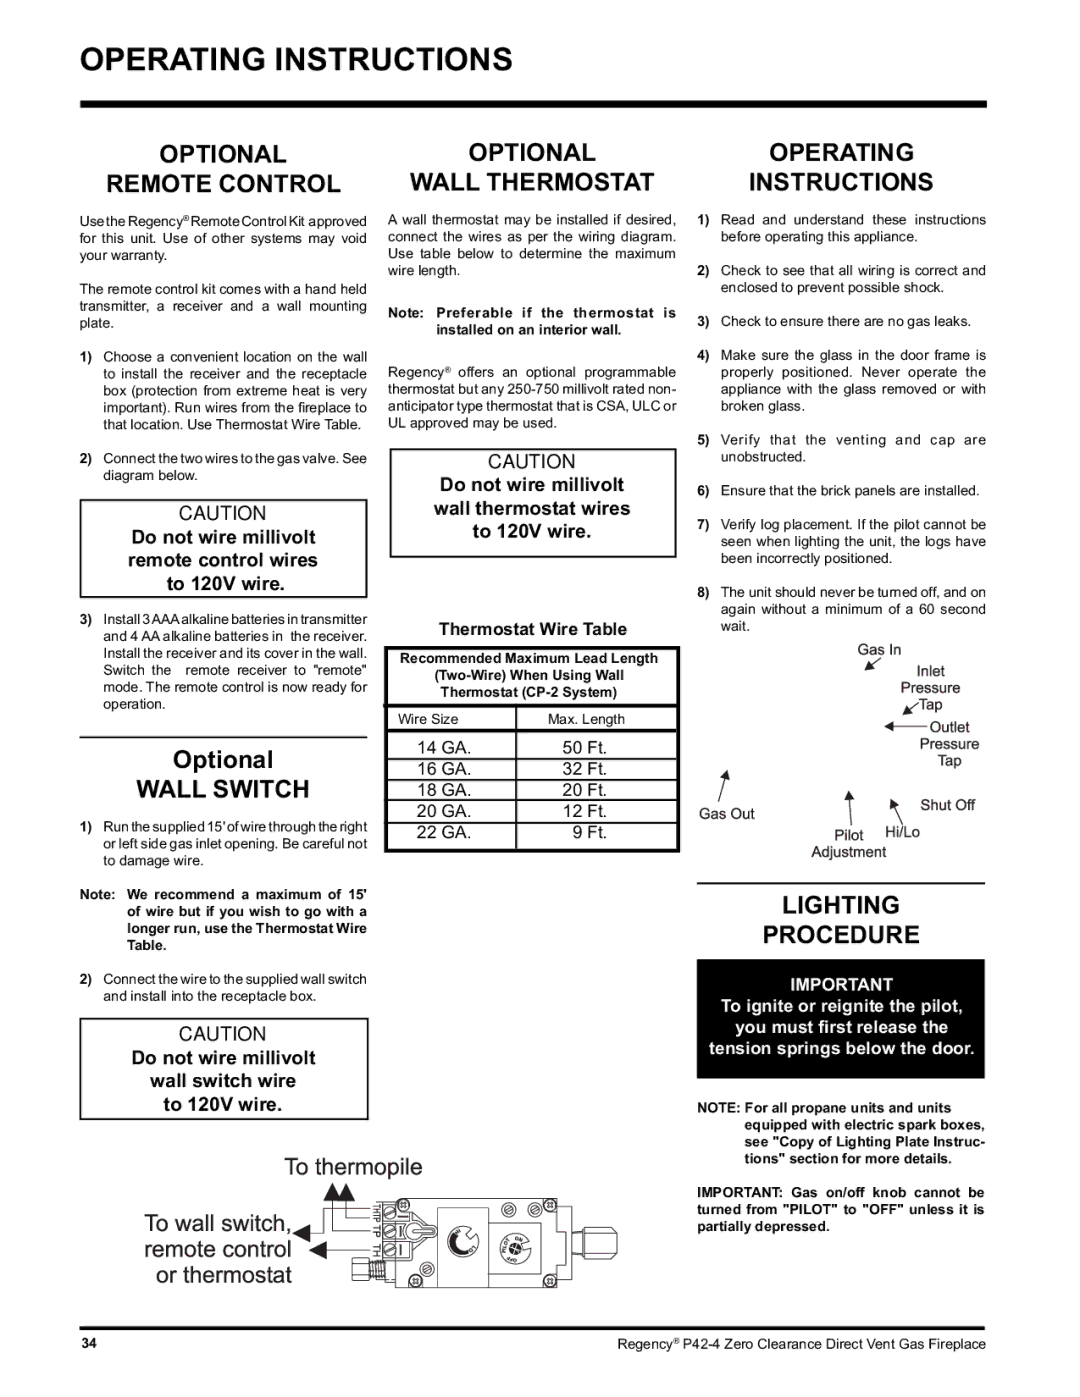
2)Connect the two wires to the gas valve. See diagram below.

CAUTION

Do not wire millivolt remote control wires to 120V wire.

3)Install 3AAAalkaline batteries in transmitter and 4 AA alkaline batteries in the receiver. Install the receiver and its cover in the wall. Switch the remote receiver to "remote" mode. The remote control is now ready for operation.

Optional

WALL SWITCH

1)Run the supplied 15' of wire through the right or left side gas inlet opening. Be careful not to damage wire.

A wall thermostat may be installed if desired, connect the wires as per the wiring diagram. Use table below to determine the maximum wire length.

Note: Preferable if the thermostat is installed on an interior wall.

Regency® offers an optional programmable thermostat but any 250-750 millivolt rated non- anticipator type thermostat that is CSA, ULC or UL approved may be used.

CAUTION

Do not wire millivolt wall thermostat wires to 120V wire.

Thermostat Wire Table

Recommended Maximum Lead Length

(Two-Wire) When Using Wall

Thermostat (CP-2 System)

Wire Size

Max. Length


14 GA.

50

Ft.


16 GA.

32

Ft.


18 GA.

20

Ft.


20 GA.

12

Ft.


22 GA.

9

Ft.


1)Read and understand these instructions before operating this appliance.

2)Check to see that all wiring is correct and enclosed to prevent possible shock.

3)Check to ensure there are no gas leaks.

4)Make sure the glass in the door frame is properly positioned. Never operate the appliance with the glass removed or with broken glass.

5)Verify that the venting and cap are unobstructed.

6)Ensure that the brick panels are installed.

7)Verify log placement. If the pilot cannot be seen when lighting the unit, the logs have been incorrectly positioned.

8)The unit should never be turned off, and on again without a minimum of a 60 second wait.

Note: We recommend a maximum of 15' of wire but if you wish to go with a longer run, use the Thermostat Wire Table.

2)Connect the wire to the supplied wall switch and install into the receptacle box.

CAUTION

Do not wire millivolt

wall switch wire

to 120V wire.

LIGHTING

PROCEDURE

IMPORTANT

To ignite or reignite the pilot,

you must first release the

tension springs below the door.

NOTE: For all propane units and units equipped with electric spark boxes, see "Copy of Lighting Plate Instruc- tions" section for more details.

IMPORTANT: Gas on/off knob cannot be turned from "PILOT" to "OFF" unless it is partially depressed.

34

Regency® P42-4 Zero Clearance Direct Vent Gas Fireplace

Page 34
Image 34
Regency P42-NG4, P42-LP4 installation manual Operating Instructions, Wall Switch, Lighting Procedure, Thermostat Wire Table

P42-LP4, P42-NG4 specifications

The Regency P42-LP4 and P42-NG4 are two exceptional gas fireplace models that beautifully combine functionality and aesthetic appeal, making them ideal for various home settings. Built with durability and efficiency in mind, these models are equipped with advanced features that enhance user experience.

One of the main highlights of the P42 series is its impressive heating capacity. Both the P42-LP4 and P42-NG4 are designed to deliver substantial warmth, ensuring that spaces of different sizes can be comfortably heated. With a maximum input of up to 40,000 BTUs, these units can effectively warm large living areas, making them perfect for modern homes.

In terms of design, the P42 models boast a sleek and contemporary look. They feature a large viewing area that allows for an expansive flame presentation, inviting warmth and ambiance into your home. The optional polished or brushed stainless steel front and various media options, including glass rocks or logs, provide customization, allowing homeowners to tailor the look of their fireplace to match their personal style and existing decor.

The technologies integrated into the Regency P42-LP4 and P42-NG4 are notable. Both models come equipped with system safety features, ensuring peace of mind. Additionally, they support the use of a programmable remote control, making adjustments to the temperature and flame appearance effortless while allowing homeowners to maintain comfort with just a click.

Efficiency is another key characteristic. These gas fireplaces highlight energy efficiency, designed to maximize heat output while minimizing fuel consumption. They have received high-efficiency ratings, which may qualify users for rebates or incentives in many regions, aligning with the growing demand for eco-friendly home heating solutions.

Installation flexibility is another advantage, with options for direct vent systems allowing for installation in various orientations and settings. This ensures homeowners can enjoy an attractive fireplace without needing extensive renovations or structural changes.

In conclusion, the Regency P42-LP4 and P42-NG4 are standout choices for anyone seeking a powerful, efficient, and stylish gas fireplace. With their innovative technologies, customizable features, and remarkable heating capabilities, these models offer an ideal focal point and cozy environment for any living space. They embody the perfect blend of modern design and traditional warmth, making them an excellent investment for enhancing home comfort and elegance.