Page
Copyright
Introduction
Simple Operation Guide
Read This Before Proceeding
Open the package
Contents
Basic Shooting
Chapter Shooting
Playback/Deleting
Camera Settings and Other Functions
Appendix
Camera Body Front
Parts & Names
Back
Remote Control Unit optional
Battery/Battery Charger AC Adapter optional
Operating Parts
Sample Warnings
Safety Precautions
Examples
Turn off the power immediately if any metallic object, water
Observe the following precautions to prevent fire, electric
Do not use the equipment near flammable gases, gasoline
Safety Warning for Accessories
Powering the Camera
Before Using the Camera
Storage Memory
Attaching the Wrist Strap
Before Using the Camera
Attaching the Lens Cap
Push the lens cap on in the direction shown by the arrow
Charging the Battery
Powering the Camera
Precautions Regarding Use
CHARGECharging Lamp Explanation
Load the battery
Loading the Battery
Close the battery cover
Tips Tips to Extend the Recording and Playback Times
Handling Precautions
Insert the power plug into the electrical outlet
Connecting an AC Adapter
Storage Memory Capacity
Storage Memory
Data
Inserting a Memory Card
Inserting Card
Check that the camera is turned off
Removing Card
Page
Before You Start Recording
Chapter
Press the power switch
Tips Auto Power Off
Turning On/Off the Camera
Turning the Camera on
Turn the mode dial to change the mode used
How to Use the Mode Dial
Mode Dial Action
Basic Operations
LCD Monitor and LCD Panel
Recording Mode
LCD panel LCD monitor
Play Mode
Switching the Displays
How to Select the Items
Selecting and Canceling Items
Select the item Select the setting
How to Use the Spin Box
How to Use the Check Box
Deleting
Character Input
Available items
Select Date Settings and press the button
Setting the Date and Time
Selecting the Date To Be Used
Setting the Date and Time
Press the Enter button
Select Date to be Used and press the button
Selecting the Date Format
Tips How to Verify the Date and Time
Checking Owner Information
When checking is completed, press the Enter button
Before You Start Recording
Set the mode dial to SET Select Format and press the button
Formatting the Storage Memory
Press the shutter release button
Adjusting the Viewfinder Diopter
How to Hold the Camera
Adjusting the LCD Monitor Brightness
When viewing through the viewfinder
When viewing using the LCD monitor
Precaution
Special Shooting Functions
Basic Shooting
Operation Flow
Basic Shooting
Set the mode dial to
Selecting a Recording Mode
Tips LCD Monitor Display Recording Mode
LCD Panel LCD Monitor Recording Destination
Selecting the Storage Memory
Records images in the internal memory
Selecting a Folder
Press the PIC button and select an image quality mode
Selecting an Image Quality Mode
Data Guide
Viewing Through the Viewfinder
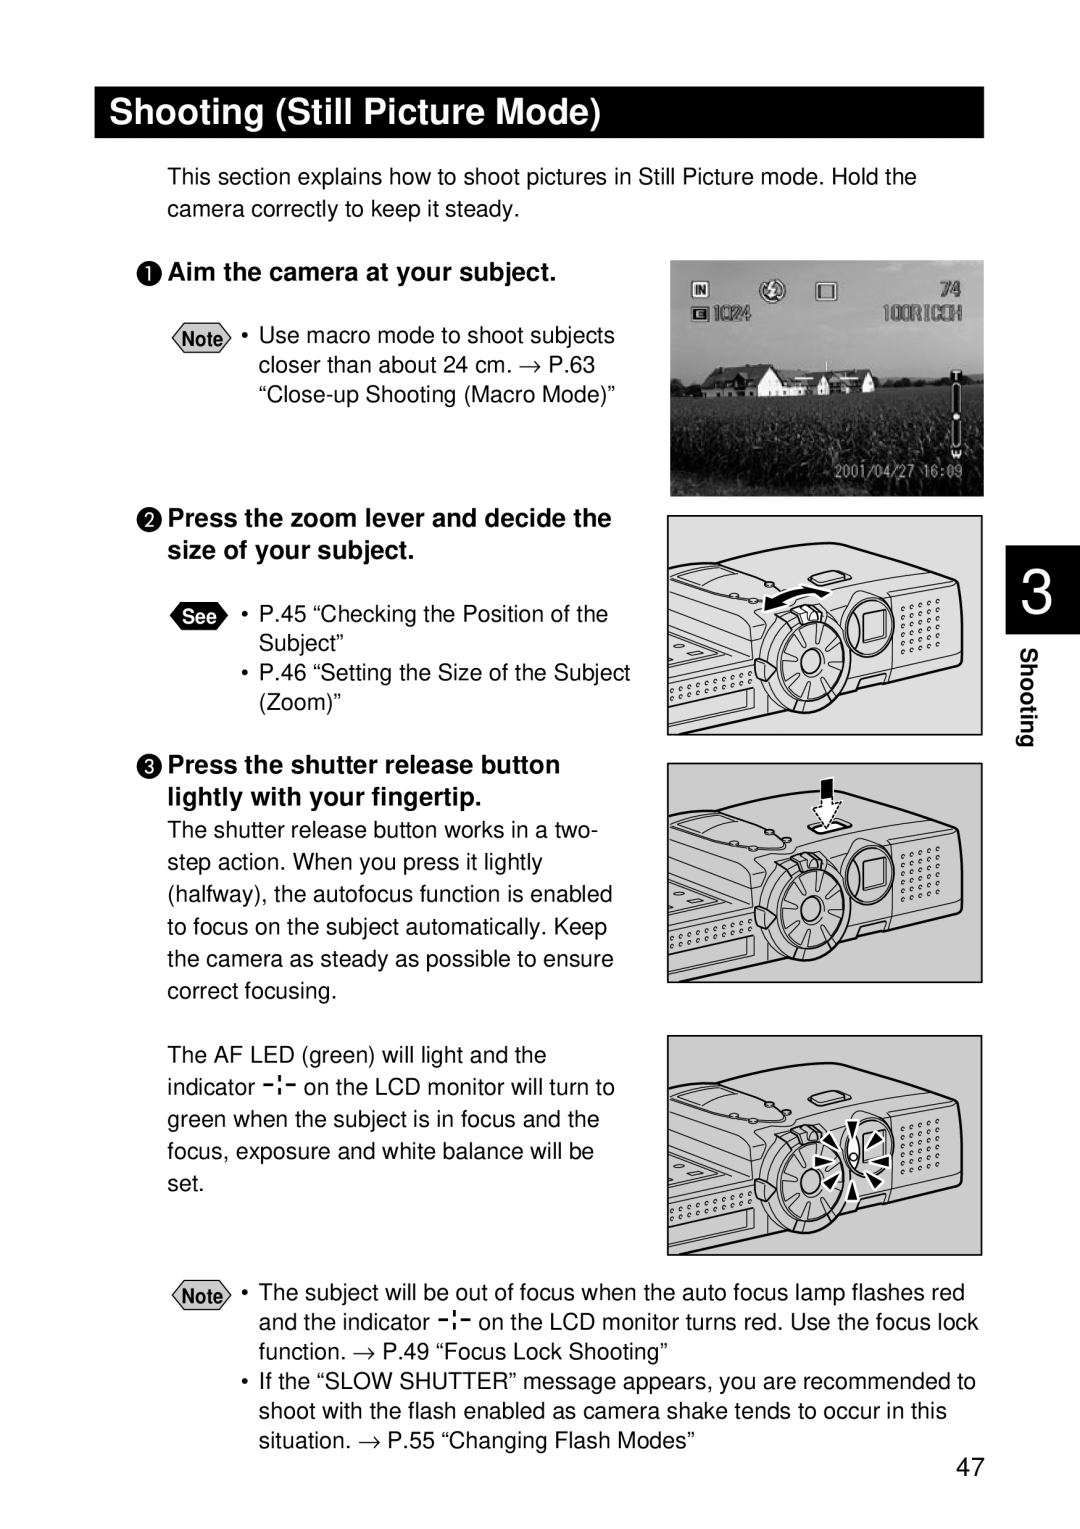
Checking the Position of the Subject
Viewing the LCD Monitor
Shooting Scope
Digital Zoom Function
Setting the Size of the Subject Zoom
Press Side or Zoom lever
Pressing
Shooting Still Picture Mode
Flash LED
To Cancel Recording
Tips Focus Lock Shooting
When Focusing is Difficult
Set the mode dial to Adjust the contrast using the buttons
Recording Text Text Mode
Special Shooting Functions
Press the shutter release button to record the image
Recording Voice Memo Voice Memo Mode
Press the shutter release button to record
Continuous Shooting Continuous Shooting Mode
Shooting Motion Pictures Motion Picture Mode
Set the mode dial to and press the Menu button
Press the shutter release button to
Maximum no. of pictures in continuous shooting mode
Will indicate that recording has started
Changing Flash Modes
Display Mode Explanation
Flash activated, the light from the flash may appear reddish
Adjusting the Flash Strength
Exposure Compensation Range
Setting the Exposure Compensation
Shooting Against the Light
Shooting a White Image
Auto
Changing the White Balance Mode
Page
Selecting Manual White Balance
Using the Self-Timer Self-timer
Tips Remote Control
Close-up Shooting Macro Mode
Setting Auto Focus AF, Snap S or Infinity
Shooting by Switching the Focus Focus
Indication Mode Description
Tips Shutter Release Button
Setting Manual Focus MF
Shooting in Redeye Reduction Mode Redeye Reduc
Shooting with the Date Date Imprint
Shooting by Splitting the Screen Split-Screen
Mode Description
Shooting in New Shot Mode
Select ADD from the menu and press the Enter button
Additional Shot Mode
Select the additional image and press the Enter button
Shooting in Sharpness Mode Sharpness
Shooting in Monochrome Mode Monochrome
Shooting in Interval Time-lapse Mode Interval
Shooting in Auto Bracket Mode Auto Bracket
Changing the ISO Sensitivity ISO Setting
Mult
Changing the Exposure Metering System Photometry
Shooting in Time Exposure Mode Time Exposure
Shooting with Signature Signature
To cancel signature imprint mode, select None
Page
Special Playback Functions
Basic Playback
Deleting a File
Files Playable on the Camera
Basic Playback
Playing a Still Picture, Text or Continuous Shooting File
Use the or button to select the file to be played
Playback Display
Playing a Voice Memo File
2048 ⋅
640 ⋅ Shooting Vertical format
Playing a Motion Picture File
To Adjust the Volume
Playback source with the button
To Pause and Resume Playback
Advance and Rewind, and Slow and Reverse Slow Playback
Tips LCD Monitor Display Play Mode
Using the Camera for Extended Periods of Time
Playback Using a TV
Special Playback Functions
Set the mode dial to and press Side of the zoom lever
Press the · · · buttons to change the file to be played
Press Side of the zoom lever
Magnifying a File Zoom Playback
Set the mode dial to and press the side of the zoom lever
Copying Files Copy
Press the · · · buttons to move the display area
Thumbnail Display
Copying a Selected File
Copying a Whole Folder
Press the Cancel button to exit the menu screen
Protecting a File Protect
Set the mode dial to Select the file to be protected
Protecting File
Press the Menu button Select Protect and press the button
Select the option Selected Files
Protecting All Files
Cancel ALL
Canceling the Protect Setting
Set the playback time and then press the Enter button
Playing Back Images Automatically Auto Playback
Setting the Digital Printing Service Dpof Setting
To specify each file
Specifying the Number of Prints of the Selected Files
To specify more than one file
Specifying the Number of Prints of All Files
Specifying the Number of Index Prints
Canceling the Dpof Settings
Press the Cancel button to exit Dpof setting menu
Confirming the Settings
Adding a Voice Memo Voice Memo
When a voice memo has already been Recorded
Deleting a File
Set the mode dial to Select the file to be deleted
Deleting a Selected File
Deleting All Files or a Single File
Using the Remote Control
Changing Camera Settings
Adding or Deleting a Folder
Changing Camera Settings
Adding a Folder
When the files are saved
Press the Cancel button to exit the folder list
Camera Settings and Other Functions
Deleting a Folder
Press the Cancel button to return to the Setup menu
Keep Settings
Changing the LCD Confirmation Time
Auto Power Off Setting
Beep Sound Setting
Setting the Power Saving Mode
Changing the Display Language
Changing the Video-out Signal Method NTSC/PAL
Setting a Signature
When sequential numbering is OFF
When sequential numbering is on
Changing the File Numbering Method
Turning the Camera On When the LCD Monitor is Opened
Initializing the Settings
119
Using the DR-4 Remote Control
Using the Remote Control
Still Picture mode
Text mode
Playback
Using the Continuous Shooting
To Cancel the Mode
Change the display position using the , , or button
Choose a file by pressing the or button
Press the button
Set the mode dial on the camera to a
Using the DR-3 Remote Control
Adjust the focus using the FWD or REV button
To cancel the mode setting
Change the selected image using the FWD or REV button
Change the display position using the FWD or REV button
Choose a file by pressing the FWD or REV button
Press Button
Deleting a single file
Select Delete ALL using the FWD or REV button
Deleting all files
Other Functions
126
Error Messages
Troubleshooting
Using Your Camera in Other Countries
Accessories
Power Source
Troubleshooting
Recording and Playback
Appendix
129
Miscellaneous
Error Message Remedy
Error Messages
Memo
Using Your Camera in Other Countries
Recording Capacities
Model Remarks
Accessories
Potential Causes of Condensation
Handling Precautions
Care
Care and Storage
Storage
NTSC/PAL
Specifications
139
140
About the Warranty and Servicing
141
Index
SET Mode Setup
Functional Index
Recording Mode Menu Button
ÔButton
Play Mode Menu Button
Button
Communication Mode
PC Mode
AF LED
Alphabetical Index
147
148
USA FCC Part15 Class B
Information to the User
150
Ricoh Service Offices