Getting To Know Your Wood Lathe
3 Spindle “Flats” |
|
| 14 Faceplate |
| |||
|
|
| Tailstock |
| |||
| 11 Spur | 11 Live Center |
| ||||
2 Index Pin | Center | Ram |
| ||||
|
|
| 7 Handwheel | ||||
|
|
| Tool Rest |
|
| ||
Belt Guard |
|
|
|
|
| ||
| Tool Rest |
|
|
| |||
|
|
|
|
| |||
|
| Base |
|
|
| 8 Tailstock | |
|
|
|
|
|
| Ram Lock | |
|
| Spindle |
|
| Foot | ||
|
|
|
|
|
| ||
13 Speed |
|
|
|
|
| 12 Tailstock | |
|
|
|
|
|
| ||
Chart |
|
| Tool Rest |
|
| ||
1 Belt Guard | Bed |
| Bracket | 5 Tool Rest | 9 Tailstock | ||
6 Tool Rest | |||||||
Knob |
| Lock | |||||
| Base Lock |
| Lock | ||||
Headstock | 4 Tool Rest |
| |||||
10 |
|
|
|
| |||
|
| Bracket Lock |
| ||||
Switch |
|
|
| ||||
|
|
|
|
|
| ||
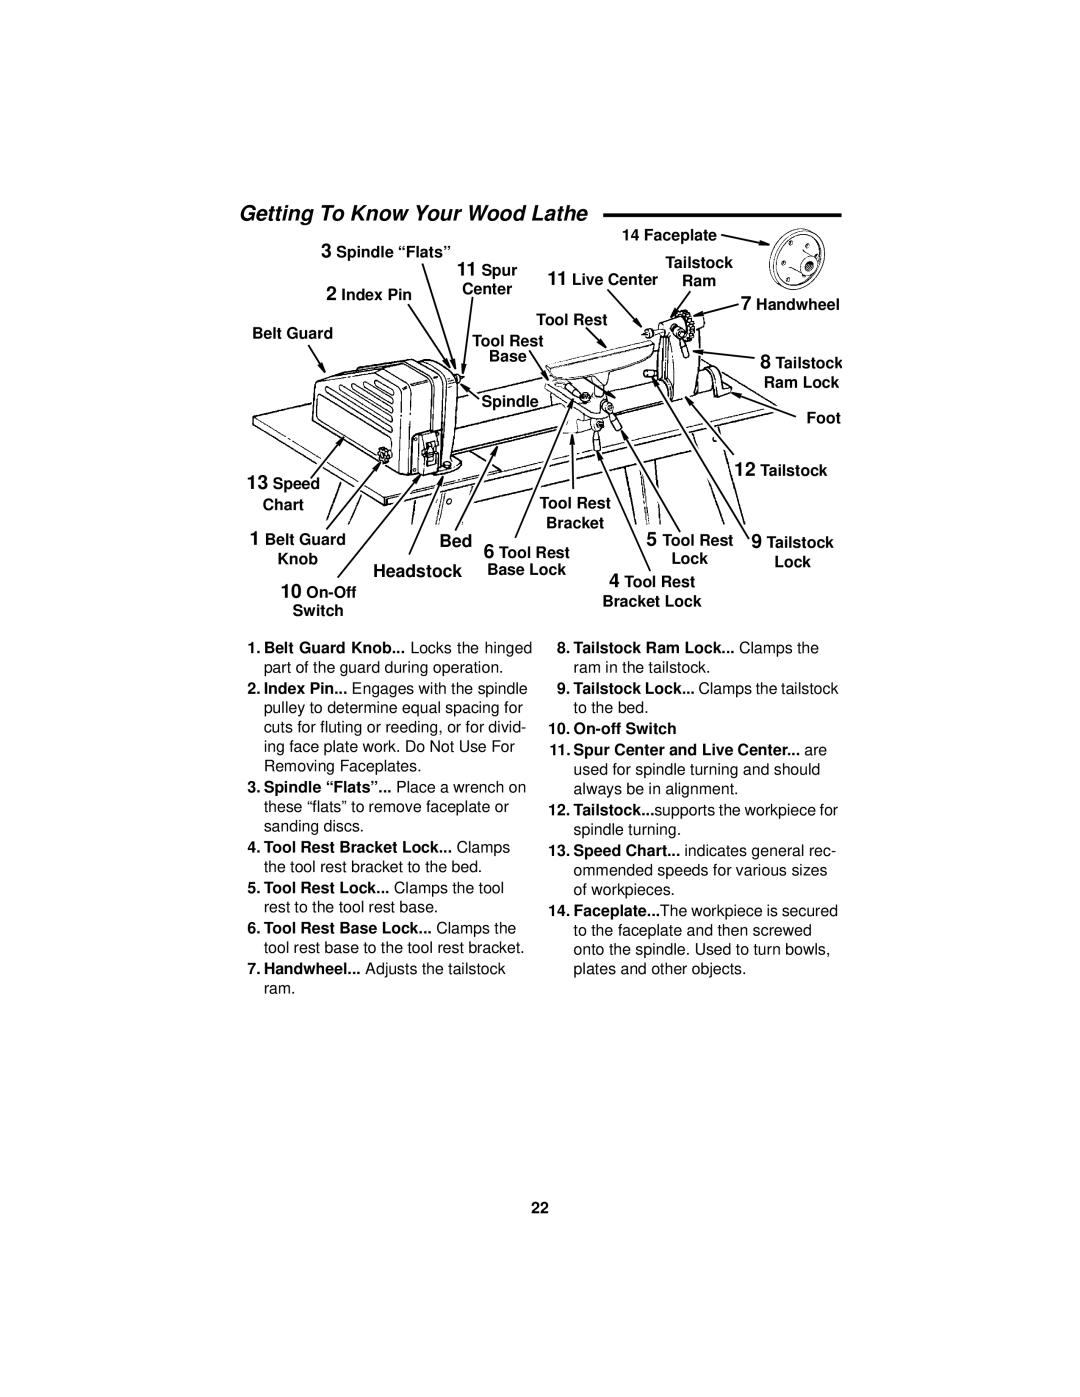
1.Belt Guard Knob... Locks the hinged part of the guard during operation.
2.Index Pin... Engages with the spindle pulley to determine equal spacing for cuts for fluting or reeding, or for divid- ing face plate work. Do Not Use For Removing Faceplates.
3.Spindle “Flats”... Place a wrench on these “flats” to remove faceplate or sanding discs.
4.Tool Rest Bracket Lock... Clamps the tool rest bracket to the bed.
5.Tool Rest Lock... Clamps the tool rest to the tool rest base.
6.Tool Rest Base Lock... Clamps the tool rest base to the tool rest bracket.
7.Handwheel... Adjusts the tailstock ram.
8.Tailstock Ram Lock... Clamps the ram in the tailstock.
9.Tailstock Lock... Clamps the tailstock to the bed.
10.
11.Spur Center and Live Center... are used for spindle turning and should always be in alignment.
12.Tailstock...supports the workpiece for spindle turning.
13.Speed Chart... indicates general rec- ommended speeds for various sizes of workpieces.
14.Faceplate...The workpiece is secured to the faceplate and then screwed onto the spindle. Used to turn bowls, plates and other objects.
22
