Convention Used in This Manual
Important Safety Instructions
For the U.K
Use only the attached power-supply cord
Protect the unit from strong impact. Do not drop it
Power Supply
Placement
Maintenance
Additional Precautions
Before Using Memory Cards
Using Memory Cards
Installing the card protector
Copyright
Contents
Pattern Mode
Patch/Sample Mode
Contents
Song Mode
Effects
Contents Multi-Effects List
Sampling 109
Menu 125
137
Appendices 141
142
Features of the MC-909
Panel Descriptions
Top Panel
Rear Panel
Panel Descriptions
Turning On/Off the Power
Turning Off the Power
Getting Ready
Making Connections
An Overview of the MC-909
Basic structure of the MC
Sound generator section
Sequencer section
Editing a value
Adjusting the display contrast
Saving your data
Regarding the locations where samples are stored
MC-909
Restoring the factory settings Factory Reset
Pattern Mode
This mode you can play, record, and edit patterns
How Things Work in Pattern mode
Mode section
How Things Work in Pattern mode Sequencer section
Part Mixer section
Sampling section
Playing a pattern
Basics of pattern play
Basic playback operation
Selecting a pattern to play back
Changing the BPM Tempo
Turning the metronome click on/off
Muting silencing a part
Velocity pads
Pattern Call
Using RPS
RPS Hold
Selecting an RPS set
Registering a phrase in an RPS set
RPS Settings
Playing a pattern Adjusting the settings of the RPS parts
Hold down RPS and press F6 RPS Setting
RPS Trigger Quantize
Arpeggiator
When you finish inputting the arpeggio style, press Exit
Creating an arpeggio style
Press F4 Arp Edit
Shift +
Chord Memory
Realtime Modify section
Part Mixer
Selecting the part whose sound you want to modify
Saving a chord form
Adjusting the volume of the external device
Mix
Directly outputting the sound of an external device
Selecting the input source device
Indicators are lighted
Beam Controller
CUT + Reso Cutoff + Resonance
Assignable Other applications
Turntable emulation
Auto Sync
Effects
Mastering
Realtime recording
Recording a pattern
Standby screen
Recording procedure
Rehearsal
Recording a pattern
Controllers that can be recorded
Recording Cancel
Realtime Erase
Select TR-REC p Press Play to begin recording
About the timing scale
Range 5-200%
Select step recording p Press Play to begin recording
Step recording
Use the velocity pads to input note messages
Tempo/mute recording
Recording a pattern Selecting the part to record
Moving the input location
Moving the display region
Basic procedure for pattern editing
Pattern editing
Extract a Rhythm Instrument
Pattern Copy
Pattern editing
Replace
Erase
Delete Measure
Insert Measure
Transpose
Edit Quantize
Data Thin
Groove Template List
Half
Reclock
Double
Basic procedure Microscope
Microscope
Performance data that can be edited in the Microscope
Midi message Explanation
Inserting performance data Create
Erasing performance data Erase
Moving performance data Move
Copying performance data Copy
Saving a pattern
Select the pattern that you want to save Press Write
Press Enter or F1 PTN
Assign a name to the pattern you created
Patch/Sample Mode
Pitch block
Filter block
LFO 1 block
Knob/Button Parameter
How Things Work in Pattern mode
Knob/Button Parameter Others
Patch Edit
How a Patch Is Organized
Tips for Creating a Patch
How a Tone Is Organized
Selecting a patch/rhythm set
Selecting from a list
Selecting directly
Patch Edit
Patch editing procedure
Selecting the Tones That Will Sound
Editing from the Panel Knobs
Detailed Editing
Patch Edit Wave
Pitch
FXM Frequency Cross Modulation
Parameter Value Description
Pitch
Patch Edit Pitch Env Pitch Envelope
Filter
High
Parameter value
Filter Env Filter Envelope
Value Description
Patch Edit Amp
Level
Key Bias Point
Level + Key
Patch Edit Amp Env Amp Envelope
Key is pressed Key is released
Using the LFOs
LFO1/LFO2
Solo/Porta Portamento
TMT Tone Mix Table
TMT Tone Mix Table
OFF, on Random
What is a Booster?
What is a Ring Modulator?
CTRL1
General
Parameter Value Description Tone Delay
Delay Time Press key
Delay Delay TimeTime Tone does not sound Press key
Delay Time Press key Release key
Rhythm editing procedure
Rhythm Edit
How Percussion Instruments Are Organized
Selecting the Waves That Will Sound
Rhythm Edit Wave
Rhythm Edit Pitch
Rhythm Edit Filter
Parameter value Cutoff frequency Low
Rhythm Edit Filter Env Filter Envelope
Rhythm Edit Amp
Revs
Rhythm Edit WMT Wave Mix Table
Genaral
Multi
Single
When you have finished entering the name, press F6 Write
Saving a Patch/Rhythm Set
Press Enter or F2 Patch
Assign a name to the patch/rhythm set
Copying a Patch Tone
Initializing a Patch
Initializing a Rhythm Set
Press F6 Execute to execute
Song Mode
This mode you can play, record, and edit songs
How Things Work in Song mode
How Things Work in Song mode Sequencer section
Song Reset
Playing songs
Selecting a song to play
Changing the BPM or mute status
Editing the setup parameters
Recording procedure
Recording a song
Auditioning a pattern
Song editing
Clear All Steps
Delete Step
Insert Step
Saving a song
Select the song that you want to save Press Write
Press Enter or F5 Song
Assign a name to the song you created
Memo
Compressor/Multi-effect/Reverb/Mastering Effect settings
Effects
Effect settings
Effect on/off
Effect connection Effect Routing
910
Effects
Compressor
DRY, MFX2
Multi-effects
Reverb
Selecting the effect that you want to control
Realtime control of effects
Press and hold Knob Assign
Multi-Effects List
Multi-Effects Types
Multi-Effects Parameters
Stereo EQ Stereo Equalizer
Enhancer
Isolator
Multi-Effects List
LOW Boost
Phaser
Step Filter
Auto WAH
Humanizer
11STEREO Phaser
12STEP Phaser
Ring Modulator
Tremolo
Auto PAN
Rotary
HEXA-CHORUS
Tremolo Chorus
Stereo Chorus
SPACE-D
Stereo Flanger
Overdrive
Step Flanger
Distortion
Specifications for each Speaker Type
Guitar AMP SIM Guitar Amp Simulator
MS1959I+II, Sldn
Match Drive
Compressor
Limiter
Slicer
100
Gate
Multi-Effects List Lofi Noise Lo-Fi Noise
101
Duck Ducking The gate will
Multi-Effects List Lofi Compress Lo-Fi Compress
Lofi Radio Lo-Fi Radio
Telephone
Phonograph
Tape Echo
FBK Pitch Shifter
Gated Reverb
Stereo Delay MFX2 only
104
Modulation Delay MFX2 only
Multi-Effects List Triple TAP Delay MFX2 only
Quadruple TAP Delay MFX2 only
105
Multi-Effects List Multi TAP Delay MFX2 only
Reverse Delay MFX2 only
Shuffle Delay MFX2 only
106
Multi-Effects List Time Skip Delay MFX2 only
Time Control Delay MFX2 only
107
About Threshold and Ratio
Mastering effect
108
Sampling
109
110
How Things Work in Sampling mode
Beam Assign
How Things Work in Sampling mode Sequencer section
111
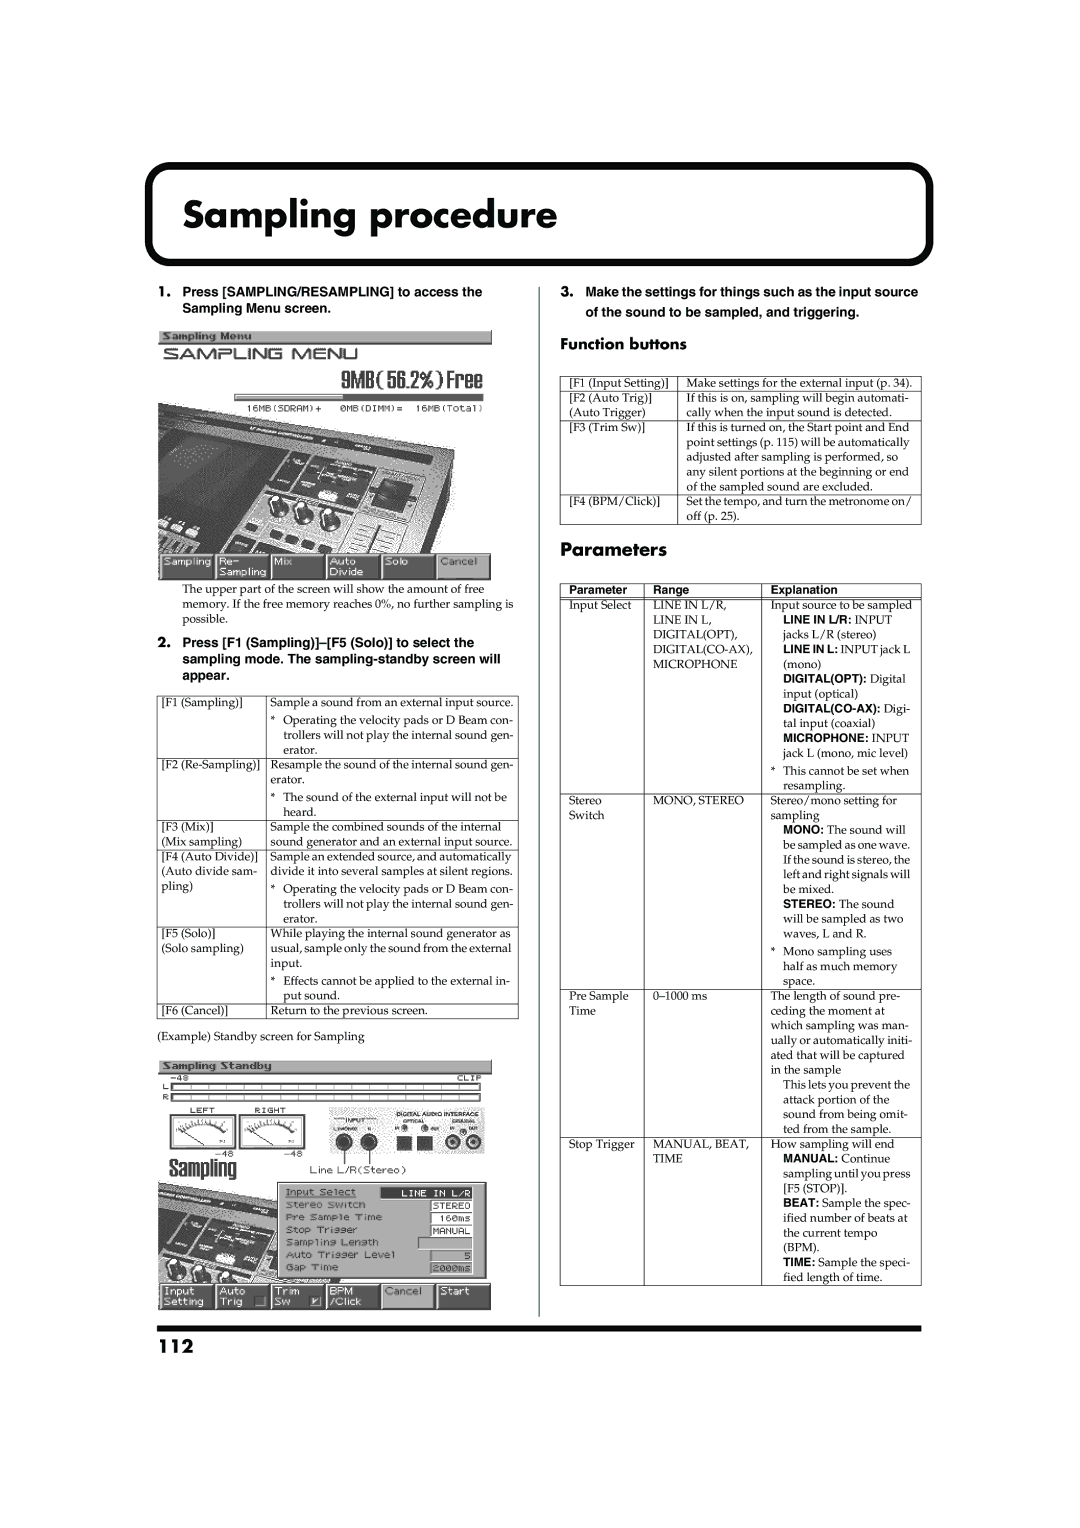
Sampling procedure
Press SAMPLING/RESAMPLING to access Sampling Menu screen
Parameters
112
Sampling procedure
About the volume when resampling
Dividing a sample during
Sampling
Basic sample editing procedure
Sample Edit
Zoom In/Out
114
Setting the start/end points of the sample
Sample List
Sample Edit
115
Sample Parameters
About the Loop Mode
116
Create Patch
Truncate
117
Procedure for dividing a sample
Chop
Automatically dividing a sample Auto Chop
118
Create Rhythm
Auditioning the divided samples
Moving a dividing point
Deleting a dividing point
Emphasis
Combine
120
Press Emphasis
Edit Time Stretch
Normalize
121
Press Time Stretch
Amp
122
Press NORMALIZE/AMP and then press F3 Amp
Range 0-400%
When you have finished inputting the name, press F6 Write
Saving a sample
123
Assign a name to the sample
Using the menu
Menu in Sample Edit
Menu
125
System
126
Panel/Controller
Sequencer/MIDI
System
127
F3 Midi Tx
128
F4 Midi Rx
Sound
Sampling
129
Parameter Range Explanation F1 Sound/Tune
System Information
Beam
130
Utility
Import SMF
131
Press Menu Use Cursor up/down to select Utility Press Enter
Factory Reset
User Backup
User Restore
Save As SMF
133
Press Menu Use Cursor up/down to select Midi Press Enter
File Utility
Initializing a memory card Format
Deleting a file Delete
Moving a file Move
USB communication procedure
Canceling USB communication
135
Windows Me/2000/XP users
136
Undo/Redo
Press Menu Use Cursor up/down to select Undo/Redo
Link
137
What is V-LINK?
Using V-LINK
About V-LINK
Connection examples
Link settings
Resetting the image
Using the Clip Filter
About V-LINK
140
Appendices
141
How to Install a Wave Expansion Board
Installing the Wave Expansion Board
142
Installing the Wave Expansion Board
Checking that a wave expansion board is installed correctly
143
French Language for Canadian Safety Standard
Installation d’une carte d’expansion Wave
144
Installation de la carte d’extension Wave
145
Precautions for Expanding Memory
How to Expand the Memory
Expanding the Memory
146
Checking that memory is installed correctly
Removing the Memory
Expanding the Memory
147
Installation du module de mémoire
Ajouter de la mémoire
Précautions à prendre lors de l’ajout de mémoire
148
Vérifier que la mémoire est installée correctement
Retrait du module de mémoire
Ajouter de la mémoire
149
Waveform List
150
Preset Patch List
Preset a CC#0 = 81, CC#32 =
Preset B CC#0 = 81, CC#32 =
Preset C CC#0 = 81, CC#32 =
Preset Patch List
Preset D CC#0 = 81, CC#32 =
Preset E CC#0 = 81, CC#32 =
152
Preset G CC#0 = 81, CC#32 =
Preset F CC#0 = 81, CC#32 =
153
Preset Rhythm Set List
154
Preset Rhythm Set List
155
156
157
Preset Pattern List
158
Pattern Name
Mes. Programmer
Preset Pattern List
159
160
RPS Pattern List
No. Pattern Name
RPS Pattern List
161
RPS Set List
162
RPS Set List
163
Pattern Set List
164
Song List
165
166
Arpeggio Style List
Number Effective Chord Steps Forms
Chord Form List
167
SRX-05 Special Patch List
168
SRX-05 Special Rhythm Set List
169
Midi Implementation Chart
170
171
Index
172
Index
173
174
Recording
MC-909 Sampling groovebox
Specifications
175
Specifications
176
Error Message List
177
Message Meaning Cause/Action
USER/CARD
Memo
For the USA
For EU Countries
For Canada
Information
Africa