01616A
Front Panel Display
Basic Connections
GB
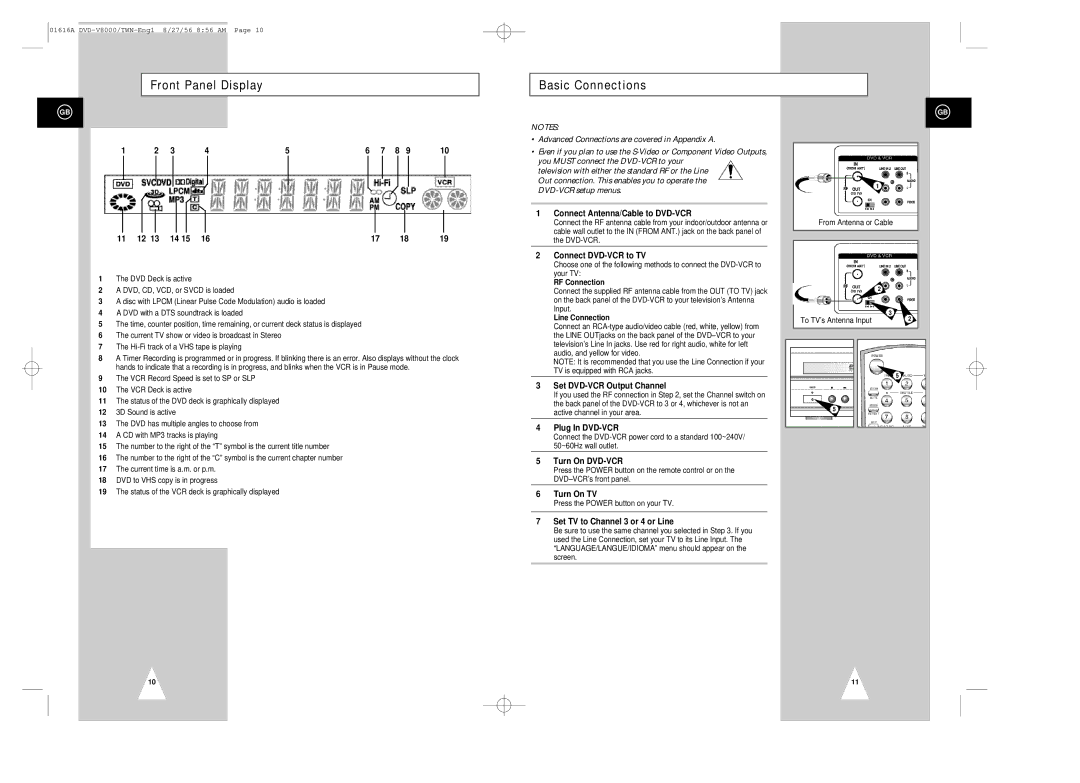
1 | 2 | 3 | 4 | 5 | 6 | 7 | 8 | 9 | 10 |
11 | 12 13 | 14 15 | 16 | 17 | 18 | 19 |
1The DVD Deck is active
2A DVD, CD, VCD, or SVCD is loaded
3A disc with LPCM (Linear Pulse Code Modulation) audio is loaded
4A DVD with a DTS soundtrack is loaded
5The time, counter position, time remaining, or current deck status is displayed
6The current TV show or video is broadcast in Stereo
7The
8A Timer Recording is programmed or in progress. If blinking there is an error. Also displays without the clock hands to indicate that a recording is in progress, and blinks when the VCR is in Pause mode.
9The VCR Record Speed is set to SP or SLP
10The VCR Deck is active
11The status of the DVD deck is graphically displayed
123D Sound is active
13The DVD has multiple angles to choose from
14A CD with MP3 tracks is playing
15The number to the right of the “T” symbol is the current title number
16The number to the right of the “C” symbol is the current chapter number
17The current time is a.m. or p.m.
18DVD to VHS copy is in progress
19The status of the VCR deck is graphically displayed
NOTES:
•Advanced Connections are covered in Appendix A.
•Even if you plan to use the
television with either the standard RF or the Line Out connection. This enables you to operate the
1Connect Antenna/Cable to DVD-VCR
Connect the RF antenna cable from your indoor/outdoor antenna or cable wall outlet to the IN (FROM ANT.) jack on the back panel of the
2Connect DVD-VCR to TV
Choose one of the following methods to connect the
RF Connection
Connect the supplied RF antenna cable from the OUT (TO TV) jack on the back panel of the
Line Connection
Connect an
NOTE: It is recommended that you use the Line Connection if your TV is equipped with RCA jacks.
3Set DVD-VCR Output Channel
If you used the RF connection in Step 2, set the Channel switch on the back panel of the
4Plug In
Connect the
5Turn On
Press the POWER button on the remote control or on the
6Turn On TV
Press the POWER button on your TV.
7Set TV to Channel 3 or 4 or Line
Be sure to use the same channel you selected in Step 3. If you used the Line Connection, set your TV to its Line Input. The “LANGUAGE/LANGUE/IDIOMA” menu should appear on the screen.
GB
1
From Antenna or Cable
2
3
To TV’s Antenna Input | 2 |
5
5
10 | 11 | ||
|
|
|
|
|
|
|
|
|
|
|
|