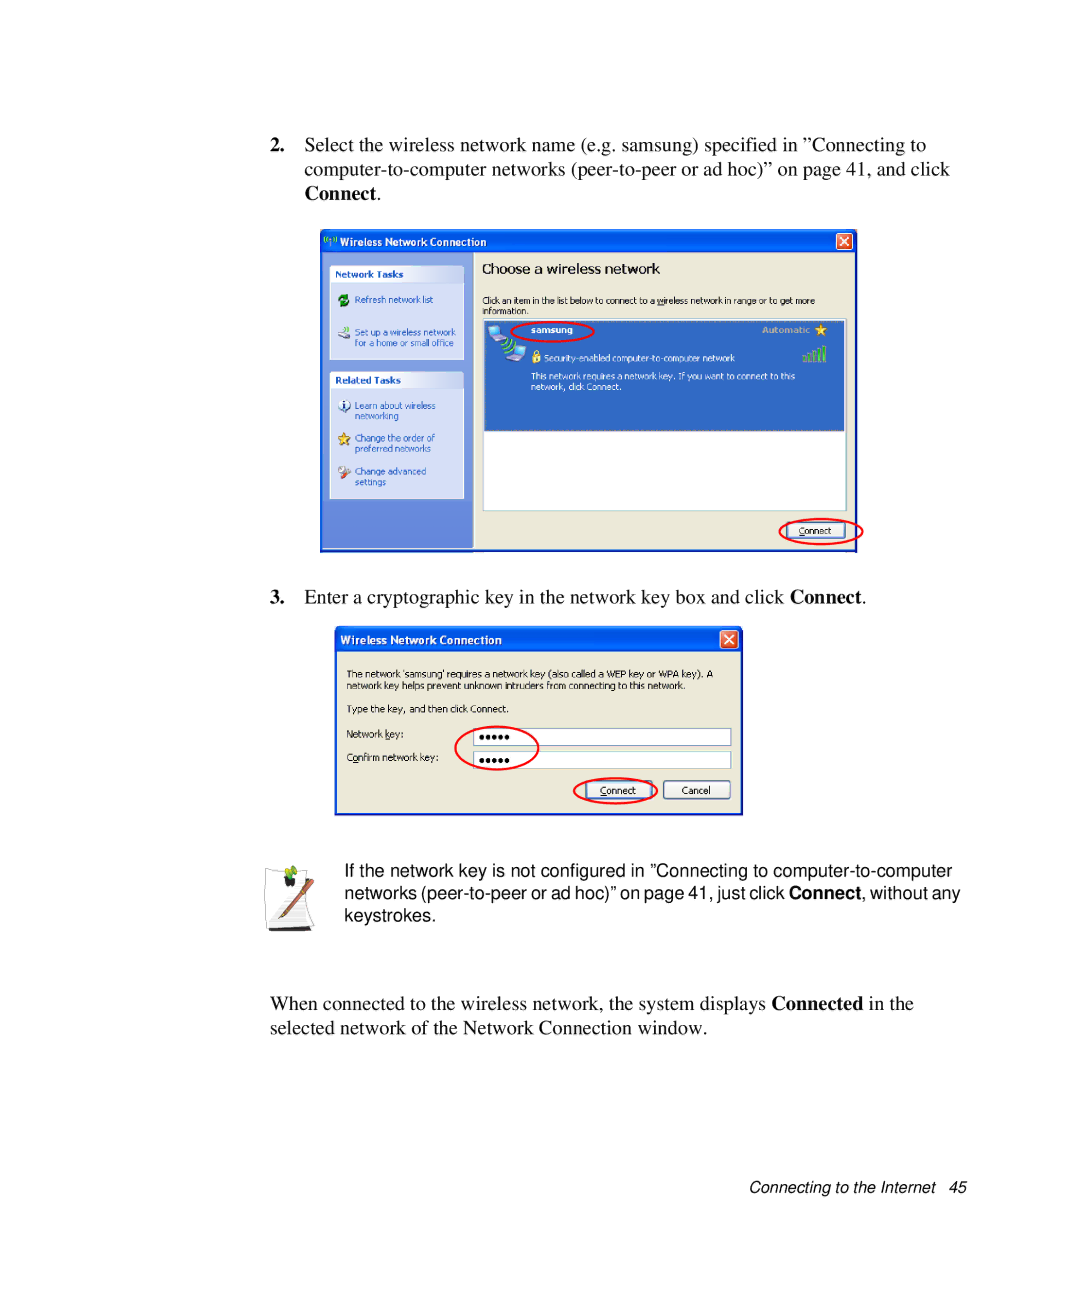
Notices
Macrovision Statement
Important Safety Information
Safety Instructions
Setting Up your System
Care During Use
Replacement Parts and Accessories
Battery Disposal
Laser Safety
Power Cord Requirements
General Requirements
Regulatory Compliance Statements
Wireless Guidance
802.11b Restrictions:
In France, the equipment must be restricted to the
United States of America
Unintentional Emitter per FCC Part
Intentional emitter per FCC Part
FCC Part
Page
Canada
Unintentional Emitter per ICES-003
Intentional Emitter per RSS
Telecommunications per DOC notice
(for products fitted with an IC-compliantmodem)
European Union
European Directives
European Radio Approval Information
(for products fitted with EU-approvedradio devices)
European Telecommunication Information
(for products fitted with EU-approvedmodems)
Using Your Documentation
Manual Documentation Conventions
Information Icons
Keyboard Conventions
CD-ROMDevice Naming Convention
Software User Documentation
Getting Started
Introducing Your Computer
Front View
Right View
Left View
Back View
Bottom View
Turning the Computer On and Off
To turn on the computer
To turn off the computer
Page
Using the Keyboard
Using the Numeric Keypad
Using Special Function Keys
Page
Using the Touchpad
You can perform various actions with your touchpad as described below
Page
Reading the Status Indicators
Adjusting LCD Brightness
Adjusting the Volume
To adjust using keyboard
To adjust using volume control program
Introducing Windows
Understanding the Desktop
Understanding the Start Menu
Understanding a Window
Help and Support Center
Windows XP Tour
Using the Computer
Using the CD Drive
To insert a CD
To eject a CD
To use the Windows Media Player
To play a video CD
To write data on a CD
5.Click Write these files to CD in the CD drive window
Write these files to CD
When the CD Writing Wizard appears, enter the CD label, and click
Using the PCMCIA Card Slot
To insert a PCMCIA card
To remove a PCMCIA card
Using EasyBox
Learn about EasyBox
Using EasyBox
Configuring Firewall
Using Samsung Smart Screen
Using Samsung Theme
Connecting to the Internet
Connecting with a Modem
Connecting Through a Wired LAN
General
7.To use DHCP:
To use a static IP:
To use both DHCP and static IP simultaneously:
Alternate Configuration
Using Samsung Network Manager
To configure network setting
To change network places
Page
Connecting Through a Wireless LAN (Option)
Connecting to an Access Point (AP)
2.Select an AP (E.g. Test) to connect to and click Connect
Connected
Connecting to computer-to-computernetworks (peer-to-peeror
Step 1. Setting up a computer-to-computernetwork
2. Click Change the order of Preferred Networks
3.On the Wireless Network tab, click Advanced
5.In the Wireless Networks tab, click Add
Page
Step 2. Connecting to the configured computer
Select the wireless network name (e.g. samsung) specified in
3.Enter a cryptographic key in the network key box and click Connect
Page
Using a wireless network with the wireless LAN setup program.(for an 11b card)
Step 1. Installing the Client Manager Program
Step 2. Constructing a Wireless Network
To create an Ad Hoc network:
1.Click on Add / Edit Preferred Profiles in the Action menu
2.Click on Add in My Preferred Network Profiles
3.Select Create a new network profile and click OK
4.Enter a Profile Name and Network Name
Profile Name
Activate Profile
Using a wireless network with the wireless LAN setup program.(for an 11g card)
Step 1. Installing the MagicLAN5 Utility Program
Step 2. Using the MagicLAN5 Utility
2.Enter Profile Name to use for the network connection
Configure
4.Click OK
To create a computer-to-computer(Ad Hoc) network:
Enter a Profile Name and the Network Names
3.In the Advanced window, configure the Network type
Using Network Services
Sharing files or folders
Step 1. Configuring Sharing
Step 2. Using Shared Files or Folders
Sharing Printers
Step 1. Configuring Printer Sharing
Step 2. Adding and Using a Shared Printer
Yes
Finish
Sharing an Internet connection through a wireless network
Step 1. Configuring Internet Sharing
Step 2. Checking the Shared Internet Connection
Customizing Your Computer
Using System Setup
Starting System Setup
Changing Booting Priority
Configuring the Password
Setting the Supervisor Password
Setting the User Password
Activating the Booting Password
Deactivating the Password
Configuring Resolution and Colour Depth
Using External Display Devices
Switching Display Devices Using the Shortcut Key
Configuring the Display Properties
Using Dual View to View Extended Screen
Deactivating Dual View Mode
System Management
Using Power Management Options
Basic Power Management Schemes
3.Click the Power Schemes tab to display the basic power management options
Power Schemes
Select the time that you wish each of the following actions to occur in
AC power
•Turn off monitor
•Turn off hard disks
Options Properties
Hibernate
Standby Mode (Power Management or Manual Method)
Standby Mode
5.Click OK to set your power management options and close the window
Advanced Power Management Schemes
Using the Battery
Replacing Battery
Monitoring the Battery Charge
To monitor using a shortcut key
To monitor in control panel
Battery Calibration
Upgrading Memory
Removing the memory module
Adding a memory module
Replacing the Hard Disk Drive
Page
Using the Security Lock Port
Tips for Using Your Computer
Travelling with Your Computer
Air Travel
Handling Spills
Storing the Computer for Long Periods
Troubleshooting
Questions and Answers
Check the Connections
Norton AntiVirus
Windows Help and Support
Questions and Answers
Windows Related
External USB Device-related
Display Related
Q9 A DVD or MPEG movie only displays on the LCD screen
Modem Related
- Using an AT command
- Configuring the Modem through the Control Panel
Q3 How do I use my modem when dialing from overseas
3.Under See Also, click Phone and Modem Options
4.In the Modems tab, select the installed modem, and click Properties
Wired LAN Related
Wireless LAN Related
Q3 I cannot share an Internet connection
Q4 I cannot connect to the AP
Checking the computer settings
Checking the AP settings
A10
Page
Page
Page
Games and Programs Related
Q7 Running speed of a game is too slow or fast
Q9 Some part of a game image is not displayed or is displayed in black
Q10 The screen may not be displayed properly in some games
Q11 The screen is severely interrupted in some games
Security Center
A1 Set up the Windows Firewall
2.From the General tab of Windows Firewall, select ON (recommended)
A2 Set up Windows Automatic Updates
2.From general tab of Automatic Updates window, select Automatic (recommended)
list of
-TrendMicro
-ComputerAssociates -Panda -Kaspersky -Ahnlabs(AhnLab)
Restoring the System
Creating a Restore Point
Returning your computer to an earlier restore point
Undoing the last restoration
Reinstalling Software
Running the system software CD
Installing drivers and programs
Reinstalling Windows XP
Reinstalling Windows
Standard installation
Quick Installation
The description for the standard installation appears. Click
7.When the Regional and Language Options window appears, click Next
Enter the computer name and the administrator password and click Next
the device drivers and applications
the system software CD
If You Cannot Run Windows
Press any key to boot from CD
Specifications
System Specification
Wireless LAN Specification (Optional)
Agere Wireless Mini-PCICard Device
Product Specification
Radio Specifications
Regulatory Notice for Channel Use in France
SAMSUNG SWL2700M 11b/g Mini-PCIWLAN Adapter Device
•Standard: IEEE 802.g
Abbreviations
ISA
LAN
lb
LBA
LCD
Glossary
CardBus
CMOS memory
COM port
Compact Disc
Conventional memory
Hard drive
I/O address
IRQ (interrupt request line)
LCD (liquid-crystaldisplay)
MB (megabyte)
PC Card
PC slot
The PC slot is the hardware slot in the computer where the PC Card is placed
Pixel
Plug and Play
Shadow RAM
TFT (thin film transistor) LCD
»ÃСÒÈ
»ÃСÒȨҡ Macrovision
¢éÍÁÙÅÊÓ¤Ñ−à¡ÕèÂǡѺ¡ÒÃÃÑ¡ÉÒ¤ÇÒÁ»ÅÍ´ÀÑÂ
¤Óá¹Ð¹Óà¾×èͤÇÒÁ»ÅÍ´ÀÑÂ
¡ÒõԴµÑé§Ãкº
¡ÒôÙáÅÃÐËÇèÒ§¡ÒÃãªé§Ò¹
¡ÒÃà»ÅÕè¹ÍÐäËÅèáÅÐÍØ»¡Ã³ìàÊÃÔÁ
¡ÒáӨѴẵàµÍÃÕè
¤ÇÒÁ»ÅÍ´ÀÑÂ㹡ÒÃãªéàÅà«ÍÃì
¤ÇÒÁµéͧ¡ÒÃà¡ÕèÂǡѺªØ´ÊÒÂä¿
¤ÇÒÁµéͧ¡Ò÷ÑèÇä»
ÃÒÂÅÐàÍÕ´à¡ÕèÂǡѺ¢éͺѧ¤ÑºµèÒ§æ
¤Óá¹Ð¹ÓÊÓËÃѺ¡ÒÃãªé§Ò¹ÃкºäÇÃìàÅÊ
¢éͨӡѴÊÓËÃѺ 802.11b:
vi Users Manual
»ÃÐà·ÈÊËÃÑ°ÍàÁÃÔ¡Ò
Unintentional Emitter ¢Í§ FCC Êèǹ
intentional Emitter ¢Í§ FCC Êèǹ
FCC Êèǹ
Unintentional Emitter per ICES-003
Intentional Emitter per RSS
á¨é§ãËé·ÃÒºà¡ÕèÂǡѺàÍ¡ÊÒôéÒ¹¡ÒÃÊ×èÍÊÒÃ
(ÊÓËÃѺ¼ÅÔµÀѹ±ì·ÕèÁÕ¡ÒõԴµÑé§âÁà´çÁÁҵðҹ IC)
ÊËÀÒ¾ÂØâû
¤ÓÊÑ觢ͧÊËÀÒ¾ÂØâû
¢éÍÁÙÅ¡ÒÃÃѺÃͧ¡ÒÃãªéÇÔ·Âآͧ¡ÅØèÁ»ÃÐà·ÈÂØâû
(ÊÓËÃѺ¼ÅÔµÀѹ±ì·ÕèµÃ§µÒÁ¢éÍ¡Ó˹´à¡ÕèÂǡѺÍØ»¡Ã³ìÇÔ·Âآͧ EU)
¢éÍÁÙÅâ·Ã¤Á¹Ò¤Á¢Í§¡ÅØèÁ»ÃÐà·ÈÂØâû
(ÊÓËÃѺ¼ÅÔµÀѹ±ì·ÕèÁÕ¡ÒõԴµÑé§âÁà´çÁ·Õèä´éÃѺ¡ÒÃÃѺÃͧâ´Â EU)
¡ÒÃãªéàÍ¡ÊÒÃ
¡ÒèѴÃٻẺàÍ¡ÊÒÃ
äͤ͹¢éÍÁÙÅ
¡ÒèѴàÃÕ§á»é¹¾ÔÁ¾ì
¡ÒáÓ˹´ª×èÍãËé¡ÑºÍØ»¡Ã³ì«Õ´ÕÃÍÁ
¤ÙèÁ×Í¡ÒÃãªé«Í¿µìáÇÃì
àÃÔèÁµé¹
ÃÙé¨Ñ¡¡Ñºà¤Ã×èͧ¤ÍÁ¾ÔÇàµÍÃì¢Í§¤Ø³
ÁØÁÁͧ´éҹ˹éÒ
ÁØÁÁͧ´éÒ¹¢ÇÒ
ÁØÁÁͧ´éÒ¹«éÒÂ
ÁØÁÁͧ´éÒ¹ËÅѧ
´éÒ¹ÅèÒ§ ÁØÁÁͧ
¡ÒÃà»Ô´áÅлԴà¤Ã×èͧ¤ÍÁ¾ÔÇàµÍÃì
¡ÒÃà»Ô´à¤Ã×èͧ¤ÍÁ¾ÔÇàµÍÃì
¡ÒûԴà¤Ã×èͧ¤ÍÁ¾ÔÇàµÍÃì
·Ó¡ÒõÃǨÊͺ´ÔÊ¡ì
¡ÒÃãªéá»é¹¾ÔÁ¾ì
¡ÒÃãªéá»é¹¾ÔÁ¾ìµÑÇàÅ¢
¡ÒÃãªé»ØèÁ¿Ñ§¡ìªÑ¹¾ÔàÈÉ
¡ÒÃãªé·Ñªá¾´
¤Ø³ÊÒÁÒöÊÑ觧ҹµèÒ§æ ä´éâ´Âãªé·Ñªá¾´ ´Ñ§¤Ó͸ԺÒµèÍ仹Õé
Page
¤ÇÒÁËÁÒ¢ͧä¿áÊ´§Ê¶Ò¹Ð
¡ÒûÃѺ¤ÇÒÁÊÇèÒ§¢Í§¨Í LCD
¡ÒûÃѺ¤ÇÒÁ´Ñ§àÊÕ§
¡ÒûÃѺâ´Âãªéá»é¹¾ÔÁ¾ì
¡ÒûÃѺâ´Âãªéâ»Ãá¡ÃÁ»ÃѺ¤ÇÒÁ´Ñ§àÊÕ§
ÃÙé¨Ñ¡¡Ñº Windows
à¢éÒ㨡Ò÷ӧҹ¡Ñºà´Ê¡ì·Í»
à¢éÒ㨡Ò÷ӧҹ¢Í§àÁ¹ÙStart
à¢éÒ㨡Ò÷ӧҹ¢Í§ÇÔ¹â´Çì
ÈÙ¹ÂìÇÔ¸ÕãªéáÅСÒÃʹѺʹع
Windows XP Tour
¡ÒÃãªé¤ÍÁ¾ÔÇàµÍÃì
¡ÒÃãªéä´Ã¿ì«Õ´ÕÃÍÁ
¡ÒÃãÊèá¼è¹«Õ´Õ
¡ÒùÓá¼è¹«Õ´ÕÍÍ¡
¡ÒÃãªéâ»Ãá¡ÃÁ Windows Media Player
¡ÒÃàÅè¹á¼è¹ÇÔ´ÕâÍ«Õ´Õ
¡ÒÃà¢Õ¹¢éÍÁÙÅŧã¹á¼è¹«Õ´Õ
5.¤ÅÔ¡ Write these files to CD ã¹ÇÔ¹â´Çì¢Í§ä´Ã¿ì«Õ´ÕÃÍÁ
ÊÓËÃѺ¢éÍÁÙÅà¾ÔèÁàµÔÁà¡ÕèÂǡѺ¡ÒÃà¢Õ¹á¼è¹«Õ´Õ
ÊÓËÃѺ¢éÍÁÙÅà¾ÔèÁàµÔÁà¡ÕèÂǡѺ¡ÒÃÊÃéÒ§ÍÍ´ÔâÍ«Õ´Õ
Help > Help Item
CDs > Creating your own CDs > à¾×èÍÊÃéÒ§«Õ´Õ¢Í§¤Ø³
¡ÒÃãªéÊÅç͵ PCMCIA
¡ÒÃãÊè¡ÒÃì´ PCMCIA
¡ÒùӡÒÃì´ PCMCIA ÍÍ¡
¡ÒÃãªéEasyBox
àÃÕ¹ÃÙéà¡ÕèÂǡѺ EasyBox
¡ÒÃãªéEasyBox
¡ÒáÓ˹´¤èҤ͹¿Ô¡¢Í§ä¿ÃìÇÍÅÅì
¡ÒÃãªéSamsung Smart Screen
¡ÒÃãªéSamsung Theme
¡ÒÃàª×èÍÁµè͡ѺÍÔ¹àµÍÃìà¹çµ
¡ÒÃàª×èÍÁµèÍâ´ÂãªéâÁà´çÁ
¡ÒÃàª×èÍÁµèͼèÒ¹Ãкº LAN
6.ã¹á·çº General ãËéàÅ×Í¡ "Internet Protocol(TCP/IP)" ¨Ò¡¹Ñ鹤ÅÔ¡ Properties
7.¡ÒÃãªéDHCP:
¡ÒÃãªéIP µÒµÑÇ:
¡ÒÃãªéDHCP áÅСÓ˹´ static IP ¾ÃéÍÁ¡Ñ¹:
áÅéÇ¡ÃÍ¡¢éÍÁÙÅŧ㹿ÔÅ´ì ¤ÅÔ¡
¡ÒÃãªé§Ò¹ Samsung Network Manager
¡ÒáÓ˹´¤èҤ͹¿Ô¡¢Í§à¹çµàÇÔÃì¡
¡ÒÃà»ÅÕè¹à¹çµàÇÔÃì¡
2.¤ÅÔ¡ Change àÅ×Í¡äͤ͹ʶҹ·ÕèáÅéǤÅÔ¡ Change
3.ã¹ä´ÍÐÅçÍ¡ºçÍ¡«ì"Do you want to change the location setting?" ãËé¤ÅÔ¡ Ok
5.¤ÅÔ¡ Close à¾×èͻԴä´ÍÐÅçÍ¡ºçÍ¡«ì
¡ÒÃàª×èÍÁµèͼèÒ¹Ãкº Wireless LAN (µÑÇàÅ×Í¡)
¡ÒÃàª×èÍÁµèÍä»Âѧ Access Point (AP)
àÁ×èÍ»ÃÒ¡¯¢éͤÇÒÁ Connected ã¹ AP ¤Ø³¨ÐÊÒÁÒöà¢éÒãªé§Ò¹à¹çµàÇÔÃì¡ä´é
¡ÒõÃǨÊͺʶҹСÒÃàª×èÍÁµèÍ
¢Ñé¹·Õè1. µÑ駤èÒà¹çµàÇÔÃ졤ÍÁ¾ÔÇàµÍÃìä»Âѧ¤ÍÁ¾ÔÇàµÍÃì
2.¤ÅÔ¡ Change the order of Preferred Networks
3.·Õèá·çº Wireless Network ¤ÅÔ¡ Advanced
5.·Õèá·çº Wireless Network ¤ÅÔ¡ Add
Page
¢Ñé¹·Õè2. ¡ÒÃàª×èÍÁµè͡Ѻà¤Ã×èͧ·Õèä´éÃѺ¡ÒáÓ˹´¤èÒáÅéÇ
3.»é͹ cryptographic key 㹿ÔÅ´ìNetwork key áÅéǤÅÔ¡ Connect
Page
¢Ñé¹·Õè1. µÔ´µÑé§â»Ãá¡ÃÁ Client Manager
¢Ñé¹·Õè2. ¡ÒÃÊÃéÒ§äÇÃìàÅÊà¹çµàÇÔÃì¡
¡ÒÃÊÃéÒ§à¹çµàÇÔÃì¡¡ÒÃàª×èÍÁµèÍÃÐËÇèÒ§à¤Ã×èͧ¤ÍÁ¾ÔÇàµÍÃì (Ad Hoc):
1.ãËé¤ÅÔ¡·ÕèAdd / Edit Preferred Profiles ã¹àÁ¹ÙAction
2.¤ÅÔ¡·ÕèAdd ã¹â»Ãä¿ÅìMy Preferred Network
3.àÅ×Í¡ Create a new network profile áÅéǤÅÔ¡ OK
ª×èÍà¹çµàÇÔÃì¡ (SSID) ¤×ÍÍÐäÃ
Page
¢Ñé¹·Õè1. ¡ÒõԴµÑé§â»Ãá¡ÃÁÂÙ·ÔÅÔµÕMagicLAN5
¢Ñé¹·Õè2. ¡ÒÃãªéMagicLAN5 Utility
2.»é͹¢éÍÁÙÅ Profile Name à¾×èÍãªé㹡ÒÃàª×èÍÁµèÍà¹çµàÇÔÃì¡
¡ÒõÑ駤èÒ WEP Key :
-»ÃÐàÀ·¢Í§¤ÕÂìÍÒ¨à»ç¹ËÁÒÂàÅ¢°Ò¹ÊԺˡËÃ×Í ASCII µÑǾÔÁ¾ìàÅç¡
(0-9, a-zËÃ×Í A-Z)(64 ºÔµ) ËÃ×ÍÍÑ¡¢ÃÐ 13 µÑÇ (0-9, a-zËÃ×Í A-Z)(128 ºÔµ)
ã¹à¹çµàÇÔÃì¡áºº Ad Hoc ʹѺʹع੾ÒÐ WEP key à·èÒ¹Ñé¹
4.¤ÅÔ¡ OK
¡ÒÃÊÃéÒ§à¹çµàÇÔÃì¡ÃÐËÇèÒ§à¤Ã×èͧ¤ÍÁ¾ÔÇàµÍÃì (Ad Hoc)
ã¹ÇÔ¹â´ÇìÃÒ¡Òà Profile ãËé¤ÅÔ¡ New
New
»é͹¢éÍÁÙÅ Profile Name áÅÐ Network Name
ª×èÍà¹çµàÇÔÃ졤×ÍÍÐäÃ
¡ÒÃãªé§Ò¹à¹çµàÇÔÃì¡
¡ÒÃáªÃìä¿ÅìËÃ×Íâ¿Åà´ÍÃì
¢Ñé¹·Õè1. ¡Ó˹´¤èҤ͹¿Ô¡¢Í§¡ÒÃáªÃì
¢Ñé¹·Õè2. ¡ÒÃãªéä¿ÅìËÃ×Íâ¿Åà´ÍÃì·ÕèÁÕ¡ÒÃáªÃì
¡ÒÃáªÃìà¤Ã×èͧ¾ÔÁ¾ì
¢Ñé¹·Õè1. ¡Ó˹´¤èҤ͹¿Ô¡¢Í§¡ÒÃáªÃìà¤Ã×èͧ¾ÔÁ¾ì
¢Ñé¹·Õè2. ¡ÒÃà¾ÔèÁáÅÐãªéà¤Ã×èͧ¾ÔÁ¾ì·ÕèÁÕ¡ÒÃáªÃì
9.¤ÅÔ¡ Finish
¡ÒÃáªÃì¡ÒÃàª×èÍÁµèÍÍÔ¹àµÍÃìà¹çµ¼èÒ¹·Ò§äÇÃìàÅÊà¹çµàÇÔÃì¡
¢Ñé¹·Õè1. ¡Ó˹´¤èÒ¡ÒÃáªÃìÍÔ¹àµÍÃìà¹çµ
¢Ñé¹·Õè2. ¡ÒõÃǨÊͺ¡ÒÃáªÃì¡ÒÃàª×èÍÁµèÍÍÔ¹àµÍÃìà¹çµ
¡ÒûÃѺáµè§à¤Ã×èͧ¤ÍÁ¾ÔÇàµÍÃì¢Í§¤Ø³
¡ÒÃãªé¡ÒõÑ駤èÒÃкº
àÃÔèÁ¡ÒõÑ駤èÒÃкº (System Setup)
¡ÒÃà»ÅÕè¹ÅӴѺ¡Òúٵ
¡ÒáÓ˹´¤èÒÃËÑʼèÒ¹
¡ÒõÑ駤èÒÃËÑʼèÒ¹¢Í§ Supervisor
¡ÒõÑ駤èÒÃËÑʼèÒ¹¢Í§ User
¡ÒÃãªé§Ò¹ÃËÑʼèҹ㹡Òúٵ
¡ÒáàÅÔ¡¡ÒÃãªéÃËÑʼèÒ¹
¡ÒáÓ˹´¤èҤ͹¿Ô¡¤ÇÒÁÅÐàÍÕ´áÅÐÃдѺÊÕ
¡ÒÃãªéÍØ»¡Ã³ìáÊ´§¼ÅÀÒ¹͡
¡ÒÃÊÅѺÍØ»¡Ã³ìáÊ´§¼Åâ´Âãªéªç͵¤Ñ·
¡ÒáÓ˹´¤èҤ͹¿Ô¡ Display Properties
¡ÒÃãªéDual View à¾×èÍ´Ù¨ÍÀҾẺ¢ÂÒÂ
¡ÒûԴâËÁ´ Dual View
¡ÒèѴ¡ÒÃÃкº
¡ÒÃãªéµÑÇàÅ×Í¡¡ÒÃãªé¾Åѧ§Ò¹ (Power Management)
ÃٻẺ¡ÒèѴ¡ÒþÅѧ§Ò¹¾×é¹°Ò¹ (Basic Power Management Schemes)
3.¤ÅÔ¡á·çº Power Schemes à¾×èÍáÊ´§µÑÇàÅ×Í¡ÊÓËÃѺ¡ÒèѴ¡ÒþÅѧ§Ò¹¾×é¹°Ò¹
àÅ×Í¡àÇÅÒ·Õè¤Ø³µéͧ¡ÒÃãËé¡Ò÷ӧҹáµèÅÐÍÂèÒ§à¡Ô´¢Öé¹ã¹âËÁ´
•»Ô´Ë¹éÒ¨Í
•»Ô´¡Ò÷ӧҹ¢Í§ÎÒÃì´´ÔÊ¡ì
•à¢éÒÊÙèâËÁ´Êáµ¹´ìºÒÂ
ËÒ¡¤Ø³µÔ´µÑé§ Windows ãËÁè:
¡ÒÃËÂØ´·Ó§Ò¹ºèÍÂæ:
âËÁ´ Standby (Power Management ËÃ×ÍÇÔ¸Õ¡ÒÃẺ¡Ó˹´àͧ)
5.¤ÅÔ¡ OK à¾×èÍ¡Ó˹´µÑÇàÅ×Í¡¡ÒèѴ¡ÒþÅѧ§Ò¹áÅлԴÇÔ¹â´Çìä»
Rest Key:
ÃٻẺ¡ÒèѴ¡ÒþÅѧ§Ò¹áºº«Ñº«é͹ (Advance Power Management Schemes)
¡ÒÃãªéẵàµÍÃÕè
¡ÒÃà»ÅÕè¹ẵàµÍÃÕè
¡ÒõÃǨÊͺ»ÃШØẵàµÍÃÕè
¡ÒõÃǨ´Ùâ´Âãªé»ØèÁªç͵¤Ñ·
¡ÒõÃǨÊͺ¨Ò¡ control panel
¡ÒõÃǨÊͺẵàµÍÃÕè
¡ÒÃÍÑ»à¡Ã´Ë¹èǤÇÒÁ¨Ó
¡ÒöʹâÁ´ÙÅ˹èǤÇÒÁ¨Ó
¡ÒÃà¾ÔèÁâÁ´ÙÅ˹èǤÇÒÁ¨Ó
¡ÒÃà»ÅÕè¹ÎÒÃì´´ÔÊ¡ì
5.ãÊè¡ÅѺà¢éÒä»ã¹ªèͧÊÓËÃѺµÔ´µÑé§ÎÒÃì´´ÔÊ¡ìáÅéǢѹʡÃÙÂÖ´ãËéá¹è¹
ËÅѧ¡ÒÃà»ÅÕè¹ÎÒÃì´´ÔÊ¡ì
¡ÒÃãªé¾ÍÃìµÅçͤà¾×èÍÃÑ¡ÉÒ¤ÇÒÁ»ÅÍ´ÀÑÂ
à¤Åç´ÅѺ㹡ÒÃãªéà¤Ã×èͧ¤ÍÁ¾ÔÇàµÍÃì
¡ÒÃà´Ô¹·Ò§â´Â¹Óà¤Ã×èͧ¤ÍÁ¾ÔÇàµÍÃìä»´éÇÂ
¡ÒÃà´Ô¹·Ò§â´Âà¤Ã×èͧºÔ¹
¡ÒèѴ¡ÒÃàÁ×èͧ͢àËÅÇË¡ãÊè
¡ÒÃà¡çº¤ÍÁ¾ÔÇàµÍÃìäÇéà»ç¹àÇÅÒ¹Ò¹
¡ÒÃá¡é䢻Ñ−ËÒ
¤Ó¶ÒÁáÅФӵͺ
µÃǨÊͺ¡ÒÃàª×èÍÁµè͵èÒ§æ
â»Ãá¡ÃÁ Norton AntiVirus
ÇÔ¸ÕãªéáÅСÒÃʹѺʹع¢Í§ Windows
¤Ó¶ÒÁáÅФӵͺ
à¡ÕèÂǡѺ Windows
à¡ÕèÂǡѺÍØ»¡Ã³ìUSB ÀÒ¹͡
à¡ÕèÂǡѺ¨ÍáÊ´§¼Å
Q9 DVD ËÃ×Í MPEG áÊ´§¼Å੾Òк¹¨Í LCD
à¡ÕèÂǡѺâÁà´çÁ
- ¡ÒáÓ˹´¤èҤ͹¿Ô¡¢Í§âÁà´çÁ¼èÒ¹·Ò§ Control Panel
1.¤ÅÔ¡ Start > Control Panel > Network and Internet Connections
2.ãµéËÑÇ¢éÍ See Also ¤ÅÔ¡ Phone and Modem Options
3.ã¹á·çº Modems ãËéàÅ×Í¡âÁà´çÁ·Õèä´éµÔ´µÑé§äÇéáÅéǤÅÔ¡·ÕèProperties
5.ËÅѧ¨Ò¡¡Ó˹´¤èҤ͹¿Ô¡áÅéÇ ãËé¤ÅÔ¡ OK
à¡ÕèÂǡѺÃкº LAN
à¡ÕèÂǡѺ Wireless LAN
-ÊÓËÃѺ Windows 2000:
A2 ¤ÅÔ¡·Õè»ØèÁ Refresh à¾×èͤé¹ËÒ AP ÍÕ¡¤ÃÑé§ (µéͧãªéÅÔ§¤ì¢Í§»ØèÁ Refresh)
A5 µÃǨÊͺ´ÙÇèÒà¤Ã×èͧ¤ÍÁ¾ÔÇàµÍÃìµÃǨ¾º¡ÒÃì´äÇÃìàÅÊ LAN
µÃǨÊͺ¡ÒõÑ駤èҢͧ AP
ÊÓËÃѺ¡Ãкǹ¡ÒÃ㹡ÒáÓ˹´¤èҤ͹¿Ô¡¢Í§ AP â»Ã´´Ù㹤ÙèÁ×ͼÙéãªé·ÕèãËéÁҡѺ AP
A6 µÃǨÊͺ´ÙÇèÒÊÀÒÇСÒ÷ӧҹàËÁÒÐÊÁÊÓËÃѺ¡ÒÃãªé§Ò¹äÇÃìàÅÊ LAN
A7 µÃǨ´ÙÇèÒ AP ÁÕ¡Ò÷ӧҹÍÂèÒ§¶Ù¡µéͧ
A8 µÃǨ´ÙÇèÒä´éàª×èÍÁµèÍ AP ¡Ñºà¹çµàÇÔÃì¡ÍÂèÒ§¶Ù¡µéͧ
Q6 àÁ×èÍÁÕ¡ÒÃàª×èÍÁµè͡Ѻà¹çµàÇÔÃì¡ÃÐËÇèÒ§à¤Ã×èͧ¤ÍÁ¾ÔÇàµÍÃì (Ad Hoc)
A1 ¤ÅÔ¡·Õè»ØèÁ Refresh à¾×èͤé¹ËÒ AP ÍÕ¡¤ÃÑé§ (µéͧãªéÅÔ§¤ì¢Í§»ØèÁ Refresh)
áÍ´à´ÃÊà´ÕÂǡѹ
Q9 ¡ÒÃàª×èÍÁµèÍäÇÃìàÅÊ LAN ËÅØ´ËÅѧ¨Ò¡¼èÒ¹ä» 2~3 ¹Ò·ÕáÅÐäÁèÊÒÁÒö¡Ùé¤×¹ä´é
à¡ÕèÂǡѺà¡ÁÊìáÅÐâ»Ãá¡ÃÁ
Q7 ¤ÇÒÁàÃçÇ㹡ÒÃÃѹà¡ÁªéÒËÃ×ÍàÃçÇà¡Ô¹ä»
Aà»ÅÕ蹡ÒõÑ駤èÒ Power Schemes ãËéà»ç¹ 'Always On
Q8 ¡Òá´»ØèÁ <Fn>+<F2/> ¢³Ð·ÕèÃѹà¡ÁÊìÍÒ¨·ÓãËéà¡Ô´¡Ò÷ӧҹ·Õè¼Ô´»¡µÔ¢Í§Ãкºä´é
Q9 ÀÒ¾ºÒ§Êèǹ¢Í§à¡ÁÊìáÊ´§¼ÅäÁè¶Ù¡µéͧËÃ×Í»ÃÒ¡¯à»ç¹ÊÕ´Ó
Q10 ˹éҨͨÐáÊ´§¼ÅäÁè¶Ù¡µéͧÊÓËÃѺà¡ÁÊìºÒ§à¡ÁÊì
Security Center
2.·Õèá·çº General ¢Í§ Windows Firewall ãËéàÅ×Í¡ ON (recommended)
2.·Õèá·çº General ¢Í§ Automatic Updates ãËéàÅ×Í¡ Automatic (recommended)
ÃÒ¡Òâͧâ»Ãá¡ÃÁ»éͧ¡Ñ¹äÇÃÑÊ·ÕèWindows ÃÙé¨Ñ¡:
-SymantecNorton Anti-Virus
-NetworkAssociates(McAfee)
Page
¡Òä׹ʶҹÐÃкº
¡ÒÃÊÃéÒ§ Restore Point
¡Ò÷ÓãËé¤ÍÁ¾ÔÇàµÍÃì¢Í§¤Ø³¡ÅѺä»ãªéʶҹСè͹ restore point
¡ÒáàÅÔ¡¡Òä׹¤èÒÅèÒÊØ´
¡ÒõԴµÑ駫ͿµìáÇÃìãËÁè
¡ÒÃÃѹá¼è¹«Õ´Õsystem software
¡ÒõԴµÑé§ä´ÃàÇÍÃìáÅÐâ»Ãá¡ÃÁµèÒ§æ
¡ÒõԴµÑé§ Windows XP ãËÁè
àÁ×èÍÁÕ¡ÒÃàÅ×Í¡ Quick Installation
ËÒ¡äÁèµéͧ¡ÒÃà»ÅÕè¹á»Å§¡ÒÃáºè§¾ÒÃì·ÔªÑ¹ ãËé¡´ <Enter
ÍÐää×Í¡ÒáÓ˹´¤èҤ͹¿Ô¡¾ÒÃì·ÔªÑ¹
5.àÅ×Í¡â¿Åà´ÍÃìÊÓËÃѺµÔ´µÑé§Ãкº»¯ÔºÑµÔ¡Òà Windows
7.àÁ×èÍ»ÃÒ¡¯ÇÔ¹â´Çìthe Regional and Language Options ¢Öé¹ ãËé¤ÅÔ¡ Next
8.àÁ×èÍ»ÃÒ¡¯ÇÔ¹â´ÇìãËéÃкت×èÍáÅÐͧ¤ì¡Ã¢Í§¤Ø³¢Öé¹ ãËé»é͹¢éÍÁÙÅáÅéǤÅÔ¡ Next
»é͹ ª×èͤÍÁ¾ÔÇàµÍÃìáÅÐÃËÑʼèÒ¹ administrator áÅéǤÅÔ¡ Next
ËÒ¡¤Ø³äÁèÊÒÁÒöÃѹ Windows ä´é
¢éÍÁÙŨÓà¾ÒÐ
¢éÍÁÙŨÓà¾ÒТͧÃкº
¢éÍÁÙŨÓà¾ÒТͧ Wireless LAN (ÍØ»¡Ã³ìàÊÃÔÁ)
¢éÍÁÙŨÓà¾ÒÐà¡ÕèÂǡѺÇÔ·ÂØ
»ÃСÒÈ¢éͺѧ¤ÑºÊÓËÃѺ¡ÒÃãªé᪹à¹Åã¹»ÃÐà·È½ÃÑè§àÈÊ
ÍØ»¡Ã³ìSAMSUNG SWL2700M 11b/g Mini-PCIWLAN Adapter
¢éÍÁÙŨÓà¾ÒТͧ¼ÅÔµÀѳ±ì
Page
µÑÇÂè͵èÒ§æ
¡ÔâÅ亵ì
¡ÔâÅ¡ÃÑÁ
Local-areanetwork
»Í¹´ì
Logical block addressing
»·Ò¹Ø¡ÃÁ
˹èǤÇÒÁ¨Ó CMOS
¾ÍÃìµ COM
COM ÂèÍÁÒ¨Ò¡ communication COM ¾ÍÃìµ ¤×;ÍÃìµÍ¹Ø¡ÃÁã¹à¤Ã×èͧ¤ÍÁ¾ÔÇàµÍÃì
¤ÍÁá¾ç¤´ÔÊ¡ì
¤ÍÁá¾ç¤´ÔÊ¡ì(CD)
MB (àÁ¡Ð亵ì)
1,024 ¡ÔâÅ亵ì
àÁ¡ÐºÔµ
1,048,576 ºÔµËÃ×Í»ÃÐÁÒ³ 128 ¡ÔâÅ亵ì
Ãкº»¯ÔºÑµÔ¡ÒÃ
૤àµÍÃì
¡ÔâÅ亵ì)