Chapter
Overview Turning the Computer On and Off
Small but Strong Umpc Ultra Mobile PC
Product Features
Powerful Multimedia Functions
Optional Accessories for Additional Convenience
Multiple Network Support
Utilizating the User Guide
Before You Start
User Guide Information
This product is supplied with an Getting
Icon Notation Description
Safety Precaution Notations
Text Notations
Samsung User Guide User Guide in this order from the menu
Precautions for Operating System Support
Copyright
About the Product Capacity Representation Standard
Contents
Safety Precautions
Keep the plastic bags out of the reach of children
Power Related
Do not unplug the power cord out by pulling the cable only
Use only the AC adapter supplied with the product
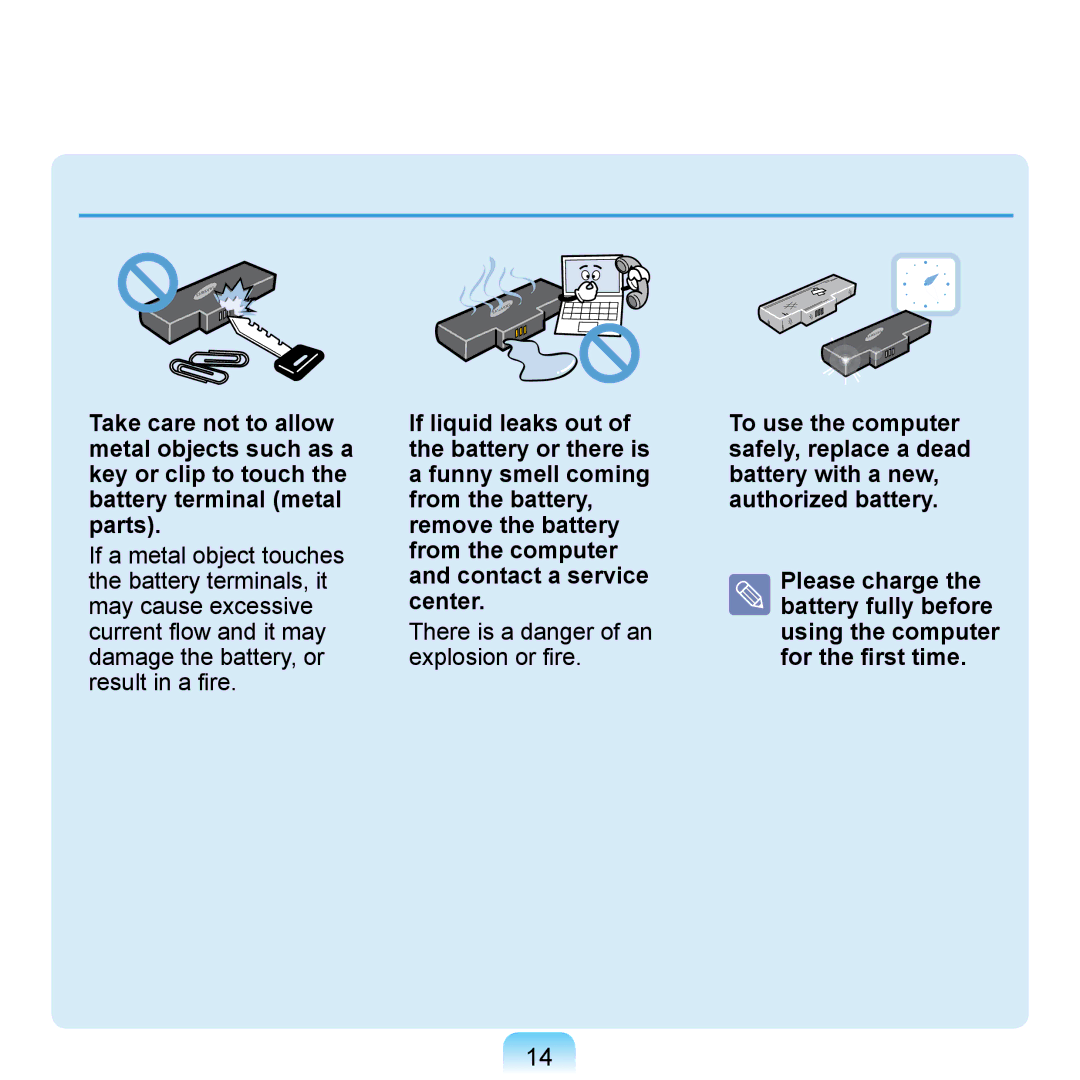
Use an authorized battery and AC adapter only
There is a danger of an explosion or fire
There is a danger of an explosion or fire
There is a danger of electric shock or damage to the product
There is a danger of electric shock
Page
Charge the battery
Or clips when keeping or
Carrying a battery
Do not throw or Instructions Manual Disassemble the battery
Page
Take care not to throw or drop a computer part or device
Use a computer cleansing solution when cleaning the product
Keep the Stylus Pen out of reach of children
Drive itself
Cleaning the LCD
LCD Related LCD Bad Pixels
Eye Position
Proper Posture During Computer Use
Proper Posture
Use Time Break Time
Volume Control Headphones and Speakers
Hand Position
Illumination
Setting Up your System
Important Safety Information
Safety instructions
Instruction On Safety Operation of NotePC
Care During Use
Power Cord Requirements
Replacement Parts and Accessories
Battery Disposal
Do not unplug the power plug by pulling the cable
General Requirements
Requirements listed below are applicable to all countries
Wireless Guidance
Regulatory Compliance Statements
Page
Unintentional Emitter per FCC Part
USA and Canada Safety Requirements and Notices
United States of America
Intentional emitter per FCC Part
FCC Part If fitted with a modem device
European Directives
European Union
European Union CE Marking and Compliance Notices
Translated Statements of Compliance
European Economic Area Restrictions
General
Page
Weee Symbol Information
USA only
Overview
Front View
Status Indicators
Touch Sensor Buttons
UDF
Precautions for using the Touch Sensor Buttons
Top View
Right View
Left View
Power Switch / Hold Switch Power Switch Function
Hold Switch Lock Function
Hand Strap Hole
Back View
Hand Strap Hole Battery
Battery Latch
Stand
Turning the Computer On and Off
Turning the computer on
Click Turn Off Computer
Turning the computer off
Click the start button on the taskbar
Chapter
Stylus Pen
Taking the Stylus Pen Out
Stylus Pen Functions
Enhancing the Accuracy
Calibrating the Screen
Tools tab, select 4 Points Calibration
Page
Using the Keypad
Entering Text
Menu Button
Using the Buttons
When the Menu button is pressed, the Menu program appears
Menu button
LCD+CRT Clone LCD+CRT Dual View mode, in this sequence
Sound On / Off Etiquette Mode Wireless LAN Battery
Menu Items Function
Brightness Backlit On / Off Rotation
Moving the Cursor
Mouse/Joystick
Mouse Function
Click / Double-Click
Press the Mouse button above the Mouse/Joystick
Joystick Function
Internet Button Function
If the Joystick icon is lit, you can use
User-Defined Button
Default Group Setting
Internet Group Setting Status
Configuring Additional Groups
To use the functions of the added group or another group
To delete or modify the group list
Insert the memory card into the multi
Supported Card Types Using a Memory Card
Multi Card Slot
Card slot according to the direction
Removing a Card
To use a Mini SD or RS-MMC card
Select Start My Computer
You have to format a card before using it
Formatting a Card
Ifbegin.you click Start, formatting will
Connecting a Monitor
Connecting a Monitor
Method 1. Configuring with the Menu Button
LCD/CRT Item
Method 2. Configuring with the Intel Program
When giving a Presentation
Display Device Display Mode When carrying it
When playing a Game
Select the Extended Desktop
Adjusting the Volume using the Volume Adjustment Program
Adjusting the Volume
Using the Volume Control with the Volume Control Button
Using the Sound Recorder
Click the Record button to perform recording
Using SRS
Chapter
Click the title
About Microsoft Windows XP
Tour Windows XP
Help and Support
Click Start Help and Support
Windows XP Screen Layout
Desktop
Support
Start Menu
Help
Window
Click Start My Computer
What is a File?
What is a Drive?
What is a Folder?
How to View the Entire Drive Structure
Click Start Control Panel
Control Panel
Running Control Panel
Click Start Control Panel
How to Add a User Account
User Account
To Delete User Account
How to Switch a User
Click Start Logoff Click Switch User
ClickAccount.Start Control Panel User
Changing Resolution and Color
LCD Type Resolution Color Quality
Chapter
Properties
Wired Network
Click Start Control Panel Click Network and Internet
To use Dhcp
To use a static IP
Wireless Network
Wireless LAN Connections
Connecting to a Wireless LAN
Connect button
Checking the network connection status
Programs Atheros Client Utility Atheros Client Utility
Using an encryption key Enter 5 for 64-bit or 13 for
Using the Samsung Network Manager
Network Settings
IP Settings
Select Device
Available AP Connect
Using in Another Location
Select an available AP and click
Diagnosing the Network Status
Bluetooth
Bluetooth Function
Bluetooth Software Setup
Sound Output HID Connections
Page
Exchanging Files between Bluetooth computers
Using Bluetooth
Bluetooth Help
File Transmission Search for Device
102
Connecting Keyboard, Mouse, Joystick and Headset devices
Stopping a Bluetooth device
Usage Instructions
Optional
136
OmniPass Fingerprint Identification software
Introducing Programs
106
Multi Media Functions
Management Functions
Samsung Magic Doctor
Troubleshooting Functions
Samsung Recovery Solution
Optional
Insertdrive. a DVD title into the CD/DVD
CyberLink DVD Suite Power DVD CyberLink PowerDVD
CyberLink DVD Suite Optional
After a moment, the DVD title will play
110
Using Additional Functions
111
112
AVStation premium Optional
Start and Screen Layout
Menu Bar Library Exit Station Bar
Launch AVStation premium and click Music on the Station Bar
Music Station
Playing an Audio CD
Music Menu Bar
Audio CD window, select
Play Audio CD using Samsung
Playing a Music File
Move to Music Station and double- click on All Musics
Add by Folders
Adding Music Files to the Library
Click on the Register a File
115
Launch AVStation premium and click Photo on the Station Bar
Photo Station
Viewing an Image
Move to Photo Station and double- click on All Images
Double-click on an image
117
Tool Zoom Image Tabs Zoom Out Workspace
Edit the image using the Shape, Edit and Effect tools
Editing an Image
119
Adding Images to the Library
Click the Register a File
Move to Movie Station and double- click All Movies
Movie Station
Playing a Movie File
Double-click a video file. The file is played 120
Adding Videos to the Library
121
Starting Exiting the program
AVStation Viewer Optional
Start AVStation Viewer
AVStation Viewer Restrictions
123
Move to the start screen while using the program
Screen Layout
124
All Musics Music File Playlist Window
125
Procedures to view images
Photo
All movies movie File Displaying the Play Control window
Procedures to play a video movie file are described below
126
Play Camera Optional
Photographing Procedures
Precautions when Taking a Picture
Select Start All Programs Samsung Play Camera Play Camera
Preview Window Shows or hides the Preview window
129
130
Samsung Update Plus Optional
To update the software and drivers
131
Updates that must be installed separately
Automatic update items display
Chain Installer window
Using McAfee SecurityCenter Optional
Installing McAfee
Web Essentials icon
User Registration
Using McAfee
Program Setup screen appears while booting
End User License Agreement
Click Start All Programs McAfee McAfee SecurityCenter
Configuring the McAfee Firewall
Inspecting and Healing Viruses
135
Method 2 When you need to deactivate the Firewall
Internet&Network
Signing Up
Integrated Password Authentication Function
When using the fingerprint identification sensor
Fingerprint Identification Function
Click Run Enrollment Wizard to start
To use the fingerprint identification function
What is a user profile backup?
Logging onto Windows
138
139
Encrypting/Decrypting Files
Select a folder or file to be encrypted and click Encrypt
To decrypt encrypted folders and files
Launch Internet Explorer
Password
Logging into Internet Sites
Open the Hotmail site. http//www
Select AuthenTec Fingerprint
Using Samsung Magic Doctor Optional
Diagnosing the System
Running the System Software Media
Reinstalling Software
Standard Installation
143
Custom Installation
Installing Software
When done, restart the system 144
Samsung Recovery Solution Functions
Samsung Recovery Solution Optional
What is Samsung Recovery Solution?
Samsung Recovery Solution provides the following functions
Function for the right case
This happens when Windows files are corrupted
Backup User
Restoring Your Computer
147
Backup Function
Factory Status Backup
Page
150
User Backup
When you cannot start Windows
What is Complete Restore?
Select drive D to save the backup file
What is Basic Restore?
Restoration Function
Restoring Your Computer
System is restarted in restoration mode
153
Click Start Control Panel Add or Remove Programs
Removing Recovery Solution
Removing the Samsung Recovery Solution Program
Settings
Slide the Power Switch down. The computer is turned on
Bios Setup
Entering the Bios Setup
Booting screen Samsung logo appears. Press the R button on
157
Setup Menu Help
Setup Items
Bios Setup Screen
158
159
System Setup Buttons Keys
Following Buttonskeys are used in System Setup
160
Enter Button Enter Key F9 Key F10 Key
Set Supervisor Password
Setting a Boot Password
Setting a Supervisor Password
Item, press Enter 161
162
Setting a User Password
Activating the Booting Password
Deactivating the Password
Setup Notice window, press Enter Password is deactivated 163
Changing the Boot Priority
Precautions
Battery
Installing/Removing the Battery
165
Viewing through the Menu button
Charging the Battery
Measuring the Remaining Battery Charge
Press the Menu button and press on
Battery Warning
To view on the battery
Battery Usage Time Information
Change Power Mode Power Saving Effects
Extending the Battery Usage Time
Using Samsung Battery Manager
Decreasing the LCD Brightness
Maximum Performance Mode
Maximum Battery Saving Mode
Normal Mode
Custom Mode
Using the Battery Calibration Function
Reinstalling Windows XP 172 177
Appendix
172
Reinstalling Windows XP
Running the System Recovery Media
Preparation
173
Quick Installation
Standard Installation
Standard Installation
174
Software Media. p.143
Select the folder to install the Windows operating system
10Remove the System Recovery
175
Reinstalling when Windows does not start
176
177
Display Related
LCD screen is too dark or too bright
Picture on the screen trembles
178
Page
Sound Related
Wake On LAN function
Wired Network LAN Related
Wireless Network Connection and select Disable
181
Page
Reinstall the driver
Wireless Network Wlan Related
Cannot find an AP Check the Wireless LAN LED
Reinstall the driver using the software media
Check the authentication type
Check the AP settings
Page
Page
Page
When the settings are completed, click OK 188
189
Bluetooth
When no headset is found or cannot be connected
Configuring the Audio Device in the Control Panel
Game and Program Related
3D game does not work, or some functions are not working
Game is not displayed smoothly on the screen
Change the setting of the Power Schemes to ‘Always On’
Running speed of a game is too slow or fast
Samsung Recovery Solution
Other
Power Switch does not work
How can I install the program?
Cannot run any functions
Touch Sensor Buttons do not work
195
Product Specifications NP-Q1 Ultra
196
Specifications
Wireless LAN Specifications 802.11a/b/g, 802.11n Card
Detailed Specifications
197
Radio Specifications
198
199
200
Data Rate Mbps 11g mode*** 54, 48, 36, 24, 18, 12, 9
Wireless LAN Specifications 802.11BG Card
201
202
203
204
205
Registered Trademarks
Energy Star Partner
Glossary
206
207
208
Index
209
Contact Samsung World Wide
Hongkong Contact Samsung World Wide
Poland Kontakt z firmą Samsung
Russia / Ukraine Связывайтесь с Samsung по всему миру
211
444 77
Turkey Samsung Turkiye’ye Ulasin
212